How to Create A Web-based Video Player
In our previous post, we covered a tutorial on how to create an Audio Web Player, as well as how to customize its player skin.
This time we are going to do it with video. Yes, we are going to create a Web Video Player. The video player will be embedded using the HTML5 <video> element, so technically, any browser with HTML5 compatibility can play this video.
If the browser does not support it, an embedded flash player will be delivered as a fallback, so you need to install the Flash plugin before you are able to play the video. This screenshot below shows the final output of our video player.
Preparation
As usual, before we get busy with the code, we need to prepare some stuff first, especially the video. In this tutorial, we will use this video from TED Talk by Kelli Anderson on Youtube. To download it, you can use this web tool, called KeepVid.com.
For wider browser compatibility, we need to provide two formats of video, MP4 and OGV. By default, when you download videos from Youtube with KeepVid.com you most likely will get the MP4 format. You can use Miro Video Converter to convert MP4 video to OGV format, it’s available for FREE for both Windows and OS X machine.
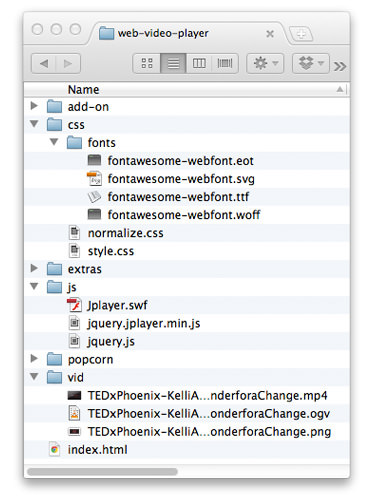
Furthermore, we also need an image file for video cover. To create this cover, you can play the video with VLC and then go Video > Snapshot to take a snapshot of the video. Regarding the user interface icon, we are going to use FontAwesome. Lastly, we also need jPlayer, jQuery to run the video, as well as a new CSS file to store the video skin styles.
After collecting all this, put them in their appropriate folders, as shown below:
HTML Structure
Now, create a new HTML document and link the jQuery, jPlayer libraries as well as the CSS file in the <head> section, like so.
<link type="text/css" href="css/style.css" rel="stylesheet" />
<script type="text/javascript" src="js/jquery.js"></script>
<script type="text/javascript" src="js/jquery.jplayer.min.js"></script>
Regarding the HTML structure for our video player, it’s actually similar to the how to create an Audio Player from the previous tutorial.
Only, this time we have a button to turn the video into fullscreen format and a play button at the center of the video. Place this code below inside the <body> section.
<div id="jp_container_1" class="jp-video">
<div class="jp-title">
<h1>Kelli Anderson - Disruptive Wonder for a Change</h1>
</div>
<div class="jp-type-single">
<div id="jquery_jplayer_1" class="jp-jplayer"></div>
<div class="jp-gui">
<div class="jp-video-play">
<a href="javascript:;" class="jp-video-play-icon" tabindex="1"></a>
</div>
<div class="jp-interface">
<div class="jp-controls-holder">
<ul class="jp-controls">
<li><a href="javascript:;" class="jp-play" tabindex="1"></a></li>
<li><a href="javascript:;" class="jp-pause" tabindex="1"></a></li>
<li><a href="javascript:;" class="jp-mute" tabindex="1" title="mute"></a></li>
<li><a href="javascript:;" class="jp-unmute" tabindex="1" title="unmute"></a></li>
</ul>
<div class="jp-volume-bar">
<div class="jp-volume-bar-value"></div>
</div>
<ul class="jp-toggles">
<li><a href="javascript:;" class="jp-full-screen" tabindex="1" title="full screen"></a></li>
<li><a href="javascript:;" class="jp-restore-screen" tabindex="1" title="restore screen"></a></li>
</div>
<div class="jp-progress">
<div class="jp-seek-bar">
<div class="jp-play-bar"></div>
</div>
</div>
<div class="jp-current-time"></div>
</div>
</div>
<div class="jp-no-solution">
<span>Update Required</span>
To play the media you will need to either update your browser to a recent version or update your <a href="http://get.adobe.com/flashplayer/" target="_blank">Flash plugin</a>.
</div>
</div>
</div>
Activating the Video
Activating the video is also similar to our previous Audio Player. The only difference is, this time, we need to link the video poster and the supplied formats are now m4v and ogv. Put all these scripts right below the jquery and jplayer links we have added before.
<script>
	$(document).ready(function(){
      $("#jquery_jplayer_1").jPlayer({
        ready: function () {
          $(this).jPlayer("setMedia", {
            m4v: "vid/TEDxPhoenix-KelliAnderson-DisruptiveWonderforaChange.mp4",
            ogv: "vid/TEDxPhoenix-KelliAnderson-DisruptiveWonderforaChange.ogv",
            poster: "vid/TEDxPhoenix-KelliAnderson-DisruptiveWonderforaChange.png"
          });
        },
        swfPath: "/js",
        supplied: "m4v,ogv"
      });
    });
</script>
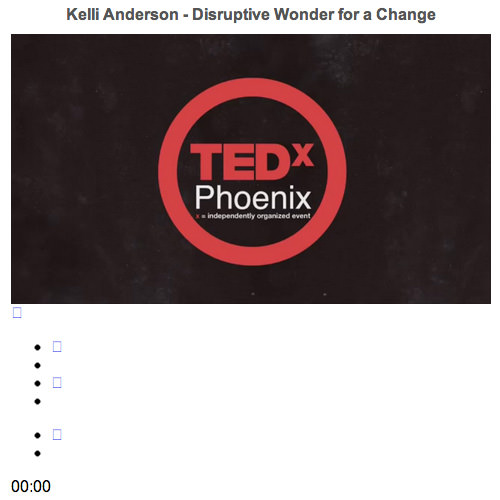
At this stage, our video player still looks plain as shown in the following screenshot.
Adding Styles
After adding those script, you should now be able to run the video. But, the player still looks unpresentable, so let’s make it nicer by adding styles.
Open up the style.css file that we have created earlier in this post.
We will start off by adding the @font-face rule and remove the underlines from all the links.
@font-face {
  font-family: "FontAwesome";
  src: url('fonts/fontawesome-webfont.eot');
  src: url('fonts/fontawesome-webfont.eot?#iefix') format('eot'),
  	   url('fonts/fontawesome-webfont.woff') format('woff'),
  	   url('fonts/fontawesome-webfont.ttf') format('truetype'),
  	   url('fonts/fontawesome-webfont.svg#FontAwesome') format('svg');
  font-weight: normal;
  font-style: normal;
}
a {
	text-decoration: none;
}
Video Width
Then, we specify the width of the video container and place it at the center of the browser window, like so.
.jp-video {
	margin: 0 auto;
	position: relative;
	font-family: Arial, sans-serif;
}
.jp-video-270p {
	width: 480px;
}
Video Title
We turn the color of the title to dark grey, specify the font-size and align it to the center.
.jp-title h1 {
	font-size: 1em;
	text-align: center;
	color: #555;
}
Play Button
Then, we style the play button. We place this button at the top over the video and to display the Play icon, we assign FontAwesome font family to it.
.jp-video-play {
	font-family: "FontAwesome";
	position: absolute;
	top: 45%;
	left: 46%;
}
.jp-video-play a {
	font-size: 2em;
	color: rgba(255,255,255,.7);
	display: inline-block;
	width: 50px;
	height: 50px;
	line-height: 55px;
	text-align: center;
	background-color: rgba(0,0,0,.8);
	border-radius: 5px;
}
Video User Interface
The User Interface for our video player will look similar. It will have a gradient with the orange color scheme while the icons to control the video, like the Play, Pause and Volume will be in white.
.jp-interface {
	width:100%;
	bottom: 0;
	position: relative;
	background: #f34927;
	background: -moz-linear-gradient(top,  #f34927 0%, #dd3311 100%);
	background: -webkit-gradient(linear, left top, left bottom, color-stop(0%,#f34927), color-stop(100%,#dd3311));
	background: -webkit-linear-gradient(top,  #f34927 0%,#dd3311 100%);
	background: -o-linear-gradient(top,  #f34927 0%,#dd3311 100%);
	background: -ms-linear-gradient(top,  #f34927 0%,#dd3311 100%);
	background: linear-gradient(to bottom,  #f34927 0%,#dd3311 100%);
	filter: progid:DXImageTransform.Microsoft.gradient( startColorstr='#f34927', endColorstr='#dd3311',GradientType=0 );
	overflow: hidden;
	-webkit-box-shadow: inset 0px 1px 0px 0px rgba(255, 255, 255, 0.1);
	box-shadow: inset 0px 1px 0px 0px rgba(255, 255, 255, 0.1);
}

.jp-interface a {
	color: #fff;
	text-shadow: 1px 1px 0 rgba(0,0,0,0.3);
}
.jp-controls, .jp-toggles {
	padding: 0;
	margin: 0;
	font-family: "FontAwesome"
}
.jp-toggles {
	position: absolute;
	top: 14px;
	right: 14px;
}
.jp-controls li, .jp-toggles li {
	display: inline;
}
.jp-play,.jp-pause {
    width: 55px;
    height: 40px;
    display: inline-block;
    text-align: center;
    line-height: 43px;
}
.jp-mute,.jp-unmute {
    position: absolute;
    right: 85px;
    top: 0;
    width: 20px;
    height: 40px;
    display: inline-block;
    line-height: 43px;
}
.jp-progress {
    background-color: #992E18;
    border-radius: 20px 20px 20px 20px;
    overflow: hidden;
    position: absolute;
    left: 55px;
    top: 14px;
    width: 55%;
    -webkit-box-shadow: 0 1px 1px 0 rgba(0,0,0,0.2) inset;
    box-shadow: 0 1px 1px 0 rgba(0,0,0,0.2) inset;
}
.jp-play-bar {
    height: 12px;
    background-color: #fff;
    border-radius: 20px 20px 20px 20px;
}
.jp-volume-bar {
    position: absolute;
    right: 40px;
    top: 16px;
    width: 45px;
    height: 8px;
    border-radius: 20px 20px 20px 20px;
    -webkit-box-shadow: 0 1px 1px 0 rgba(0,0,0,0.1) inset;
    box-shadow: 0 1px 1px 0 rgba(0,0,0,0.1) inset;
    background-color: #992E18;
    overflow: hidden;
}
.jp-volume-bar-value {
    background-color: #fff;
    height: 8px;
    border-radius: 20px 20px 20px 20px;
}
.jp-current-time {
    color: #FFF;
    font-size: 12px;
    line-height: 14px;
    position: absolute;
    right: 115px;
    top: 13px;
    text-shadow: 1px 1px 0 rgba(0,0,0,0.3);
}
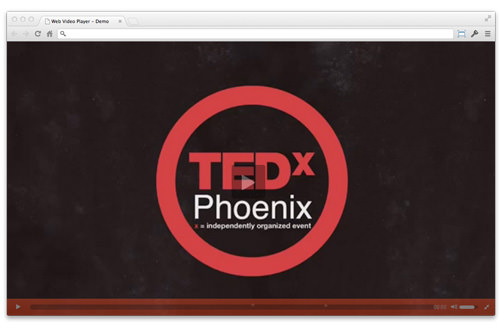
At this point, our video player start looking nice, as shown in the following screenshot.

Video Fullscreen
We are able to switch the video to fullscreen. For that reason, we also need to add styles to specifically target when the video is in fullscreen mode, including adjusting the width and the height of the Play button, the width of the progress bar and the video should be on top of others by specifying the z-index larger.
.jp-video-full {
	/* Rules for IE6 (full-screen) */
	width:480px;
	height:270px;
	/* Rules for IE7 (full-screen) - Otherwise the relative container causes other page items that are not position:static (default) to appear over the video/gui. */
	position:static !important;
	position:relative;
}
/* The z-index rule is defined in this manner to enable Popcorn plugins that add overlays to video area. EG. Subtitles. */
.jp-video-full div div {
	z-index:1000;
}
.jp-video-full .jp-jplayer {
	top: 0;
	left: 0;
	position: fixed !important;
	position: relative; /* Rules for IE6 (full-screen) */
	overflow: hidden;
}
.jp-video-full .jp-interface {
	position: absolute !important;
	position: relative; /* Rules for IE6 (full-screen) */
	bottom: 0;
	left: 0;
}
.jp-video-full .jp-gui {
	position: fixed !important;
	position: static; /* Rules for IE6 (full-screen) */
	top: 0;
	left: 0;
	width:100%;
	height:100%;
	z-index:1001; /* 1 layer above the others. */
}

.jp-video-full .jp-video-play a {
	font-size: 3em;
	height: 80px;
	width: 80px;
	line-height: 95px;
}
.jp-video-full .jp-progress {
	width: 83%;
}
And this is how our video player looks like in fullscreen mode.
Add Shadow
This is only optional, but I would like to add shadow to make the video player look nicer and more prominent.
.jp-video-270p .jp-type-single {
	-webkit-box-shadow: 0px 0px 5px 0px rgba(0, 0, 0, 0.5);
	-moz-box-shadow: 0px 0px 5px 0px rgba(0, 0, 0, 0.5);
	box-shadow: 0px 0px 5px 0px rgba(0, 0, 0, 0.5);
}
And, that’s all the codes we need, you are now able to see the video and download the file source from the following links.