4 Useful JavaScript Statements You Should Know
JavaScript statements give us the power to implement different types of logic in our code. JavaScript provides us with several of them, all of which has its own purpose and syntax. Among the most well-known examples we can find expression statements, iteration statements, conditional statements, and more
In today’s post we’ll see four less common JavaScript statements you may not have known before, but can deepen your JavaScript knowledge, and enable you to write better code.
1. Empty Statement
In place of any JavaScript statement, you can add an empty statement, which is written as a single semi-colon ;. When the JavaScript interpreter interprets an empty statement, no code is executed, therefore they can be useful to replace sub-statements that you don’t want to execute.
For instance, assume there’s a variable called litmus with the default value neutral. Based on the value of another variable called pH, litmus changes to either acidic when pH < 7 or basic when pH > 7.
If the value of pH turns out to be invalid, an error is thrown. For a condition like this, the following conditional statements apply:
var litmus = 'neutral';
var pH;

if(pH>0 && pH<7)
    litmus = 'acidic';
else if(pH>7 && pH<15)
    litmus = 'basic';
else
    throw "Invalid pH value";
However the above set of statements throws an error when pH‘s value is 7, which shouldn’t be the case.
When pH is 7, litmus should keep its default value, that is neutral. So, for a case like this, add a condition when pH is 7 with a trailing empty statement.
var litmus = 'neutral';
var pH;

if(pH>0 && pH<7)
    litmus = 'acidic';
else if(pH===7)
    ;       /* empty statement */
else if(pH>7 && pH<15)
    litmus = 'basic';
else
    throw "Invalid pH value";
Now, when pH is 7, the interpreter doesn’t execute any instructions, and litmus keeps its default value, neutral.
Empty statements can also be used to populate an array with the help of the for loop.
var ary = [];

for(var i = 0; i < 5; ary[i++] = i)
;       /* empty statement */
console.log(ary);
// [1, 2, 3, 4, 5]
Typically, a for loop statement is followed by a sub-statement that is made up of a single, or a block statement (the one enclosed in {} curly brackets) to be executed. By using an empty statement in place of the sub-statement, the interpreter won’t have anything to execute after each loop, so only the looping occurs, and the looping conditions get executed.
In the above example, ary[i++] = i executes for each loop iteration as part of the looping condition, and the array ary gets instantiated with values of i.
2. The debugger Statement
In debugging tools, we can add markers called breakpoints to any line in the source code to mark the lines from where the debugger tool will start debugging.
In JavaScript, the debugger statement works the same way as a breakpoint, except that it’s added into the source code directly, rather than within a tool. Any running debugger will halt the script execution when it reaches the debugger statement in order to help you debug the code.
Remember, the debugging will get triggered only if the script is running in a debugging mode, i.e. a debugging program is already running over the execution of the script. If there is no currently running debugger program while interpreting the debugger statement, the interpreter will continue its work as if nothing happened.
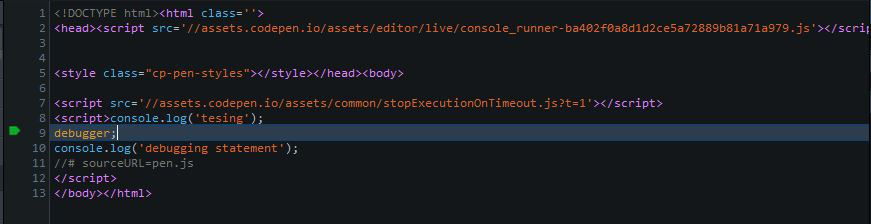
As a quick test, run the following code in Codepen, while keeping the browser’s debugger tool open:
console.log('tesing');
debugger;
console.log('debugging statement');
You’ll see a breakpoint besides the debugger statement as shown below in the browser’s debugger tool.
3. Labeled Statement
In JavaScript, you can add labels to certain statements as well. By doing so, you can later jump to the labeled statement using its label in your code, kind of like the goto statement works in some other languages.
Labeled statements can only be used together with the break and continue statements, as in JavaScript there’s no literal goto statement.
Both break and continue can only be used inside looping statements, such as the for loop (with one exception, break can be used in the switch statement as well). So, we can label loops, and use break and continue to control their execution.
The syntax of labeled statements is simple, you just need to add the name of the label with a following colon, as you can see it in the example below, where loop is the name of the label we add to the for loop.
loop: for(var i=0; i<5; i++){
    if(i===2)
        continue loop;
    console.log(i);
    // 0, 1, 3, 4
}
When the value of i is 2, the execution jumps back to the loop instead of proceeding and hence prevents the console output of “2”.
Now let’s see another example with the break statement. Just replace the continue keyword with break in the above example, and you will notice that instead of jumping back to the loop like it did with continue, the loop ends/breaks altogether.
loop: for(var i=0; i<5; i++){
    if(i===2)
        break loop;
    console.log(i);
    // 0, 1
}
The examples above were rather simple so that you can quickly understand how labeled statements work, but in real-life coding, labels are more frequently used in compound loops, when it’s necessary to distinguish the different loops, like in the following example:
loop: for(var i=0; i<4; i++) {
for(var j=0; j<2; j++) {
    if(i===2 && j===1)
        break loop;
    console.log(i+"-"+j);
}
Here, the outer loop breaks at value 2 for variable i and at 1 for j, and the console returns the following output:
0-0
0-1
1-0
1-1
2-0
4. The with Statement
When the JS interpreter comes across an unqualified name that doesn’t specify which object or function the call is associated with, it searches the scope chain for any suitable object or function the call may refer to.
By using the with statement, we can add an object to the top the scope chain, and specify which object the call is associated with.
In the following example, you can see that the properties of the person object are called using their names alone inside the with statement.
var person = {
    firstName: "John",
    lastName: "Doe",
    age: "18",
    country: "Greenland"
};

with(person) {
    console.log("Hi, my name is " + firstName + " " + lastName +
    ". I'm " + age + " years old, and live in " + country + ".");
}
// "Hi, my name is John Doe. I'm 18 years old, and live in Greenland."
Compare how the code above would look like without using the with statement:
var person = {
    firstName: "John",
    lastName: "Doe",
    age: "18",
    country: "Greenland"
};

console.log("Hi, my name is " + person.firstName + " " +
person.lastName + ". I'm " + person.age +
" years old, and live in " + person.country + ".");
// "Hi, my name is John Doe. I'm 18 years old, and live in Greenland."
You can see, the with statement can be a great shortcut if you work with many properties of the same object.
Note however, that using the with statement in strict mode is not allowed, since it can cause some scope confusion.
Also, it’s only advised to use the with statement if its internal statements use the object associated with the with statement, otherwise the interpreter will waste time looking into the object mentioned by with first, for all the unqualified property names it later finds inside the with block.