Sass Best Practices: Tips And Tools For Developers
Editor’s note: This article is part of our Code Optimization series, where we take a look at how to optimize coding for better efficiency in a bid to be better coders.
Much like how jQuery revolutionized vanilla JavaScript, Sass has revolutionized vanilla CSS. Most developers who learn Sass agree that they’d never want to go back. Many also agree that the biggest problem with new developers is the way they use Sass, not Sass itself.
I’ve scoured the web and compiled this article of best practices for writing expandable and reusable Sass code. Suggestions are from my own opinions and from trusted websites like Sass Guidelines.
You certainly don’t need to implement all of these features into your workflow. But it’s worth to at least entertaining these ideas and contemplating the potential benefits.
Read more: Get started with SASS with this guide
File Organization
The best place to start with Sass development is file organization. If you’re already into modular code, then you should understand the value of imports and partials (more on these later).
But for now, just take a look at this file structure example from DoCSSa. I’ve recreated this file structure which you can see below:
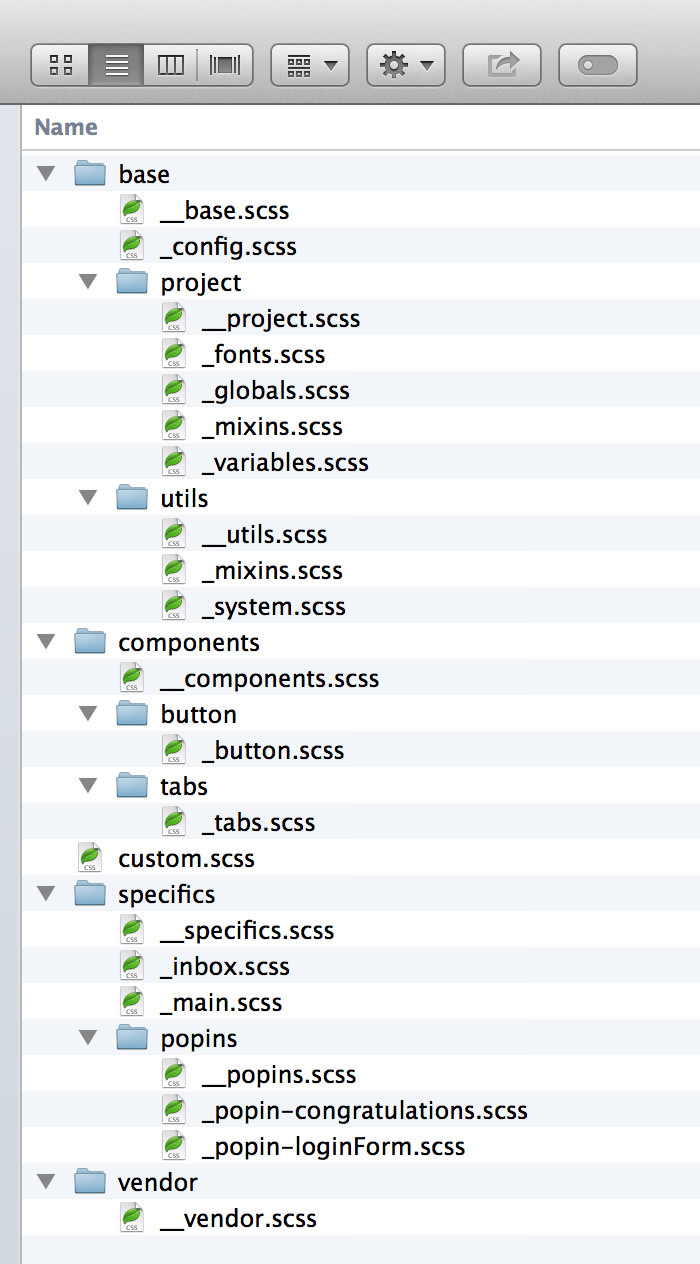
This is just a suggestion, and it’s one of the many ways you could organize your files. You can find other methods that use different folder structures like “globals” for site-wide SCSS and “pages” for page-specific SCSS.
Let’s walk through this suggested organization style to examine the purpose of each folder:
- /globals – contains Sass files that get applied site-wide like typography, colors, and grids
- /components – contains Sass files with component styles like buttons, tables, or input fields
- /sections – contains Sass files dedicated to specific pages or areas on a page (might work better combined into the /components/ folder)
- /utils – contains third-party utilities like Normalize that can be updated dynamically with tools like Bower.
- main.scss – the primary Sass file in the root folder that imports all others.
This is just a basic starting point and there’s plenty of room to expand with your own ideas.
But no matter how you choose to organize your SCSS, it’s crucial that you have some organization with a separate file (or folder) for libraries like Normalize that need to be updated, plus components in Sass partials for your project.
Sass partials are vital to modern best practices. These are highly recommended by Zurb’s design team and by many other professional frontend developers.
Here’s a quote from the Sass website explaining partials:
“You can create partial Sass files that contain little snippets of CSS that you can include in other Sass files. This is a great way to modularize your CSS and help keep things easier to maintain. A partial is simply a Sass file named with a leading underscore. You might name it something like _partial.scss. The underscore lets Sass know that the file is only a partial file and that it should not be generated into a CSS file. Sass partials are used with the @import directive.”
Also take a look at these other posts regarding Sass file structure:
- Aesthetic Sass: Architecture and Style Organization
- Directory Structures That Help You Maintain Your Code
Import Strategies
Not enough can be said about the value of Sass import and partials. Code organization is key to getting an import structure and workflow that just works.
The best place to start is with a globals sheet containing imports, variables and mixins together. Many developers prefer to separate variables and mixins but this comes down to semantics.
Keep in mind that mixins are a way of importing, or rather duplicating, Sass code. They’re incredibly powerful but shouldn’t be used with “static” code. Keep in mind there’s a difference between mixins, extends, and placeholders, all of which have their use in Sass development.
Read more: 11 Sass mixin libraries for designers
Mixins are best used with dynamic values passed into the mixin for code alterations. For example, check out this Sass mixin that creates a background gradient between two colors.
@mixin linearGradient($top, $bottom){
    background: $top; /* Old browsers */
    background: -moz-linear-gradient(top,  $top 0%, $bottom 100%); /* FF3.6+ */
    background: -webkit-gradient(linear, left top, left bottom, color-stop(0%,$top), color-stop(100%,$bottom)); /* Chrome,Safari4+ */
    background: -webkit-linear-gradient(top,  $top 0%,$bottom 100%); /* Chrome10+,Safari5.1+ */
    background: -o-linear-gradient(top,  $top 0%,$bottom 100%); /* Opera 11.10+ */
    background: -ms-linear-gradient(top,  $top 0%,$bottom 100%); /* IE10+ */
    background: linear-gradient(to bottom,  $top 0%,$bottom 100%); /* W3C */
    filter: progid:DXImageTransform.Microsoft.gradient( startColorstr='#ffffff', endColorstr='#000000',GradientType=0 ); /* IE6-9 */
}
The mixin takes two values: a top color and a bottom color. You could write different mixins for different types of gradients that include 3 or 4+ different colors. This allows you to import and clone the mixin code while changing the parameters for custom options.
The example from Code Responsible looks like this:
.button{
    @include linearGradient(#cccccc, #666666);
}
Related to the mixin is Sass’ placeholder which is primarily useful with the extend directive. It’s admittedly more complex than mixins, but this can be a way to combine selectors together without rewriting excess code.
While Sass has only one @import method, I’ve included mixins and placeholders to demonstrate the flexibility of code that can be written in one file but included anywhere.
When building an import structure just remember to follow the concepts of DRY coding (Don’t Repeat Yourself).
Naming Conventions
General rules for naming conventions apply to variables, functions, and mixins. When naming anything in Sass it’s recommended to use all lowercase letters with dashes for separation.
Sass code syntax is actually based on the CSS guidelines ruleset. Here are some recommended best practices to keep in mind:
- two (2) spaces indents, no tabs
- ideally, 80-characters wide lines or less
- meaningful use of whitespace
- use comments to explain CSS operations
These are not required items for valid Sass code. But these suggestions come from professional developers who have found these rulesets provide the most uniform coding experience.
But in regards to naming conventions you may end up with two different structures: one for Sass names and another for CSS class names. Some developers prefer BEM over Sass suggestions. Neither one is more, or less, correct; just different with different operating procedures.
Read more about BEM here: Understanding CSS Writing Methodologies
The problem is that BEM doesn’t carry over well to Sass variables or mixins because they don’t have the block/element/modifier(BEM) structure. I personally prefer to use Sass naming conventions but you could try anything from camelCase to your own internal syntax.
When organizing your variables and mixins it’s recommended to split them up by category, then list them in alphabetical order. This makes editing a whole lot easier because you know exactly where to find something.
For example, to change a link color you’d open your variables file (maybe _variables.scss) and locate the section for color variables. Then find the link by name (header link, text link, etc) and update the color. Simple!
To get an idea of how you might structure a table of contents for your Sass files check out Foundation’s settings file.
//  Foundation for Sites Settings
//  -----------------------------
//
//  Table of Contents:
//
//   1. Global
//   2. Breakpoints
//   3. The Grid
//   4. Base Typography
//   5. Typography Helpers
...
// 1. Global
// ---------

$global-font-size: 100%;
$global-width: rem-calc(1200);
$global-lineheight: 1.5;
// etc
Another naming practice pertains to responsive breakpoints. When naming Sass breakpoints, try to avoid device-specific names. It’s better to write names like small, med, lg, and xlg because they’re relative to each other.
This is better for internal relationships between breakpoints, but also great for teams where developers may not know which devices relate to each other.
As for actually putting down names, it’s recommended that you be as specific as possible without extra-lengthy variables. You should adopt site-wide naming conventions that are easy to remember while coding.
Give specific naming conventions for everything like colors, margins, font stacks and line-heights. Not only can the names be quickly recalled, but it makes your job easier when writing new variable names that need to match an existing syntax.
But there’s a fine line between specificity and convolution. Practice will help you find that line, and writing more memorable names makes it easier to copy code into other projects.
Nesting And Looping
These two Sass techniques are very different in action, yet both have the ability to be abused if not used considerately.
Nesting is the process of adding selectors nested together through indentation to create more specificity with less code. Sass has a nesting guide which illustrates examples of code nesting in action. But it’s easy to get carried away with nesting. If you’re overzealous you can end up with code that looks like this:
body div.content div.container { ... }
body div.content div.container div.articles { ... }
body div.content div.container div.articles > div.post { ... }
Far too specific and almost impossible to overwrite, this type of code defeats the purpose of cascading stylesheets.
Skimming this SitePoint guide you’ll find three golden rules for nesting:
- Never go more than 3 levels deep.
- Ensure the CSS output is clean and reusable.
- Use nesting when it makes sense, not as a default option.
Developer Josh Broton suggests nesting when necessary, indent the rest as a general syntax rule.
Indenting your selectors will not cause any cascading CSS effects. But you’ll have an easier time skimming your Sass file pinpointing which classes relate to one another.
Loops can also be overused if not applied properly. The three Sass loops are @for, @while, and @each. I won’t go into detail about how they all work but if you’re interested check out this post.
Instead I’d like to cover the purpose for using loops and how they function in Sass. These should be used to save time writing code that can be automated. For example, here’s a code snippet from the Clubmate post showing some Sass code followed by the output:
/* Sass code */
@for $i from 1 through 8 {
    $width: percentage(1 / $i)

    .col-#{$i} {
        width: $width;
    }
}

/* output */
.col-1 {width: 100%;}
.col-2 {width: 50%;}
.col-3 {width: 33.333%;}
.col-4 {width: 25%;}
.col-5 {width: 20%;}
.col-6 {width: 16.666%;}
.col-7 {width: 14.285%;}
.col-8 {width: 12.5%;}
These column classes can be used in conjunction with a grid system. You could even add more columns or remove some just by editing the loop code.
Loops should not be used to duplicate selectors or properties for a selector; that’s what mixins are for.
Also when looping there’s something called Sass maps that store key:value pairs of data. Advanced users should take advantage of these whenever possible.
But regular Sass loops are simple and effective at providing code output without repetition. The best reason for using loops is with CSS properties that vary data output.
Here’s a good way to check if your loop is helpful: ask yourself if there’s any other way to output the CSS you need with fewer lines of code. If not then the loop syntax is probably a great idea.
If you’re ever confused or want feedback about nesting or Sass loops you should post a question in either /r/sass/ or /r/css/, active Reddit communities with very knowledgeable Sass developers.
Modularization
The practice of writing modular Sass is an absolute necessity for most projects (I’d argue, every project). Modularization is the process of breaking down a project into smaller modules. This can be accomplished in Sass using partials.
The idea behind modular Sass is to write individual SCSS files with a specific purpose targeting global content(typography, grids) or page elements(tabs, forms).
The Sass module definition is pretty clear and makes a very specific suggestion: importing a module should never output code.
The idea of mandatory output for all modules would be a nightmare for optimization. Instead you should create modules individually and only call the ones you need. Modules can be defined by mixins or functions, but it is possible to create modules that contain selectors as well.
However a Sass Way article suggests writing all selectors as mixins and only calling them as needed. Whether you adopt this or not is ultimately your choice. I think it depends on the size of the project and your comfort with handling mixins.
Quoting John Long from his post on The Sass Way:
“For me, modules have become the basic units or building blocks of my Sass projects.”
If you’re really looking for a Sass routine I recommend going fully modular. Try building almost everything as a modular partial that gets included into a primary CSS file. At first this workflow can seem daunting but it makes sense on a grander scale – especially with big projects.
Plus it’s much easier to copy modules from one project to another when they’re located in separate files. Flexibility and reusable code are the cornerstones of modular development.
To learn more about Sass modules and modularization techniques check out these posts:
- CSS Modules: Welcome to the Future
- The Pros and Cons of Modular Sass
- Modular CSS Organization with SMACSS & SASS
Find Your Perfect Workflow
Each team and individual developer has their own practices that work best. You should adopt practices that work best for you personally, or choose to adopt the ones that work best for your team professionally.
Also consider using Gulp or Grunt for project automation and minifying your code. This will save a lot of manual labor and automation tools are now undoubtedly part of the best practices for modern frontend development.
Skim through open source libraries like Foundation’s SCSS on GitHub to learn more about best practices employed by other libraries.
The thing about best practices is that they really improve your work most of the time, but there are many alternatives. Just try things and see how they feel. You’ll always be learning so your best practices may change rapidly over the course of 5 years.
One final suggestion I have for the entire Sass process is to make decisions with clarity in mind. Write code that makes your job easier. Don’t over-complicate a project if there’s a simpler way to do it.
Sass is meant to enhance the CSS development experience, so work with clarity and best practices to get the best experience possible.
Read more: A simple & easy Gguide to Uunderstand Sass
Wrap-Up
Congestion in a Sass workflow can be corrected by tweaking code styles and following best practices. I’ve outlined a handful of suggestions in this post given from Sass blogs and professional developers.
The best way to learn more is to apply these practices into your workflow and see what works. Over time you’ll find that some activities are more beneficial than others, in which case you should keep whatever works and drop what doesn’t.
Check out these links to find more tips and best practices for Sass development: