5 Photoshop Tricks for Better Productivity
Reader Douglas R. reached out and asked us to share some useful tips and shortcuts for getting around Photoshop more efficiently. We found this to be a great suggestion. However, it’s important to note that the shortcuts you use the most can vary depending on the type of work you do.
Here’s five we frequently use.
1. Using Smart Objects and Smart Filters
Essentially, Smart Objects and Smart Filters let you undo changes you’ve made to images, whether that’s effects, filters, or resizing. In other words, after you’ve converted elements into Smart Objects or Filters, they become non-destructive. This means the original state can be restored with ease if you make a mistake.
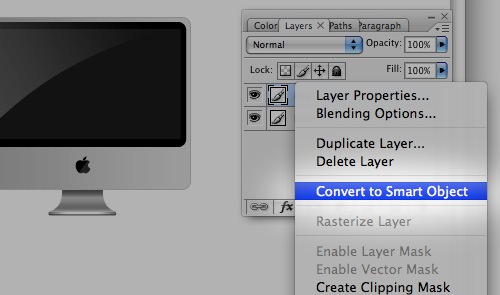
Smart Objects
When you turn an image into a Smart Object, you can change its size without losing image quality. To convert an image into a Smart Object, right-click on the image layer and choose Convert to Smart Object.
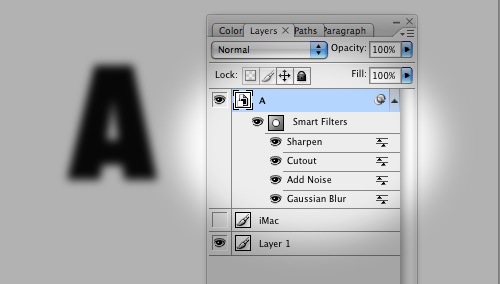
Smart Filters
By converting to a Smart Filter, you gain the ability to remove and reapply filters as needed, without having to revert to the original image and starting from scratch.
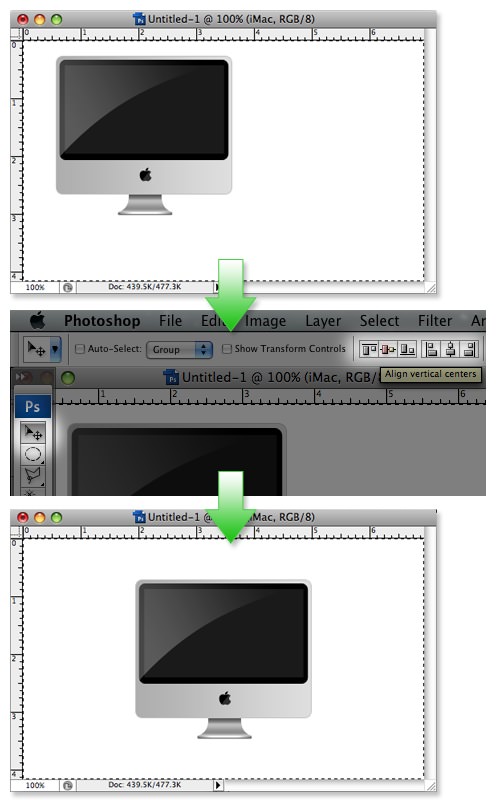
2. Centering with Absolute Positioning
If you have a canvas that is 500×300 pixels and want to center an iMac icon, doing it manually with the mouse or even with Photoshop’s rulers can be slightly off and definitely time-consuming.
Here’s a better way. First, select your canvas, then make sure you’re on the iMac layer. Choose the Move Tool V, and click on these two buttons at the top:
- Align vertical centers
- Align horizontal centers
Now, you can be confident that your icon is perfectly centered.
3. Navigating with the Hand Tool
Working on a large file but constrained by a smaller canvas? Moving around within the canvas can be a hassle. Here’s where the hand tool comes in handy. Simply hold Space (which changes your cursor to a hand symbol) and click the left mouse button to glide across your canvas. This shortcut is truly a game-changer for navigating your workspace.
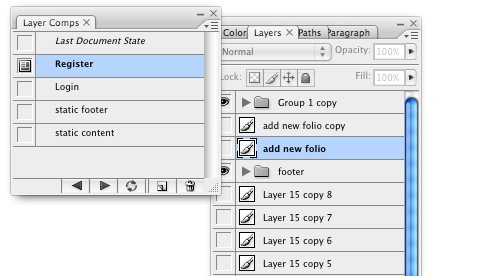
4. Mastering Layer Comps
Layer Comps are excellent for managing the visibility of various layers and folders. They come in handy when you need to show your design work to colleagues, bosses, or clients because they allow you to easily toggle layers and folders on or off. Simply create a layer comp for each combination of layers that you want to show.
You can find Layer Comps by going to Window -> Layer Comps.
5. Quick Zoom Reset
Designers often zoom in closely to adjust details and then need to quickly see the whole picture again. You can zoom into your work in Photoshop using Alt + Control + +. To zoom in even closer, keep pressing the +.
No matter how deep you’ve gone, just one command can bring you back to the original view. Here’s the keyboard shortcut you need: Alt + Control + 0 for Windows, or Option + Command + 0 for Mac users.
Read Also: 100+ Adobe Photoshop Keyboard Shortcuts