How to Organize Photoshop Files Better (5 Tips)
Photoshop is a really powerful tool to draw any digital presentation that we could possibly imagine. Some of us might have familiarized ourselves with Photoshop and may have even been working with it for ages. Still, I often find a Photoshop file stacked with poorly managed layers, causing headaches when a refinement is needed, or when converting it into another format.
For a graphic or web designer who regularly works in a team environment, where multiple designers may work on a single Photoshop file, the issue of managing and organizing the file suddenly becomes a very important matter.
In general, there are some benefits when we organize our files properly:
- It will streamline the workflow.
- It helps other designers to understand our design structure easily.
- All designers involved with the file can do a revision, quickly and easily, if necessary.
- This minimizes errors in the criss-cross production process.
Thus, in the following post, we will share some basic tips to manage and organize Photoshop files so that we can work more efficiently, particularly in a team.
10 Simple Photoshop Tips for Website Designers
Photoshop offers powerful tools that help turn your design ideas into reality. However, how familiar are you with... Read more
1. Creating folders and managing assets
When working with Photoshop, we typically have many files like photos, backgrounds, fonts and the PSD file itself.
To organize these files and reduce the possibility of chaos, the items should be placed in corresponding folders. So, before we even start up Photoshop, we should create these folders first. For instance, a fonts folder for font files or a background folder for the images we use as backdrops in the design.
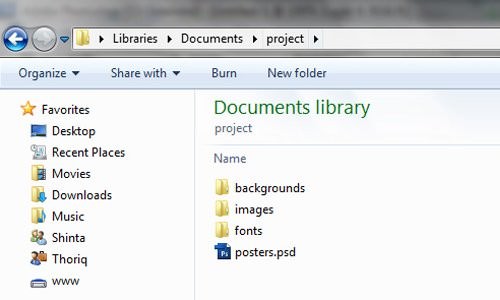
That way, you will be able to do the project faster, as you already know where to go for which file. On the Windows OS, files can be stored according to recent history, which will help you call files even faster.
In web development this practice is obvious. Files and all assets must be placed in the respective directories for the website to work properly, otherwise it would cause a 404 Not Found error.
2. Setting the document properly
In early 2003, I was working with Photoshop for the first time. I did not set up the document properly, which eventually became a real pain during the production process.
Photoshop comes with several preset documents that you can use to quickly and easily create a commonly used standard document for your project. However, often times we need to work with a document size that is not available in the Presets. In these conditions, we have to set up the document ourselves.
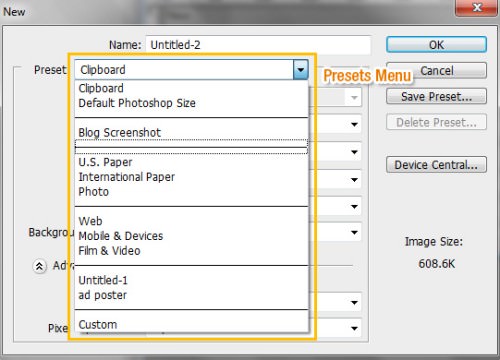
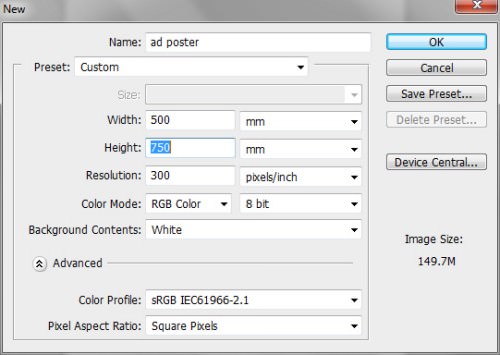
When creating a new document through Files > New... menu or hitting Ctrl / Cmd + N, a new window with several options will pop up. In this dialog we can set document parameters: like the dimension, DPI, background and color mode.
Print Design
When designing a project intended for print, the document will need some pre-requisites to ensure that the document can be printed correctly. It normally needs a 300 dpi resolution and has to be in CMYK color mode to be printed via color separation. Document size may vary depending on the project specifications.

You will also need to ‘bleed’ print designs. To bleed a document is to give it an extended area from the actual document size it will be printed on. This is important for designs that use a colored background instead of white. Bleeding prevents the occurence of white spaces that will turn up when cropping is not done with perfect precision.
Web Design
Designing websites need fewer specifications as it is only for screen view purposes, so a 72 dpi resolution with an RGB color mode should be sufficient. The pixel (px) is used as the unit measurement.

You can save this customized document specification, if you find that you will use it regularly.
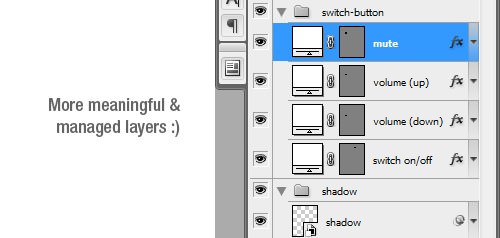
3. Naming the layers
We have prepared the files and the new document has been set up. We now move to working with layers.
When we have layers that grow along with our design, it would be better to rename these layers to be more descriptive and meaningful rather than just with random names like Shape 1 or Layer 1. That way we will be able to find the layers we want to edit more easily.
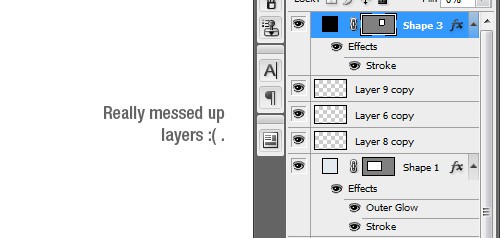
Be descriptive with the name. However, make the layers’ names simple, and short as well. Use your local language if it is the preferred language in your work environment.
4. Grouping the layers
We may find that we have too many layers and these layers are actually several parts that shape a single object. In this case, we can group those layers and name the group to appropriately represent all the layers. We can also create a sub-group and nest it inside a group like a tree structure, if necessary.
When naming the groups, try to be descriptive, simple, short and intuitive. For instance, in web design, we typically have default groups of layers like header, sidebar, content and footer.
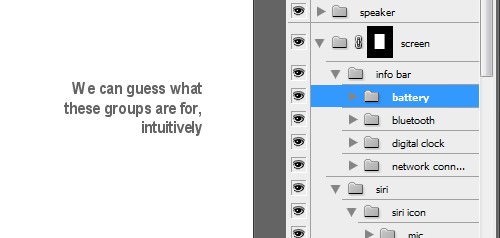
This practice will be helpful when working in a team, particularly when we work with developers that tend to work in an orderly and organized fashion. This practice can also be applied in print design projects.
5. Arrange layers or groups in order
Poorly ordered layers will drive anyone insane, and it is a nightmare to look at as well.
Let’s try putting the layers and the groups in a logical order. Have the layers and the groups positioned in the Layer tab as matched with its visual position. For instance, when we have several layers/groups like question, replied, option box and screen, the layers position should be as follows:
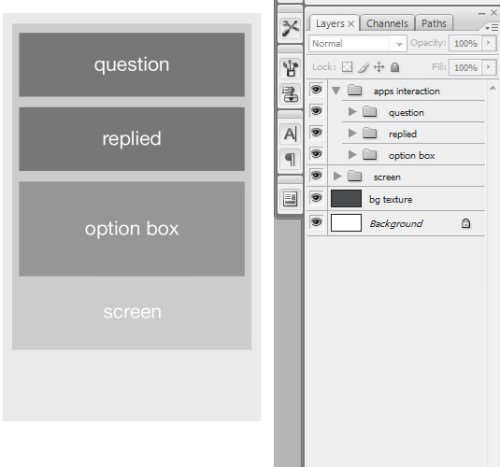
That way, anyone who will continue working on the design can intuitively find the layers and the groups faster.
Bonus Tips: Clean up unused layers
Sometimes we try a lot of things to get an effect or look for a design; this often leaves some unused layers. Eliminating these layers will not only keep the Layers tab clean and neat but it also reduces the PSD file size as well.
Conclusion
These practices, ideally, should be done from the moment the first layer is produced. It’s a matter of preferences what sticks and what goes. Some might prefer organizing the layers/groups from the beginning while others might do it after the whole design is complete.
However, these tips are not the only way to be organized and nobody is totally right when it comes to tips and best practices. It all depends on our working experience with Photoshop. Feel free to share and add your experiences in the comments section below.