How to Create and Insert New Elements with jQuery (Part 3)
In this third part (click here for Part 1 and Part 2), we continue our discussion on creating and inserting new elements with jQuery. Previously, we discussed how to use the jQuery functions before() and after() to insert a new element before or after a specified element.
jQuery provides two similar functions: insertBefore() and insertAfter(), which can sometimes cause confusion. How do these functions compare to before() and after()?
The Difference Explained
Both before() and insertBefore(), as well as after() and insertAfter(), essentially perform the same task. However, their execution order is reversed. Let’s look at an example for clarity.
Consider the following HTML list:
<ul id="list">
    <li class="list-1">Ut enim ad minim veniam.</li>
    <li class="list-2">Lorem ipsum dolor sit amet, consectetur adipisicing elit.</li>
    <li class="list-3">Duis aute irure dolor in reprehenderit.</li>
    <li class="list-4">Sunt in culpa qui officia deserunt mollit.</li>
    <li class="list-5">Excepteur sint occaecat cupidatat non proident.</li>
</ul>
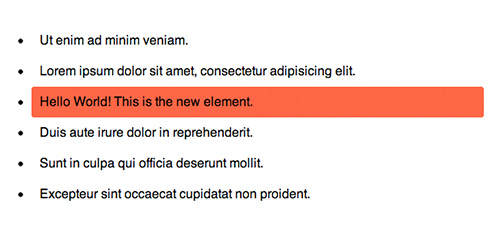
Using the .after() method, we can insert a new <li> element after the second list item like this:
$('.list-2').after('<li class="new-elem">Hello World! This is the new element.</li>');
The code above tells jQuery to search for .list-2 and insert the new element after it. Using the .insertAfter() function, the process is reversed: we create the new element first, then search for the target container where it should be inserted.
$('<li class="new-elem">Hello World! This is the new element.</li>').insertAfter('.list-2');
As mentioned, these functions will produce the same result.
Repositioning Elements
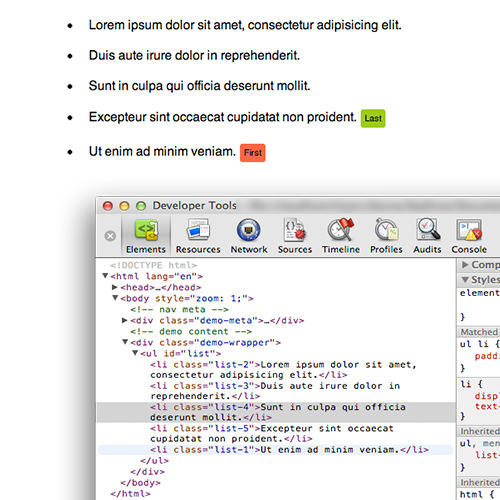
Instead of creating new elements, we can also reposition existing elements in the document using these functions. Given the same HTML structure, we can move .list-1 to the bottom using the .after() function:
$('.list-5').after($('.list-1'));
Alternatively, using the .insertAfter() function, we can write it this way:
$('.list-1').insertAfter('.list-5');
Both methods will yield the same result, as shown in the following screenshot:
The same functionality applies to .before() and .insertBefore().
Final Thoughts
The choice of function depends on the specific situation. Sometimes, insertAfter() might be necessary, while in other cases, after() might be more suitable.
This concludes our jQuery series on Creating and Inserting New Elements. We hope this guide has been helpful. Thank you for reading, and stay tuned for our next jQuery session.