How to Create and Insert New Elements with jQuery (Part 1)
jQuery is an incredibly popular JavaScript library that simplifies many tasks. With jQuery, you can effortlessly manipulate HTML elements, create animations, and much more.
In this tutorial, we’ll explore how to create and insert new elements into the DOM using jQuery’s Append method.
jQuery Guide: How to Create and Place New Elements Effectively (Part 2)
In our previous article, we began exploring how to create and insert new elements using jQuery's Append method.... Read more
Understanding Element Insertion
Appending is a technique for creating and inserting a new element into a specified parent element. The new element becomes a child of the parent, appearing right before its closing tag.
Before diving into jQuery, let’s first understand how to accomplish this task using plain JavaScript. This will help you appreciate the simplicity that jQuery offers.
Creating Elements in JavaScript
To add an element to a document in JavaScript, you first need to create it. You can use the .createElement() function for this purpose. For example, the code below creates a new <div> element and stores it in a variable named div.
var div = document.createElement('div');
After creating the element, you’ll need to insert it into the document. To do this, you can use the .appendChild() function. The following example inserts the new <div> into the body of the document.
 var div = document.createElement('div');
 document.body.appendChild(div);
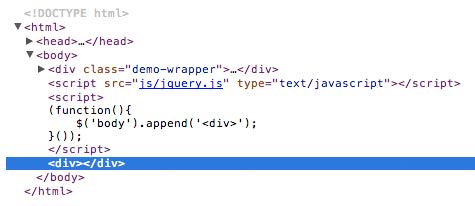
If you inspect the document using Developer Tools, you’ll see that the new div element has been added right before the closing body tag.

Creating Elements in jQuery
Now let’s see how to achieve the same result using jQuery, which simplifies the process. jQuery offers a function called .append().
In the example below, we add a <div> element to the body of the document using just one line of code.
$('body').append('<div>');
This one-liner accomplishes the same thing as the JavaScript example but in a more straightforward manner. It’s worth noting that elements generated by JavaScript or jQuery are not saved in the actual document source.
Adding New Elements with Text
Let’s delve deeper into this technique. This time, we’ll explore how to insert a new element that includes text. As always, we’ll start by demonstrating how to do this using plain JavaScript.
Firstly, we need to create the new element and the text that will go inside it. For this example, we’ll create a paragraph element.
var p = document.createElement('p'); // create new paragraph element
Next, we’ll define the text content. In JavaScript, text can be created using the .createTextNode() function. Here, we store the text in a variable named txt.
 var p = document.createElement('p'),
 txt = document.createTextNode('This is the text in the new element.');
Now, we have two separate variables: one for the new element and another for the text. To combine them, we use the .appendChild() function as shown below.
p.appendChild(txt);
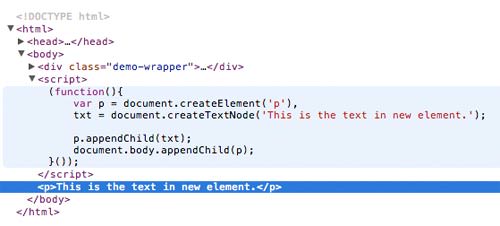
Finally, we use .appendChild() again to insert the new paragraph element into the body of the document.
document.body.appendChild(p);
If you inspect the result in your browser or Developer Tools, you should see the following:
In jQuery, the process is even more streamlined. You can define both the text and the new element together using the .append() function, like this:
$('body').append('<p>This is the text in the new element.</p>');
This one-liner accomplishes the same task: it inserts a new paragraph element, complete with text, right before the closing body tag.
Concluding Remarks
As you can see, jQuery’s .append() function allows us to add new elements more efficiently compared to using plain JavaScript. However, there are situations where using JavaScript might be more appropriate, which is why we’ve covered both methods.
This tutorial is just the beginning. In the next installment, we’ll delve into more advanced techniques for element insertion. Stay tuned for more!
If you have any questions or comments about this tutorial, feel free to leave them in the comment section below.