iOS Development Guide: Creating Your First App (Part II)
In the first part of our iOS tutorial, we took you through an introduction to iPhone app development. We explored Xcode 4 and covered a basic tutorial on building an iPhone app. This beginner tutorial was designed for anyone interested in learning how to program iOS apps.
Today, we’ll delve into the second segment of the topic, where we will be building a fully-functioning iPhone application. The app, with tabbed navigation, will convert temperature units and distance units. Don’t worry if you’re still new to Xcode. It doesn’t take long to get comfortable with the interface. I’ll explain each step in detail so you won’t get lost!
By the end of the tutorial, you will have an application that, while it can’t be pushed to an iPhone without purchasing a developer program, can be run inside the iOS Simulator on a macOS system. I’ve provided the project files for download, which you can refer to if you’re unsure about any step. Ready to build an app? Let’s get started!
Note: You will need a computer with the Macintosh Operating System (macOS) for Xcode installation, application development, and app submission. There is no legal way to do this on Windows.
Pre-Setup: Installing Xcode Packages
If you haven’t done so already, you will need to get Xcode 4 on your computer. You must use Xcode 4 since this tutorial is written specifically for Xcode 4. If you’re running the latest macOS Lion, a simple search in the App Store will provide everything you need. Xcode 4 includes the iOS SDK & Simulator for building and running iPhone apps directly on your Mac!
If you cannot find Xcode 4 in the App Store, you can also try accessing the official Xcode page to download the software. Otherwise, you’ll need to find the software in your developer account, which you can register for without a fee on the Apple Developer site.
You could also check on Google if you’re having difficulty finding the software. Apple tries to keep their developers more private and refined, so it can be a struggle getting everything set up to begin programming. Luckily, Xcode is a one-time install that includes all the SDK components you’ll need for iPhone app development.
After the installation is completed, open your new software and let’s build this iPhone app!
Creating Your New Project
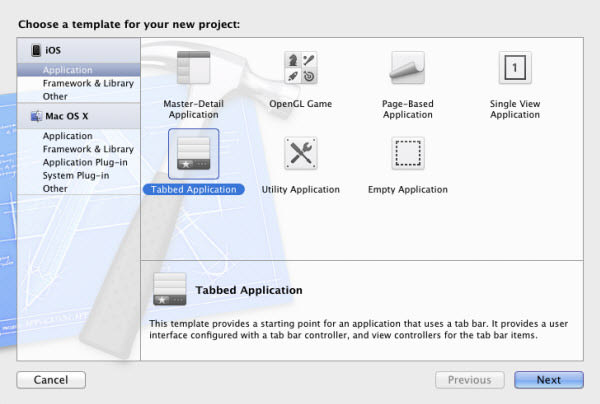
Open Xcode 4 and you should see a startup screen with a few default options. From the list, select “Create a new Xcode project” to open the main window. Here, you have the choice to select which template to begin with. We’re going to use the Tabbed Application.
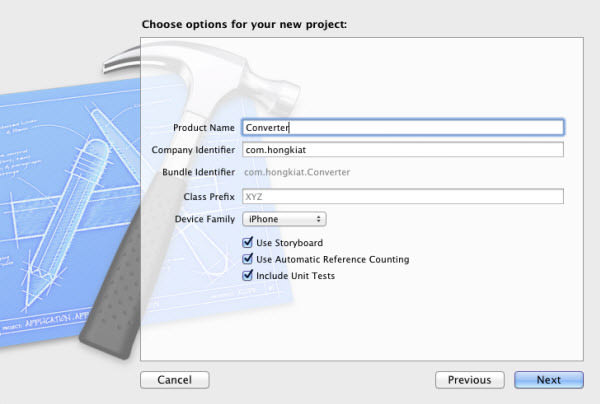
Click “Next” and you need to enter a name for your project. I’ve chosen Converter. Next, you need to enter the Company Identifier, such as com.hongkiat, which is used to sort the internal build directories of your application. Make sure you select “iPhone” from the Device Family, and ensure all options below are checked. Click “Next” and choose a location to create all the project files.
In the left pane, you’ll notice the Project Navigator with a whole new set of files. Click on the “Converter” file to view all files inside. Beside the Project Navigator is the Document Outline. Remember these names since we’re going to use them throughout the entire tutorial.
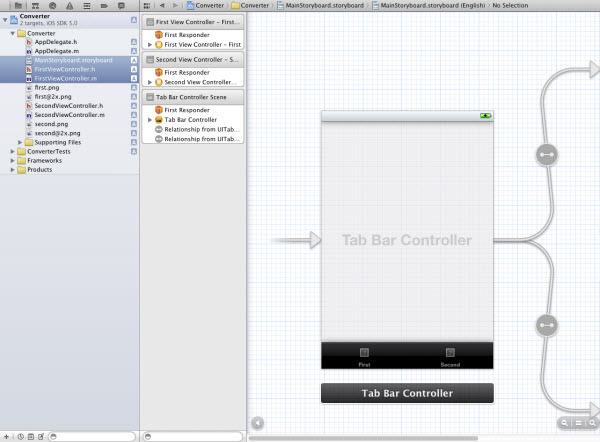
You should notice three very important files: MainStoryboard.storyboard, FirstViewController.h, and FirstViewController.m. The .h and .m files are used for header and implementation code, which essentially connects the back-end programming with our front-end buttons and text fields. You should see matching files, SecondViewController.h and SecondViewController.m for the Second View as well.
The storyboard file was originally a .xib (pronounced nib) file that was ported over from Interface Builder. The newest release of Xcode 4.2 actually ties this functionality into a type of flowchart to make editing a bit easier. When creating a new project, you can uncheck the storyboard option and you’ll have individual .xib files for each view. If you feel more comfortable with the old file system, you can use that, but for this tutorial, you must stick to the storyboard method.
Custom Tab Bar Icons
We will start building the interface components first and move onto Objective-C programming later. To begin, let’s replace the label text with icons in the tab bar. First, download the Glyphish icon set to your Desktop. They offer a pro set with 2X icons for iPhone 4 retina display, but we can work with the free standard icons for this tutorial.
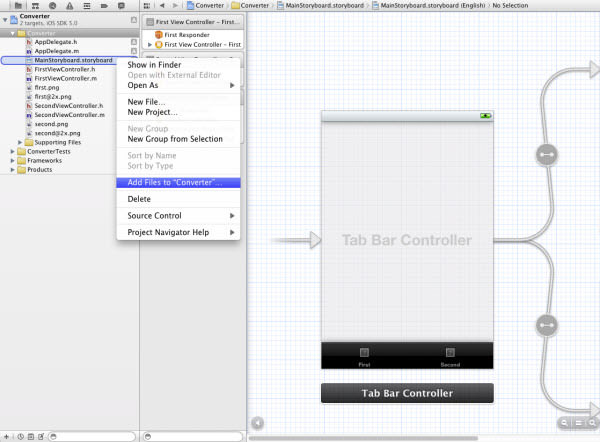
Back in Xcode, in your Project Navigator, right-click on the first yellow folder which contains your main views and select “Add files to Group…”. The Group should be titled according to your project name; in this case, it’s Converter.
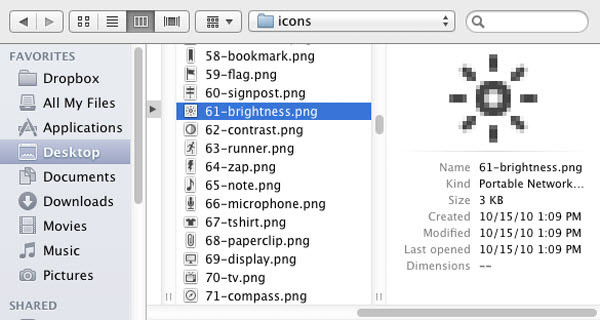
A new window will open to select files to add to Xcode. Choose the Glyphish icon file located on your Desktop (or wherever you saved it) and inside the icons folder, choose the 61-brightness.png. Click “Add” so they’ll be imported into your project directory. Repeat the same process to add 07-map-marker.png to the project directory.
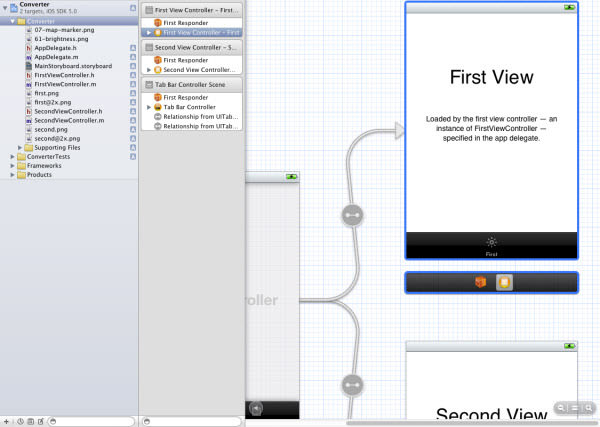
Now, select MainStoryboard.storyboard to open the visual editor in the center of the software. To the left, you’ll notice a new menu on the right side of the Project Navigator, called the Document Outline. This is a documented list of all the elements, pages, views, and navigation in your app.

Before we add the icons, we need another menu called the Utilities. The Utilities pane is enabled by default, but you can also enable it by selecting View > Utilities > Show Utilities on the top menu bar of the software.
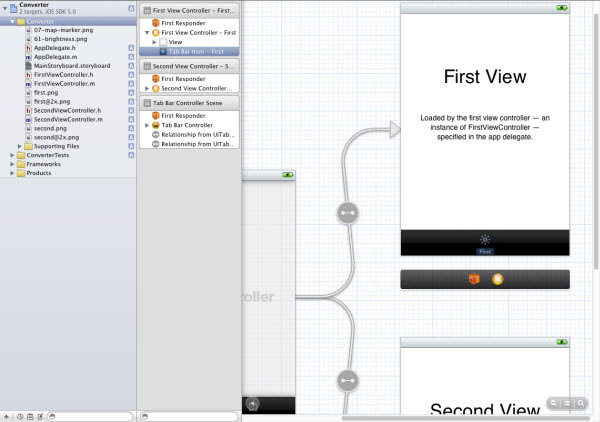
Back in the Document Outline, you will notice how the First View and Second View each have their scene box and view controller. Click on the left arrow of First View Controller – First to display more elements, and you should see Tab Bar Item. Click to select it, and if you can’t see anything, try scrolling to the right in your storyboard viewer. All the edits for the tabs will be done in the Attributes Inspector, which you can show by selecting View > Utilities > Show Attributes Inspector.
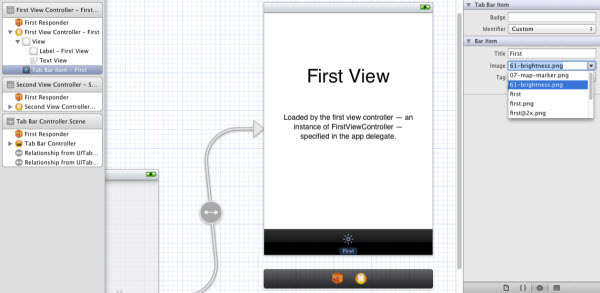
Now look at the Utilities pane on the right side of the editor, and you will see the Title and Image property under the Tab Bar Item. Click on the down arrow of the Image option, then select 61-brightness.png. The icon will be assigned to the Tab Bar Item of the First View. You can also remove the Title of the Tab Bar Item so there will be no text below the icon.
For the Second View, return to the Document Outline and click on the down arrow of Second View Controller – Second to show the Tab Bar Item – Second. Click on “Tab Bar Item – Second” and look at the Utilities pane on the right side of the editor for the Title and Image property under the Tab Bar Item. Click on the down arrow of the Image option, then select 07-map-marker.png. The icon will be assigned to the Tab Bar Item of the Second View. Remove the Title of the Tab Bar Item.
Designing Views with Objects
We’ve finished importing and setting the images. Now, let’s move on to designing the views. We will design the First View first, then copy all elements from the First View and paste them into the Second View, making some additional changes for the Second View later.
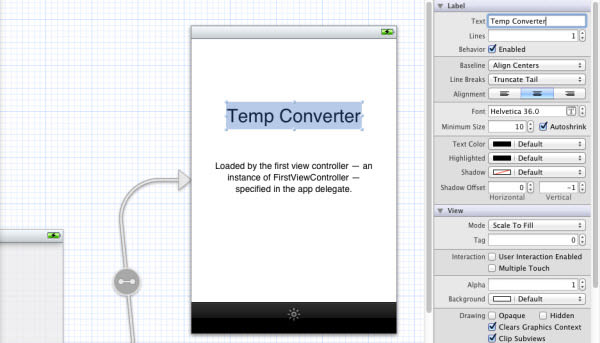
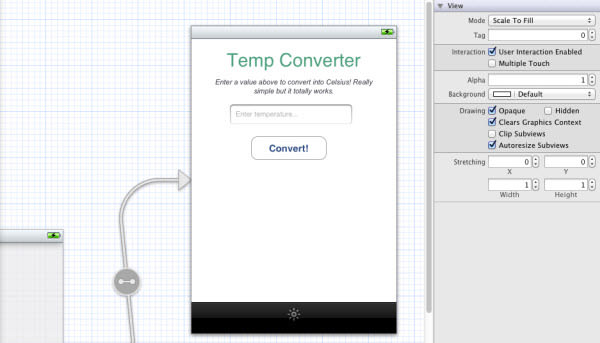
For each default view, we are given a basic text header and description object. Double-click on the “First View” text of the First View Controller in the visual editor and change it to “Temp Converter”. Repeat the process for the Second View Controller but change the name to “Distance Converter”. You can select the text and use the Attributes Inspector in the Utilities pane to change the font, color, size, etc.
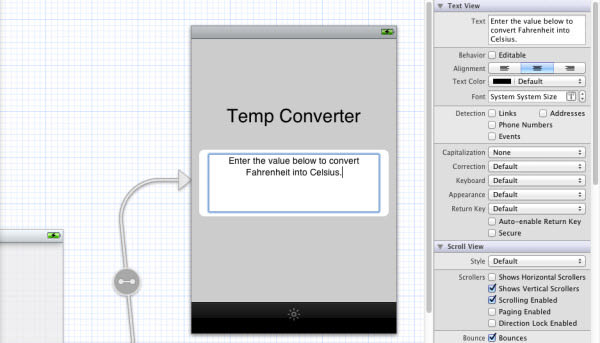
For the description object under the text header of the First View Controller, you can double-click on the description text and provide a basic description of what we’ll be doing in each view, such as “Enter the value below to convert Fahrenheit into Celsius“. You can repeat the process to give a basic description for the description object of the Second View Controller, but change the description to “Enter the value below to convert Miles into Kilometers and Astronomical Units“.
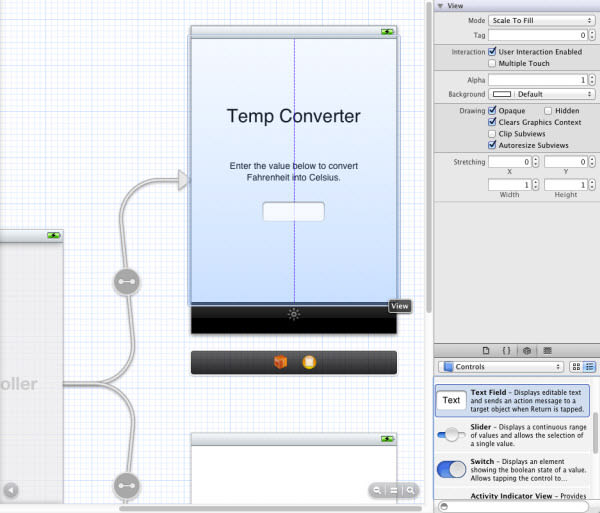
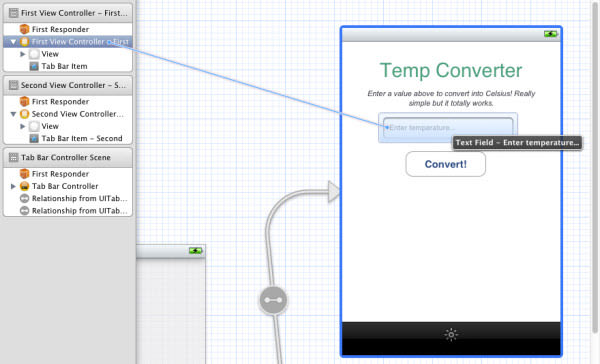
Now we need to create a text field for the value input. In the bottom part of the Utilities pane on the right side of the software, you should see the Objects library, which can also be enabled by selecting View > Utilities > Show Object Library. In its drop-down menu, choose Controls and select a Text Field, then drag it into the First View Controller.
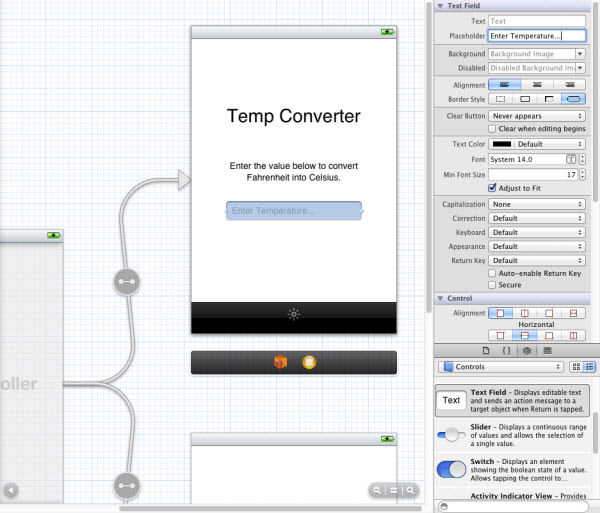
Move the text field to center it and resize the box to your preferred size. In the Attributes Inspector in the Utilities pane, you can also change the text color of the input field. Next, add the text “Enter temperature…” into the Placeholder field (not the Text field).
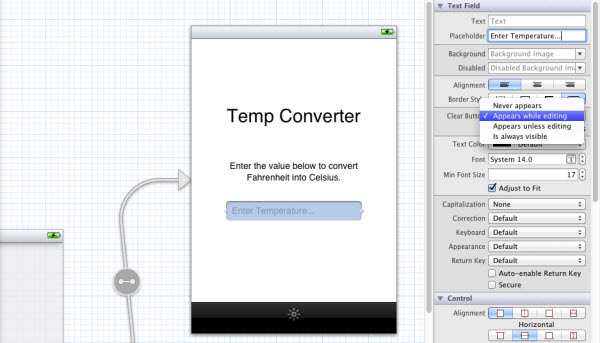
Now let’s do some extra settings to make the app more user-friendly. In the Utilities pane, find the property “Clear Button”, then change it from “Never appears” to “Appears while editing”. This allows you to delete the entire entry at once without repeatedly tapping the x button.
Next, in the pane, find the “Keyboard” property with a drop-down menu. Change this from “Default” to “Number Pad” so the input will be limited to only numbers.
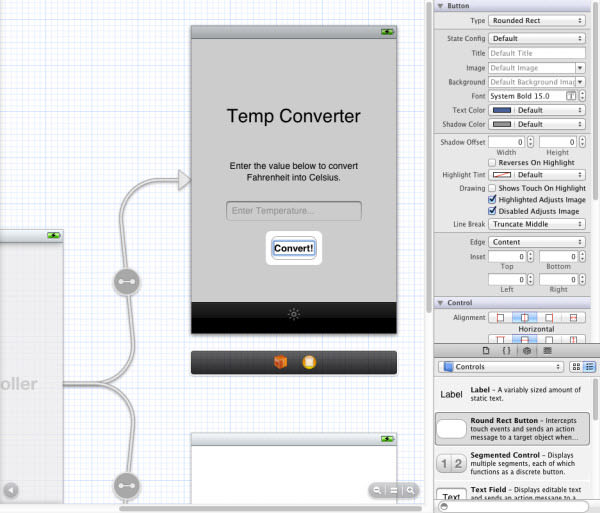
Next, we will create a button to convert the value. Drag a Round Rect Button from the Object Library located at the bottom of the Utilities pane and place it below the text field. Double-click to add the text “Convert!”. Again, spend some time in the Attributes Inspector to customize the style, although it looks fine by default.
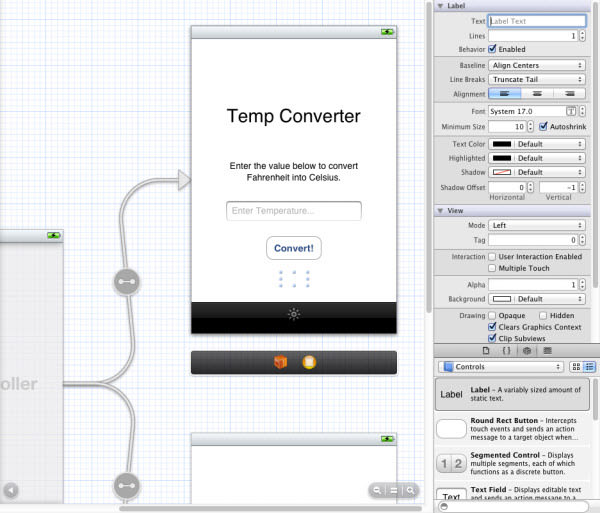
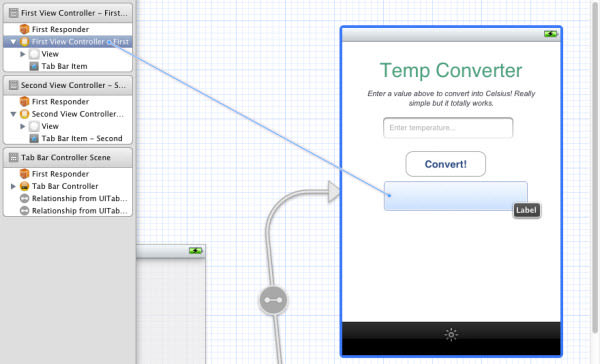
We just need to drag the Label object from the Object Library into the First View Controller to handle output text from the conversions. When you drag the label into the view, by default it’s given some static text, such as “Label”. You should delete the text so nothing will be displayed when the app launches. Resize the box to make it wider and position it below the Convert button.
Before we move to the Second View Controller, you can improve the design of the First View Controller. It’s recommended to enhance the design now so later, when we duplicate the elements of the First View Controller to the Second View Controller, we don’t need to redesign the Second View Controller again.
Now let’s do the same process for the Second View Controller. We can save time by copying everything from the First View, but we also need to change certain things to match the function of the Second View Controller.
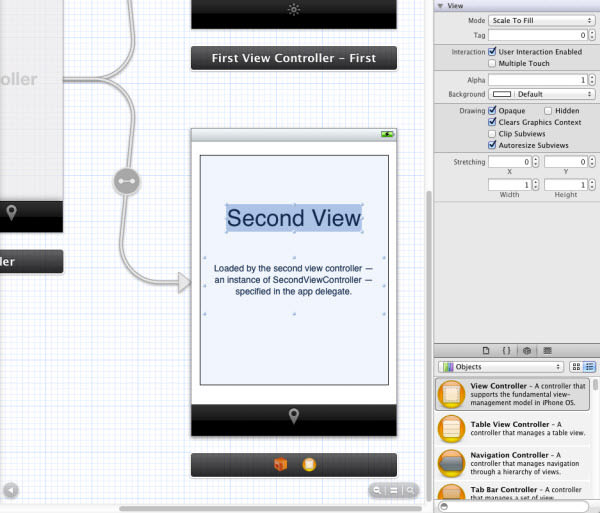
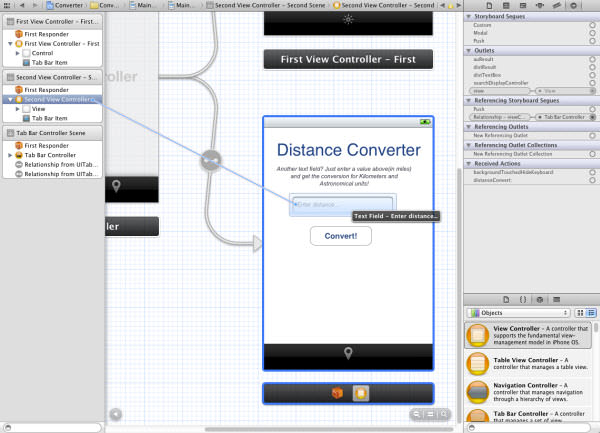
Click on the “View” of the Second View Controller in your Document Outline, and drag to select all items and delete them. This should only remove a text header and description object so that the second view is completely empty. Now select all the items in the First View and press cmd+c/cmd+v to copy/paste them into the empty Second View. Below are the changes required for the Second View:
- Text Header – Change to “Distance Converter”.
- Text Field – Placeholder reads “Enter distance…” and set Keyboard property to “Number Pad”.
- Labels – Add one more Label below the existing Label. The top Label will display the Kilometers value, while the bottom Label will display the Astronomical Units value.
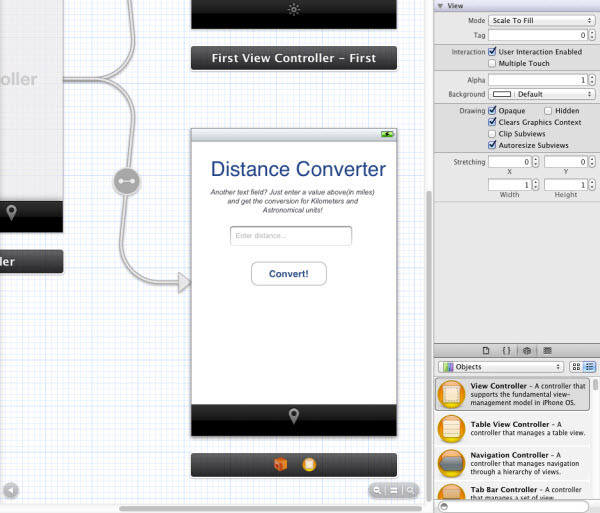
This is what you will achieve in the end. You can notice that the outcome of the Second View is almost identical to the First View.
Programming In First View
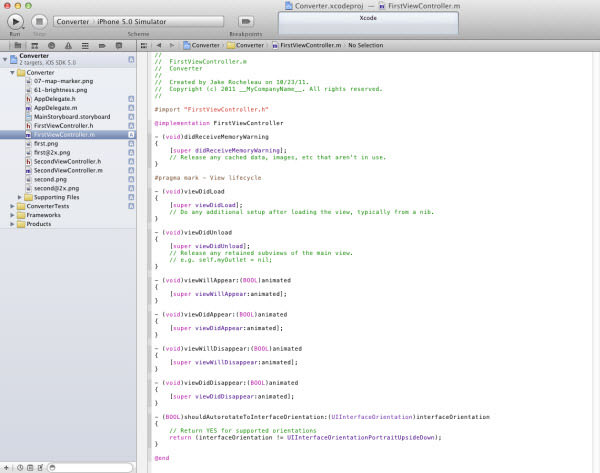
Enough graphics for now, let’s move into some programming! We can start by building the backend functionality for our simpler first view. Select FirstViewController.h from your Project Navigator.
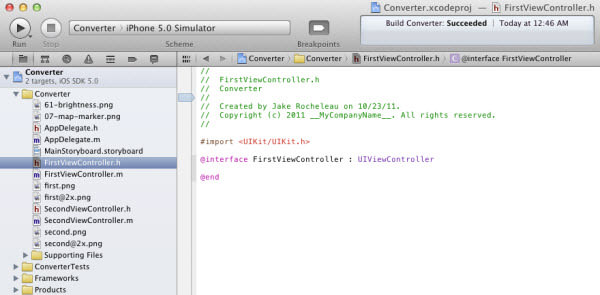
We need to update the code to give instance names for each of the functions and properties we’re using. First of all, you will see the following code in FirstViewController.h:
#import <UIKit/UIKit.h>

@interface FirstViewController : UIViewController

@end
Now replace the code above with the code below. The @interface keyword is creating a subclass of UIViewController, which is the default view in any iOS app.
#import <UIKit/UIKit.h>

@interface FirstViewController : UIViewController {
    UITextField *tempTextBox;
    UILabel *calcResult;
}
@property (nonatomic, retain) IBOutlet UILabel *calcResult;
@property (nonatomic, retain) IBOutlet UITextField *tempTextBox;
- (IBAction)degreeConvert:(id)sender;
- (IBAction)backgroundTouchedHideKeyboard:(id)sender;
@end
We need to declare IBOutlets (Interface Builder Outlets) for each of the elements in our app. This is what @property is creating – a new outlet for Xcode to connect to the interface. I also defined two actions which, in simple terms, are blocks of code that execute whenever they’re called.
About degreeConvert, it will take the value in our text field and perform conversions from Fahrenheit to Celsius. Similarly, backgroundTouchedHideKeyboard is a small action I’ll be adding to hide the keyboard when the user touches any part of the background.
Now we get into the differences between .h and .m files. We’ve declared all of these functions and variables, but they don’t do anything or connect to anything right now. We need to implement the functionality into our FirstViewController.m. Save any changes and click to open FirstViewController.m in Project Navigator. We need to create a synthesis to access elements in the First View header. This is performed with @synthesize so now our actions can manipulate the different objects on-screen.
Add the @synthesize tempTextBox, calcResult; into FirstViewController.m so the first few lines will look like this:
#import "FirstViewController.h"

@implementation FirstViewController
@synthesize tempTextBox, calcResult;
This is declared for the single text field and results label, respectively. To go further, let’s look at the two functions I’ve pre-written. If you are still new to Objective-C syntax, it may seem a bit confusing. But you’ll get used to the structures over time. Paste the code below into the file.
- (void)degreeConvert:(id)sender
{
    double fahren = [tempTextBox.text doubleValue];
    double celsius = (fahren - 32) / 1.8;

    [tempTextBox resignFirstResponder];

    NSString *convertResult = [[NSString alloc] initWithFormat: @"Celsius: %f", celsius];
    calcResult.text = convertResult;
}

- (void)backgroundTouchedHideKeyboard:(id)sender
{
    [tempTextBox resignFirstResponder];
}
First, we have degreeConvert, which takes no parameters and returns void. This is the method called when a user presses the convert button in the first view. A variable fahren is set to pull the value from whatever the user has entered. We can then calculate another variable, celsius, with basic math.
Now [tempTextBox resignFirstResponder] is actually calling a method resignFirstResponder on our keyboard. This code is also seen in the second function, backgroundTouchedHideKeyboard. Basically, it hides the keyboard and deselects the text field after the user either touches the background or hits the convert button.
The rest of our degreeConvert function creates a new string (NSString) to store the Celsius conversion and, using dot syntax, adds this to our label field. If you have any familiarity with C-based programming (Java, PHP, C#/C++, Perl), some of these terms should be familiar.
Now, search for the code below:
- (void)viewDidUnload
{
    [super viewDidUnload];

    // Release any retained subviews of the main view.
    // e.g. self.myOutlet = nil;
}
Replace the code above with the code below:
- (void)viewDidUnload
{
    [super viewDidUnload];

    // Release any retained subviews of the main view.
    // e.g. self.myOutlet = nil;
    self.tempTextBox = nil;
    self.calcResult = nil;
}
At the bottom of our FirstViewController.m, I’ve done some garbage collection for the variables we synthesized. We should release all the different subviews from memory, including our text field and output label. Automatic Reference Counting (ARC) will automatically deallocate variables from memory, which will save a lot of stress on iOS projects.
Connecting Actions And Outlets
This is the final step for the First View where we will connect our front-end elements with back-end code! When building iOS apps, there are three major segments to completion: adding the physical UI elements, writing the program code, and finally connecting the two together. This segment will wire all our First View’s components to make them run and work perfectly!
Save both your FirstViewController.h and FirstViewController.m to ensure everything is updated. Then, click back onto the storyboard and look at the Document Outline. There, you’ll notice an orange orb named First View Controller – First.
Click on the orb to select it, and a blue outline should appear on your First View scene. Now press Ctrl and click the First View Controller – First to drag onto the text field, then release it.
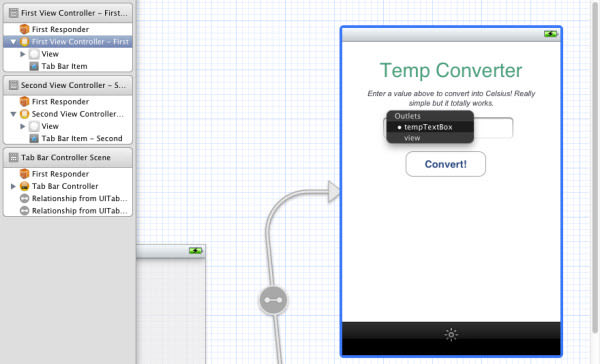
After the action, a list of Outlets will come up. Select “tempTextBox” from the list. If the connection is successful, the text field will flash.
Now press Ctrl and click the First View Controller – First again to drag onto the Label field and select “calcResult”. Both our outlets are now connected to these variables, and we just need to connect the actions.

Click on the right arrow of the First View Controller – First and you will see a component named View – click to select it. Open your Identity inspector in the Utilities pane, which you can also enable by going to the top menu bar of the software, and selecting View > Utilities > Show Identity Inspector. Under Custom Class, enter “UIControl” or select it from the dropdown menu.
In order for the keyboard to recognize the background as a tappable object, it must be converted into a control. Now, in the Utilities pane, activate the Connections inspector by going to the top menu bar of the software and selecting View > Utilities > Show Connections Inspector.
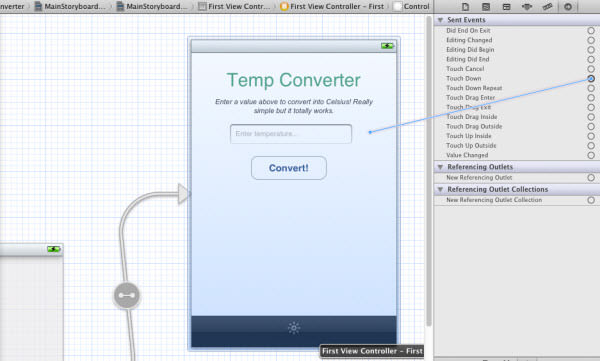
This is how we connect a page event (swipe, tap, hold, etc.) to a single function call. Look through the list of events until you find Touch Down. Click the small circle located at the right side of the Touch Down event, then drag and drop it onto the First View Controller. You’ll be given two actions to select from – choose backgroundTouchedHideKeyboard and you’ll get a confirmation flash.
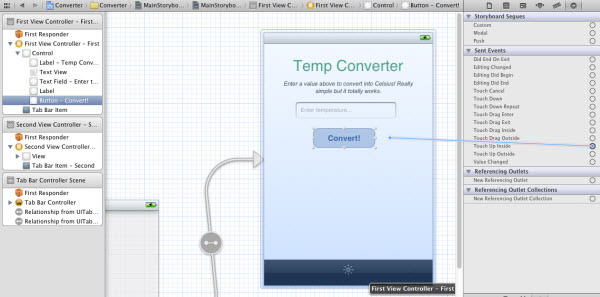
Finally, click to select the Convert button and make sure it has a blue highlight, similar to the screenshot above but without selecting the whole View Control. In the Connections Inspector, drag the Touch Up Inside’s small circle and drop it onto the First View Controller again. Choose the function named degreeConvert, which will only trigger when the user touches the button and releases it within the set boundaries.
Porting Code Over To Second View
Now this may be a good time to save your work and compile/build the application so far. If everything is running smoothly, you should be able to enter some values into the text field and hit convert to see the result in Celsius! If you’re getting any errors, try downloading the demo project in the last section of this article to compare the differences and fix the errors.
I’ll assume you’ve already created the layout for the Second View in the earlier section. Instead of outputting one conversion (Fahrenheit > Celsius), our Second View will output two values (Miles > Kilometers and Miles > Astronomical Units). So all we need to do is migrate the Objective-C code from the First View and reorganize everything to work properly for our Second View, then finish up by connecting the storyboard to our new actions and outlets.
We should start with the header code and move into implementation. Below I’ve added the full code from my SecondViewController.h file. It’s basically a clone of the First View Controller’s header, but with an additional property linked to the second UILabel element.
Again you need to search for the following code in SecondViewController.h:
#import <UIKit/UIKit.h>

@interface SecondViewController : UIViewController

@end
Replace the code above with the code below:
#import <UIKit/UIKit.h>

@interface SecondViewController : UIViewController {
    UITextField *distTextBox;
    UILabel *distResult;
    UILabel *auResult;
}
@property (nonatomic, retain) IBOutlet UILabel *distResult;
@property (nonatomic, retain) IBOutlet UILabel *auResult;
@property (nonatomic, retain) IBOutlet UITextField *distTextBox;
- (IBAction)distanceConvert:(id)sender;
- (IBAction)backgroundTouchedHideKeyboard:(id)sender;
@end
You can notice I’ve changed all the instance names for the actions and outlets. distTextBox will now hold our text input for distance. distResult is the first distance result label (kilometers) and auResult will hold our second conversion label. distanceConvert is the new action we call to convert the numeric value, and backgroundTouchedHideKeyboard remains the same.
As before, we’re using the MVC hierarchy to separate the app functions (implementation) from the controller between storyboard objects. If your SecondViewController.h looks the same as mine above, save changes and select SecondViewController.m. I will again break up my code into two parts.
The code below is from the top portion of my SecondViewController.m. This contains the @synthesize statement to create setters and getters for each instance variable. I know this concept of synthesizing instance variables can be very confusing initially. I recommend this StackOverflow thread which may help to clear things up.
Now, look for the code below in SecondViewController.m:
#import "SecondViewController.h"

@implementation SecondViewController
Replace the code above with the code below:
#import "SecondViewController.h"

@implementation SecondViewController
@synthesize distResult, auResult, distTextBox;

- (void)distanceConvert:(id)sender
{
    double miles = [distTextBox.text doubleValue];
    double km = miles * 1.61; // multiply miles by ~1.609 kilometers
    double au = miles / 92956000; // divide miles by 92,956,000AU

    [distTextBox resignFirstResponder];

    NSString *kiloResult = [[NSString alloc] initWithFormat: @"Kilometers: %f", km];
    NSString *ausResult = [[NSString alloc] initWithFormat: @"AUs: %f", au];
    distResult.text = kiloResult;
    auResult.text = ausResult;
}

- (void)backgroundTouchedHideKeyboard:(id)sender
{
    [distTextBox resignFirstResponder];
}
The new action distanceConvert will be called once the user taps the Convert button. Variable miles will pull the number from distTextBox while km and au perform some basic mathematical conversions to get their values. Afterwards, using two lines, we allocate memory for two NSString objects holding the Kilometer and AU output info. Using dot syntax, we call upon the .text property to change UILabel text.
Now, search for the code below:
- (void)viewDidUnload
{
    [super viewDidUnload];

    // Release any retained subviews of the main view.
    // e.g. self.myOutlet = nil;
}
Replace the code above with the code below:
- (void)viewDidUnload
{
    [super viewDidUnload];

    // Release any retained subviews of the main view.
    // e.g. self.myOutlet = nil;
    self.distResult = nil;
    self.auResult = nil;
    self.distTextBox = nil;
}
And now the final bit of code found at the very end of SecondViewController.m. viewDidUnload is called after our view is finished compiling and displaying. We set the three properties synthesized earlier to nil (null in Objective-C) and release their instance from memory. The app is almost complete after we finish connecting the storyboard to outlets and actions.
Second View Connections
The process of building views is basically a repetition of step 5, with a few extra steps. You can treat this as an exercise to strengthen your memory on connecting the storyboard to outlets and actions, as they can often be confusing.
Again, save both your SecondViewController.h and SecondViewController.m to make sure everything is updated. Then, click back onto the storyboard and look at the Document Outline. There, you’ll notice an orange orb named Second View Controller – Second.
Click on the orb to select it, and a blue outline should appear on your Second View scene. Now press Ctrl and click the Second View Controller – Second to drag onto the text field, then release it.
After the action, a list of Outlets will come up. Select “distTextBox” from the list. If the connection is successful, the text field will flash.
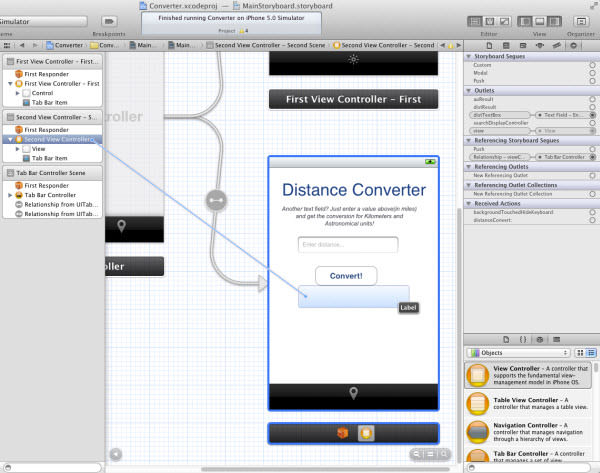
Now press Ctrl and click the Second View Controller – Second again to drag onto the Label field and select “distResult”. Repeat the process for the second Label located below the first Label, but choose “auResult” for it. Both our outlets are now connected to these variables, and we just need to connect the actions.
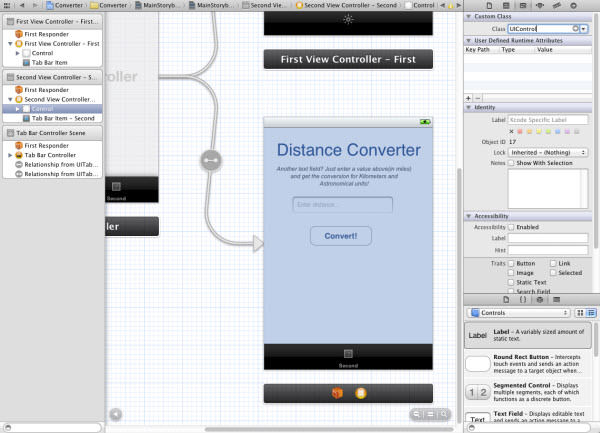
Click on the right arrow of the Second View Controller – Second and you will see a component named View – click to select it. Open your Identity inspector in the Utilities pane, which you can also enable by going to the top menu bar of the software and selecting View > Utilities > Show Identity Inspector. Under Custom Class, enter “UIControl” or select it from the dropdown menu.
In order for the keyboard to recognize the background as a tappable object, it must be converted into a control. Now, in the Utilities pane, activate the Connections inspector by going to the top menu bar of the software and selecting View > Utilities > Show Connections Inspector.
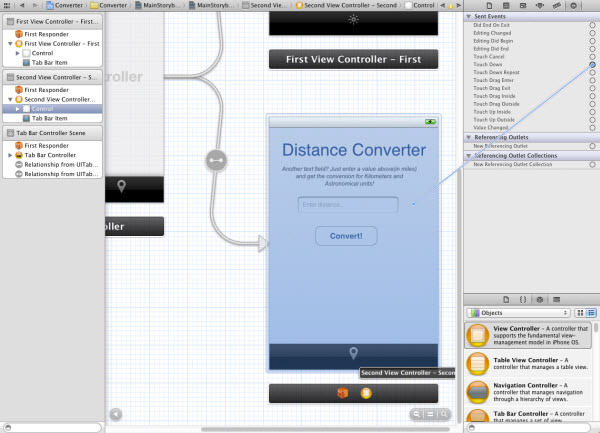
This is how we connect a page event (swipe, tap, hold, etc.) to a single function call. Look through the list of events until you find Touch Down. Click the small circle located at the right side of the Touch Down event, then drag and drop it onto the Second View Controller. You’ll be given two actions to select from – choose backgroundTouchedHideKeyboard and you’ll get a confirmation flash.
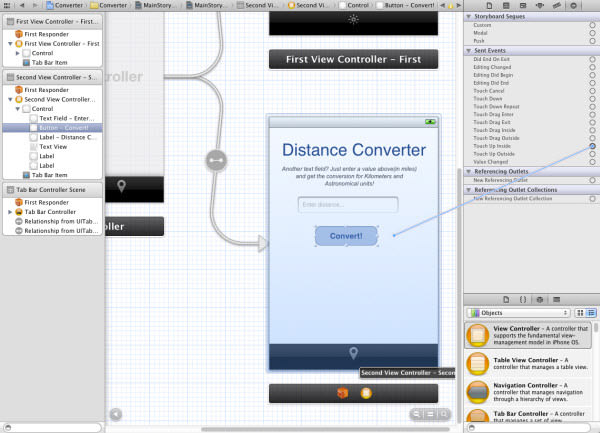
Finally, click to select the Convert button and make sure it has a blue highlight, similar to the screenshot above but without selecting the whole View Control. In the Connections Inspector, drag the Touch Up Inside’s small circle and drop it onto the Second View Controller again. Choose the function named distanceConvert, which will only trigger when the user touches the button and releases it within the set boundaries.
Build and Run to see if your app compiles successfully. If there are no errors, everything should work properly. You could now spend time improving the text and layout, or maybe adding a custom logo PNG.
Thanks for following the tutorial and congrats, you’ve just made your first working iPhone app!
Download Xcode Project
Can’t achieve a certain step? Here is the result file for you to test and compare the differences.
Final Words
In closing, it would be helpful to review the key points in this tutorial. We started a new Xcode iPhone app project with a tabbed navigation. This included two UIViews to which we added a text field, button, and labels. We then wrote some Objective-C code for defining Instance Variables (ivars) and Actions (functions) to process the conversions.
After all this, we finally connected Objects for each Instance Variable. This allowed the Objective-C backend implementation code to target an ID such as tempTextBox and tie it to a storyboard object.
Hopefully, you’ve learned many of the keywords and techniques for using Xcode. You most likely won’t be an expert at building iOS apps after this tutorial. In fact, you may still be deeply confused about a lot of these topics! iOS programming requires practice, so don’t feel discouraged if you cannot understand everything right away. Try downloading the demo project file I’ve provided and look through it to familiarize yourself with this tutorial and Xcode projects in general. One last tip: never give up!