10 New Features of HTML 5.1 & How to Use Them IRL
The HTML specification got a major overhaul a couple of weeks ago when W3C published its new HTML 5.1 recommendation in November 2016. In its recent blog post, W3C called the new major release the gold standard, as HTML 5.1 provide us with new ways of how we can use HTML to create more flexible web experiences.
In this article, we’re going to have a look at its new features you can make use of without touching JavaScript, however the improvements of the JavaScript background are also remarkable, as you can see it in the official change log.
Note that currently not all browsers support all of these features, so don’t forget to check browser support before you use them in production. If you are interested in the further development of the HTML standard, you can check out the working draft of HTML 5.2 as well.
Recommended Reading: A Look Into: ARIA Web Standards & HTML Apps Accessibility
1. Define multiple image resources for responsive design
In HTML 5.1, you can use <picture> tag together with the srcset attribute to make responsive image selection possible. The <picture> tag represents an image container that allows developers to declare different image resources in order to adapt to the UA‘s viewport size, screen pixel density, screen type, and other parameters used in responsive design.
The <picture> tag itself doesn’t display anything, it functions merely as context for the multiple image resources. You need to declare the default image resource as the value of the src attribute of the <img> tag, and the alternative image resources go within the srcset attributes of the <img> and <source> elements.
Code example:
<picture>
	<source srcset="mobile.jpg, mobile-hd.jpg 2x"
      media="(max-width: 360px)">
	<source srcset="large.jpg, large-hd.jpg 2x"
      media="(min-width: 1920px)">
  <img src="default.jpg" srcset="default-hd.jpg 2x"
      alt="your image">
</picture>
2. Show or hide extra information
With the <details> and <summary> tags, you can add extended information to a content piece. The extra information isn’t shown by default, but if users are interested, they have the option to take a look. In your code, you are supposed to place the <summary> tag inside <details>. After the <summary> tag you can add the extra information you want to hide.
Code example:
<section>
  <h2>Error Message</h2>
  <details>
  <summary>We couldn't finish downloading this video.</summary>
  <dl>
    <dt>File name:</dt><dd>yourfile.mp4</dd>
    <dt>File size:</dt><dd>100 MB</dd>
    <dt>Duration:</dt><dd>00:05:27</dd>
  </dl>
  </details>
</section>
This is how this code example looks like in Firefox 50.0.2:

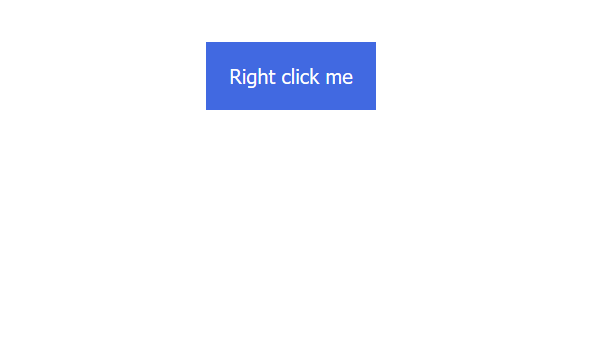
3. Add functionality to the browser’s context menu
With the <menuitem> element and its type="context" attribute, you can add custom functionality to the context menu of the browser. You need to assign <menuitem> as the child element of the <menu> tag.
The id of the <menu> element needs to carry the same value as the contextmenu attribute of the element to which we want to add the context menu to (which is the <button> element in the example below).
Code example:
<button contextmenu="rightclickmenu">Right click me</button>
<menu type="context" id="rightclickmenu">
  <menuitem type="checkbox" label="I ♥ HTML5.1.">
</menu>
The <menuitem> tag can have three different types, "checkbox", "command" (to which you need to add an action with JavaScript), and radio. It’s possible to add more than one menu item to a context menu, however the browser support for this feature is not very good yet. Chrome 54 doesn’t support it, and Firefox 50 only allows the presence of one extra context menu. Below you can see how the code example works in Firefox 50.
4. Nest headers and footers
HTML 5.1 allows you to nest headers and footers if each level is contained within sectioning content. The note below is a screenshot from the W3C docs, and advises developers about the right way of header and footer nesting.

This feature can be useful if you want to add elaborated headers to semantic sectioning elements, such as <article> and <section>. The code example below creates a sidebar inside the header, the <aside> tag is also a sectioning element, and adds extra information about the author inside it. The sidebar inside the header has its own header as well, with a subtitle and the author’s contact info.
Code example:
	<article>
	  <header>
	    <h1>Article Title</h1>
	    <aside>
	      <header>
	        <h2>About the author</h2>
					<p><a href="#">Email</a><a href="#">Twitter</a></p>
	      </header>
	      <img src="photo.jpg" alt="Author photo">
	      <p>Author bio ... </p>
	    </aside>
	  </header>
	  <p>Article intro</p>
	  <p>Other paragraphs ...</p>
	</article>
5. Use cryptographic nonces for styles & scripts
With HTML 5.1, you can add cryptographic nonces to styles and scripts. You can use the nonce attribute within the <script> and the <style> elements. A cryptographic nonce is a randomly generated number that can be used only once, and has to be regenerated for every page request. A nonce can be used by the Content Security Policy of a website to decide if the certain script or style should be applied on the page. In Google Developers’ Web Fundamentals you can read more on the proper usage of nonces and CSP.
Below, you can see a simple code example of how to use the nonce attribute, however note that in a real world scenario its value shouldn’t be hard-coded but randomly generated.
Code example:
<script nonce='adfjaf8eda64U7'>
  // some JavaScript
</script>
6. Create reverse link relationships
You can add the rev attribute to your links again. It was previously defined in HTML 4, however it wasn’t supported by HTML5. HTML 5.1 allows developers to use this attribute again for the <link> and <a> elements. The rev attribute is the opposite of rel, it specifies the relationship of the current and the linked document in the reverse direction (how the current document is related to the linked one).
Code example:
<!-- Current document is the parent of the
linked category.html document -->
<link rev="parent" href="category.html">
The rev attribute has been included in the HTML 5.1 specs primarily to support RDFa which is a widely-used structured data markup format, and extends the HTML language.
Recommended Reading: Improve Your Search Results with Rich Snippets & Schema.org Vocabulary
7. Use zero-width images
HTML 5.1 makes it possible to create zero-width images by permitting developers to use the width attribute with 0 as value. This feature can be useful if you want to include images that you don’t want to show to users, such as tracking image files. Zero-width images are recommended to be used together with empty alt attributes.
Code example:
<img src="yourimage.jpg" width="0" height="0" alt="">
8. Separate browser contexts to prevent phishing attacks
Using same origin links on your website can eventually get you into some trouble. The vulnerability is called the target=”_blank” exploit, and it’s a nasty phishing attack. You can (safely) test how this attack works on this clever Github demo page, and its background code you can find here on Github.
HTML 5.1 has standardized the usage of the rel="noopener" attribute which separates browser contexts therefore eliminates this issue. You can use rel="noopener" within the <a> and <area> elements.
Code example:
<a href="#" target="_blank" rel="noopener">
	Your link that won't make troubles
</a>
9. Create an empty option
HTML 5.1 allows developers to create an empty <option> element. The <option> tag can be the child element of the <select>, <optgroup>, or <datalist> elements. The possibility of having an empty <option> can be useful if you don’t want to suggest which option users should select, and which can be useful when you want to design user-friendly forms.
Recommended Reading: 4 Form Design UX Tips You Should Know (With Examples)
10. Handle figure captions more flexibly
The <figcaption> tag represents a caption or a legend belonging to the <figure> element which is a container for visuals, such as illustrations, photos, and diagrams. Previously, the <figcaption> tag could be used only as the first or last child of the <figure> element. HTML 5.1 has loosened this rule, and now <figcaption> can appear anywhere within its <figure> container.