How to Customize Firefox Reader View for Better Readability
Reader View is a popular feature of the Firefox browser, that changes the appearance of a web page, and makes it more readable by removing visual clutter such as images, ads, headers, and sidebars. Reader View is, however not available, for all home pages.
If the feature is available for a certain page, you will find the icon to enable it in the shape of a small book icon displayed to the right of the address bar.

There are a few built-in options that allow readers to customize the look of the Reader View. We’ll be looking at those options before showing you what you can do to further personalize the look of the Reader View. For demo purposes, I will be using an article by National Geographic article.
Pre-Built Options
Firefox Reader View comes with a few pre-built customization options such as dark, light and sepia backgrounds, adjustable font sizes, and serif and sans-serif typefaces. You can customize the theme by overriding the CSS rules of these pre-existing options.

I use a dark skin with serif fonts, and this means that I will need to override the belonging CSS classes, in my case .dark and .serif.
If you want to customize another theme variant (skin + font), you will need to use the appropriate CSS selectors. You can check these out with the help of the Firefox Developer Tools by hitting F12.

Create the Custom CSS File
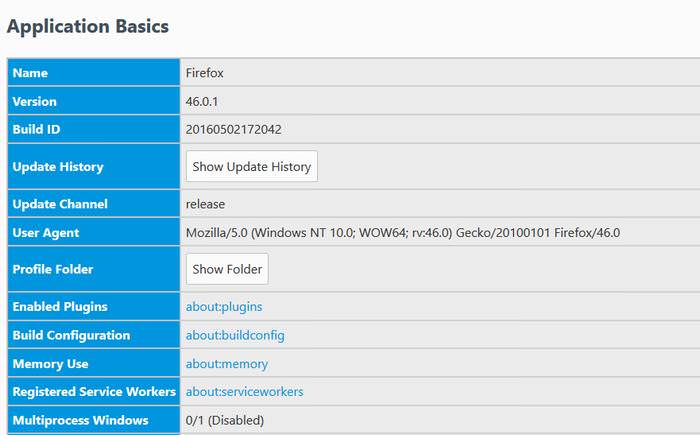
You need to create a file called userContent.css inside the chrome folder of your Firefox profile folder for your Reader View customizations. To find your Firefox profile folder, type about:support into the URL bar and press Enter.
You’ll find yourself on a page that contains the technical data related to your Firefox install. Click the Show Folder button, and it will open your Profile folder.
Create a folder called chrome inside your Profile Folder (if you don’t have it yet), and a file called userContent.css inside the chrome folder. The file path looks like this:
...\Profiles\<your-profile-folder>\chrome\userContent.css
Add the Custom CSS Rules
Once you’ve created and opened userContent.css in a code editor, it’s time to add your CSS rules. In order to customize the design of the Reader View, you need to target the <body> tag with the appropriate selectors.
You can use the following selectors for the different default options:
/* When dark background is selected */
:root[hasbrowserhandlers="true"] body.dark  {
}
/* When light background is selected */
:root[hasbrowserhandlers="true"] body.light  {
}
/* When sepia background is selected */
:root[hasbrowserhandlers="true"] body.sepia  {
}
/* When serif font is selected */
:root[hasbrowserhandlers="true"] body.serif {
}
/* When sans-serif font is selected */
:root[hasbrowserhandlers="true"] body.sans-serif {
}
You can also combine the classes, to target a specific combination of settings.
/* When dark background and serif font are selected */
:root[hasbrowserhandlers="true"] body.dark.serif  {
}
/* When sepia background and sans-serif font are selected */
:root[hasbrowserhandlers="true"] body.sans-serif.sepia  {
}
Do not use the common selector :root[hasbrowserhandlers="true"] body to target all the settings at once. It will work, but it will also affect other browser pages, such as about:newtab, as their root elements also carry the hasbrowserhandlers attribute (which is used to mark the event handlers of internal Firefox pages, such as about: pages).
Here’s the code I added to my userContent.css. I changed the font family, font style, colors, and widened the text container. You can use any other style rules according to your own taste.
/** userContent.css
***************************/
:root[hasbrowserhandlers="true"] body.dark.serif,
:root[hasbrowserhandlers="true"] body.dark.serif #reader-domain {
font-family: "courier new" !important;
}
:root[hasbrowserhandlers="true"] body.dark.serif {
background-color: #13131F !important;
color: #BAE3DB !important;
}
:root[hasbrowserhandlers="true"] body.dark.serif #reader-domain {
font-style: italic !important;
}
:root[hasbrowserhandlers="true"] body.dark.serif h1,
:root[hasbrowserhandlers="true"] body.dark.serif h2,
:root[hasbrowserhandlers="true"] body.dark.serif h3,
:root[hasbrowserhandlers="true"] body.dark.serif h4,
:root[hasbrowserhandlers="true"] body.dark.serif h5 {
color: #06FEB0 !important;
}
:root[hasbrowserhandlers="true"] body.dark.serif a:link {
color: #83E7FF !important;
}
:root[hasbrowserhandlers="true"] body.dark.serif #container {
max-width: 50em !important;
}
Note that it’s necessary to use the !important keyword in userContent.css for all CSS rules. The browser adds user-specified property values before the values specified by the author (the developer of the given web page, here the Reader View).
Hence, any user-specified property value without the !important keyword won’t work if an author-specified stylesheet also targets the same property, as it will be overridden.
Final Result
You can see the changes of my Reader View theme below. Use your own CSS rules to customize the design of your own personalized Firefox Reader View.
Before
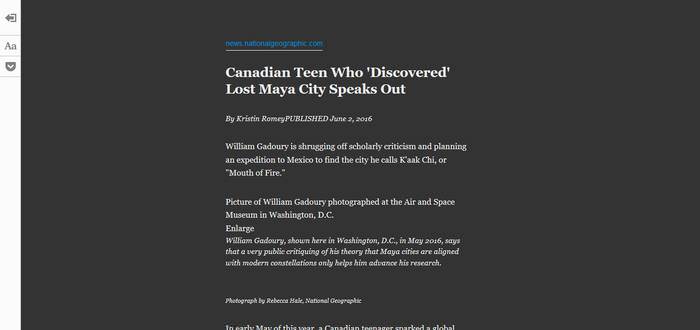
After

If you want to dive deeper in the theme customization of Firefox tools, check out my previous tutorial on the customization of the Firefox Developer Tools theme.