45 Clever Photoshop Tricks You Should Know
Without question, Photoshop is one of the most preferred and most favorite image editing software for graphic designers, digital painters and photographers alike. With each revision, Adobe adds more power to the program.
In this article we will be looking at 45 tips and tricks you can use in Photoshop; the sort of tricks you wish you had known sooner. Some of these tricks are powerful but little know since Photoshop is full of so many features, all seeking recognition in the hands of great designers. Note that some the tricks are dependent on the Photoshop version; they have been specifically mentioned to prevent confusion.
Read more: 20 Free Photoshop Actions designers should have
1. How to Make Merged Vector Shapes Editable
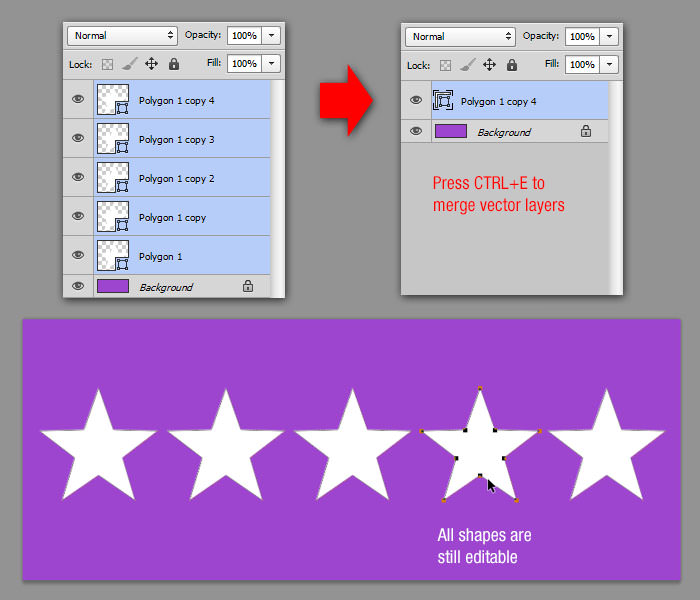
In Photoshop CS6, we can merge two or more vector shape layers together and keep the result as an editable vector. From the layers panel, select both vector layers and hit Cmd/Ctrl + E to merge them quickly.
Early Photoshop versions would result in a rasterized layer, but Adobe updated this functionality for CS6.
2. How to Resize/Rename/Convert a Bunch of Photos
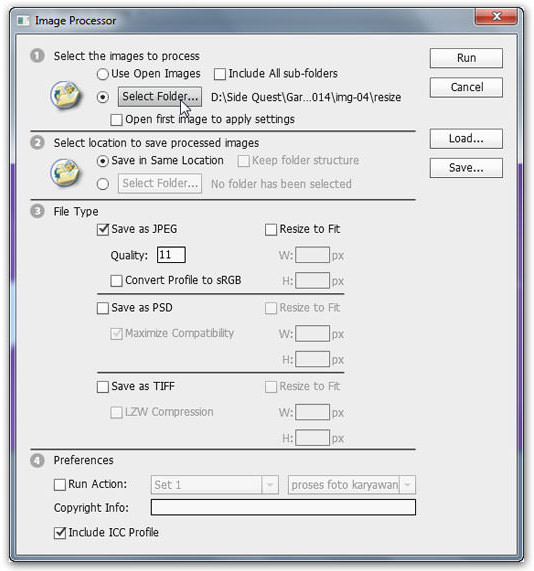
You probably didn’t notice that Photoshop CS2 (and newer versions) have a great tool to convert and process multiple files. Unlike the Batch command, the Image Processor lets you process files without first creating an action.
As a demo, say you want to generate a bunch of low resolution images from your local hard drive to share on social media later.
Go to File > Scripts > Image Processor. Choose the folder with the images you want to resize, specify the output dimensions and click on Run. Photoshop will process your images quickly and save them as a JPEG, PSD, or TIFF.
You also have the option to control the compression or compatibility settings.
3. How to Finish Text Editing Quickly
When working with text in Photoshop, all the shortcut keys won’t work. To quickly finish editing text, simply press Cmd/Ctrl + Return. This will move focus outside the text field, allowing us to quickly select other tools using the usual shortcut keys.

4. How to Cross Two images For A Color Effect
Want to create your own "instagram-like" filter? You can do it by combining photos inside Photoshop.
Open a photo with an interesting color palette, then open up your photo you wish to edit. Go to Image > Adjustments > Match Color menu. Select the photo with the interesting color palette as the source, then play around with Luminance and Color Intensity until you are satisfied with the result. Hit OK and we’re done.

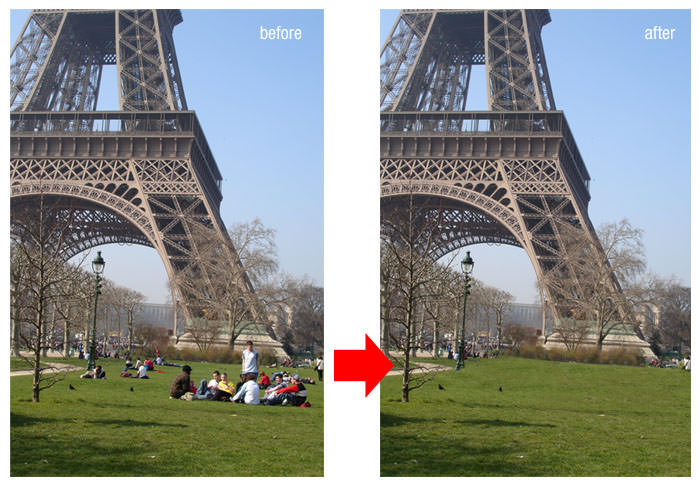
5. How to Remove Unwanted Objects Automatically
Want to remove people and other distracting objects from one of your photos? You can in mere seconds but only you have done this beforehand. With your camera on a tripod, take 15 shots of the same view, spaced 10 seconds from each other.
Inside Photoshop, go to File > Scripts > Statistics. Choose "Median" and then select all the image files you have taken. Photoshop will look at what is different in the photos and remove it.
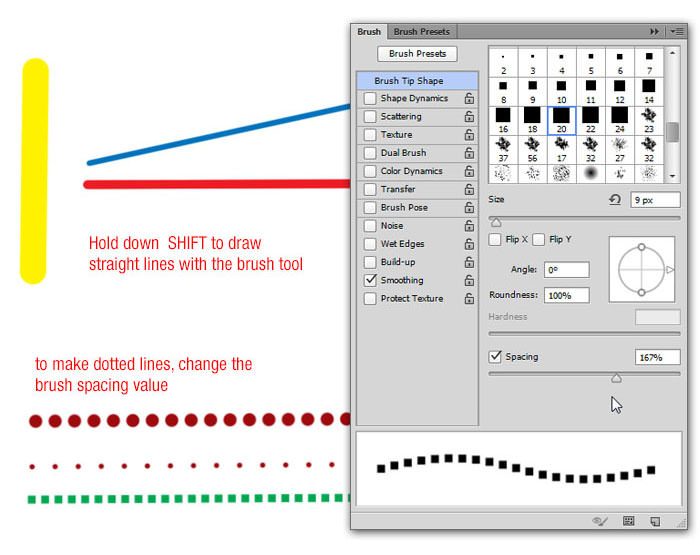
6. How to Draw Straight Dotted Lines Quickly
Using the Brush tool, click to mark the first starting point then hold down SHIFT to create a stright lines. If you need dotted lines, change the brush spacing value to be bigger than 100% in the Brush panel.
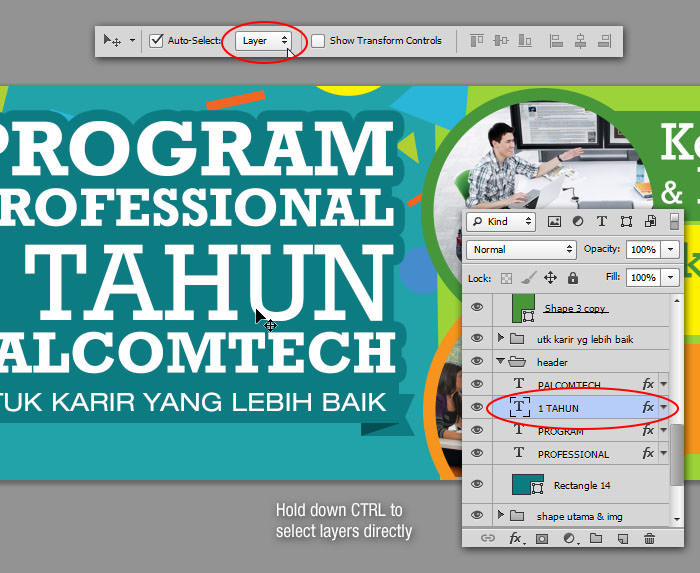
7. How to Quickly Select and Activate a Layer
Hold CTRL while using the Move tool or check the auto-select option. This way, you can select a layer just by clicking it in the canvas.
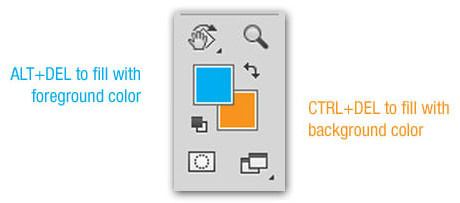
8. How to Fill Layer with Fore/Background Color (Hotkeys)
Press Ctrl + Del to fill layer with background color. Press Alt + Del to fill layer with foreground color.
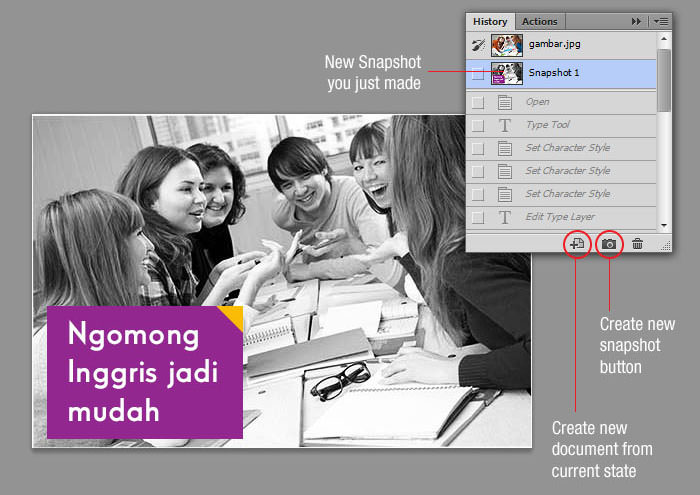
9. How to Backup and Restore your Work on the Fly
If you need to do a lot of manipulation on a particular image but you’re not sure what the final result will look like, you can use this trick. The History palette has limits when it comes to how far back it can go. In its place, use the History Snapshot tool.
From the History panel, click ont he Camera icon everytime you feel like it’s time to "save" your progress. This creates a history snapshot that you can return to at any point. You can even name it by double-clicking on it.
It will all disappear if the document is closed. Oh, and remember that these Snapshots can also be used as the source for the history art brush!
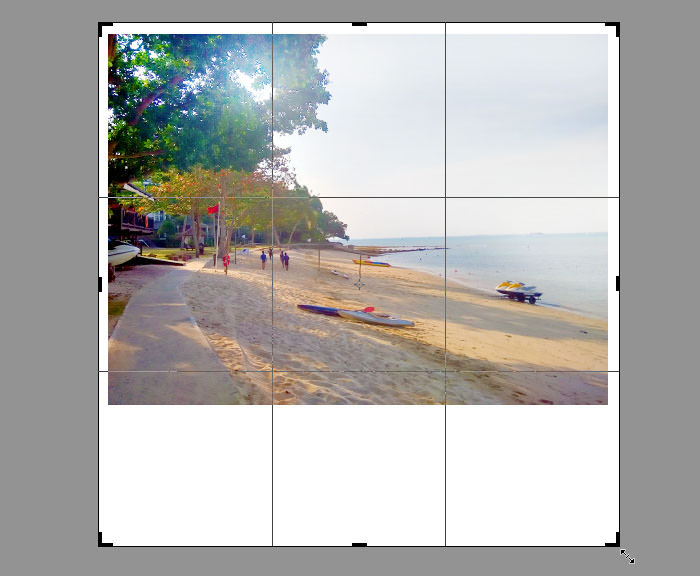
10. How to Expand Canvas with the Crop Tool
Until now, you’re probably using the Crop tool only to crop image. It can also be used to expand a canvas: just pull the crop handles outside of the frame and press Enter to apply the changes.
11. How to Copy and Apply Layer Style Fast
Need a layer style applied to another layer? Just hold the Alt key and drag on the "fx" which indicates the layer styles. The same technique also works if you just want to copy specific layer styles. If you want to apply a layer style onto multiple layers, right click then select Copy Layer Style. Select the multiple layers, then right click again and select Paste Layer Style.


12. How to Toggle Between Open Documents
If you work with more than one document at the same time, pressing Ctrl + Tab to toggle through them quickly.
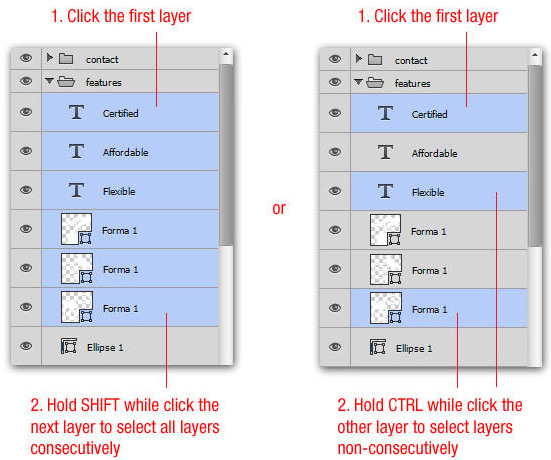
13. How to Select Consecutive or Non-Consecutive Layers
It is possible to select multiple layers in Photoshop CS2 and above. Select a layer and then click another one whilst holding down the Shift Key, this selects all the layers between the two clicked layers.
To select non-consecutive layers, say Layer 1 and Layer 3 and maybe just Layer 6, then just hold down the Ctrl key and click on the layer which you want to select in the Layer Palette. This way, only the alternative layers (i.e only the layers that you want) will be selected.
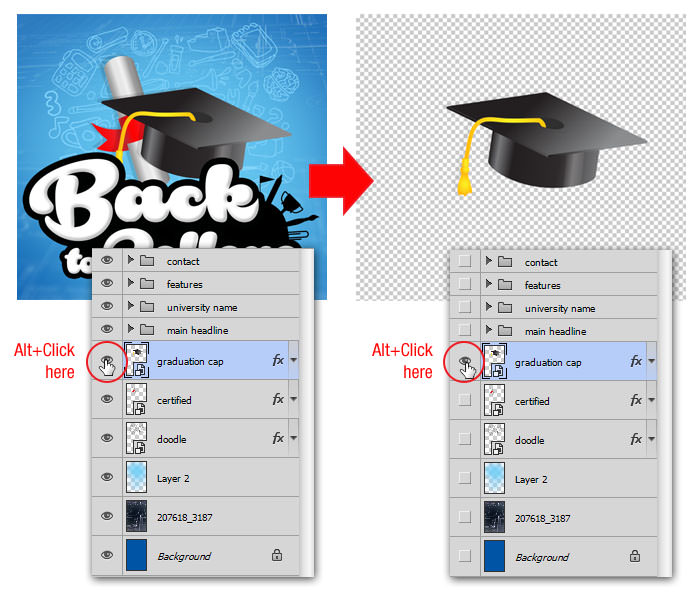
14. How to Show One Layer & Make Others Invisible
When working with tons of layers in a document, sometimes we need to inspect each layer to make sure the content is correct. In case you need to hide all the other layers, hold down the Alt Key and click on the eye icon on the layer palette. This will set all the other layers invisible.
Repeating Alt + click on the eye icon again will return you to the previous layer’s visibility state. Note that if you accidentally click on another layer’s eye icon you’ll lose the ability to revert to the previous state.
Removing Recent Files in Photoshop Home Screen
If you are using one of the latest versions of Photoshop CC, you may notice that at the... Read more
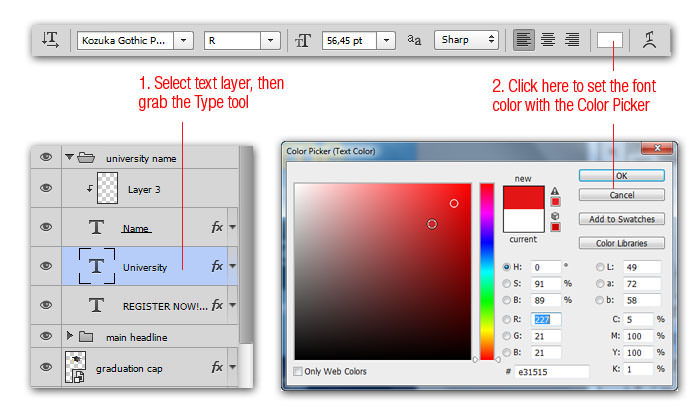
15. How to Change Text Color Without Highlighting It
New users will change text colors by highlighting the text and then picking a new hue by double-clicking the Foreground color. But if you did it this way, you can’t see the color change as the text is highlighted.
One simple solution for this is to not hightlight the text. Just grab the Type tool and make sure the text layer is selected, then click the color square in the Options Bar. As you change the color, you’ll see the type change accordingly.
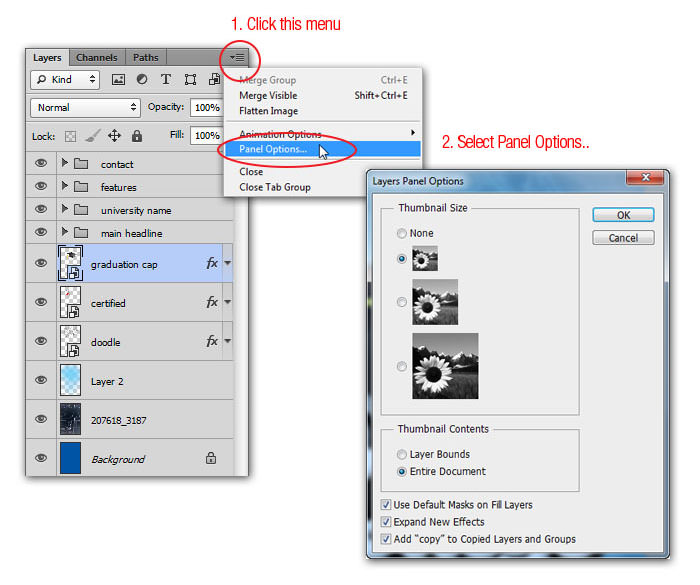
16. How to Access the Hidden Panel Options
Did you know that at the top right hand corner of every panel in Photoshop there is a little icon that reveals a fly-out menu. You can find additional options hidden away here that you might not have seen before.
Click this menu, then select Panel Options. Inside this panel options, You can set thumbnails size to be larger, crop to artwork and much more – experiment with it!
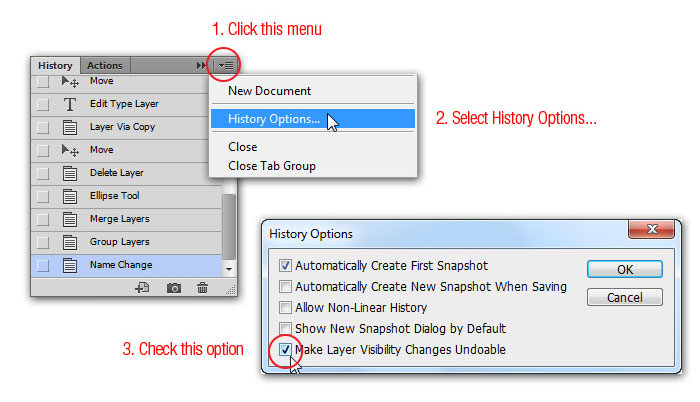
17. How to Keep Layer Visibilty Unchanged
Sometimes we make mistakes, and we try to fix it by checking each layers’ visibility. While going through the changes, we might find ourselves having to Ctrl + Z to get back to a previous state. The problem is the layer visibility has not returned.
To avoid this, check the "Make Layer Visibility Changes Undoable" from the History Options dialog. Once checked, you can use Cmd/Ctrl + Alt + Z to step backwards through your history as you always have, and you’ll find changes to the visibility of layers is now included within the history.
18. How to Hide Palettes, Toolbox & Option Bar Quickly
We can hide all the Palettes, Toolbox and option bar inside Photoshop just by hitting the Tab key once. This is particularly useful when you just want the image to be on the artboard. Hit Tab again to get them all back. If you only want to hide Palettes, hold down the Shift key and hit Tab.
19. How to Alter Values via Mouse Scrub
From CS4, you can scrub your mouse over input values. For instance, if you want to change the opacity of a layer, rather than click into the opacity field of the layers panel, click and drag on the value for opacity. A scrub to the left reduces the opacity, a scrub to the right increases it. This is definitely one of the best time-saving features in Photoshop.

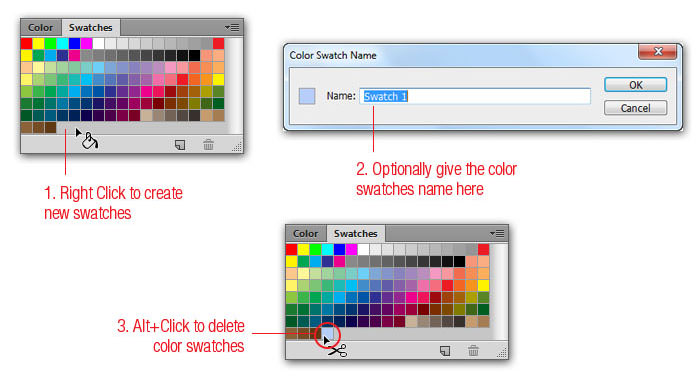
20. How to Add New Colors Inside The Swatch Palette instantly
Photoshop allow us to add new colors to the Swatch Palette but instead of going to the color picker and clicking the "Add to swatches" button, there is shorter way. From the Swatches palette, right click to add a new color instantly. In case you add the wrong color, simply delete it by hold down the Alt key and notice how the cursor changes into a Scissor icon, allowing you to snip the color to delete.
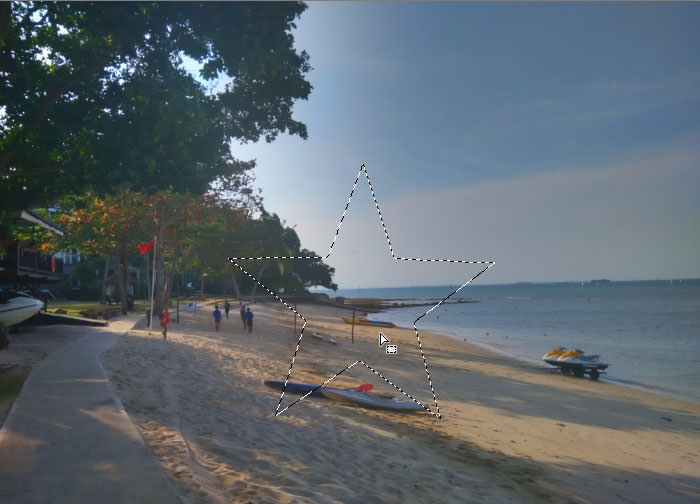
21. How to Move and Transform Selection
After making a selection with the marquee or lasso tools, you might find that you need to move the seletion since it is not properly aligned or because the selection has to be applied on another canvas area.
To move the selection around, hold down the space bar and use the selection tool to move the selection. It works with any selection tool you choose. Alternatively, you can transform a selection by choosing Select > Transform Selection menu.
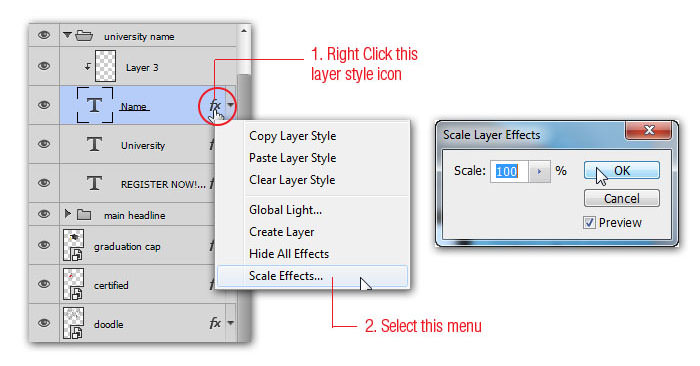
22. How to Scale Layer Style/Effects
If you want to apply a layer style to an object, you can easily adjust how much of a layer style you want applied by right clicking on Layer Style icon (fx) and choosing Scale Effect. In the corresponding dialogue box you can easily scale effects by moving the slider.
23. How to Open Layered File as a Flattened Image
If your file has lots of layers, it can be a time consuming task to wait for all the layers to load. For a quick way to open a flattened version of a file, go to File > Open and find the layered file you want. Before you click the Open button, hold down Shift + Alt. When the dialog to read composite data appears, click Yes. Photoshop will open a flattened version of that file.

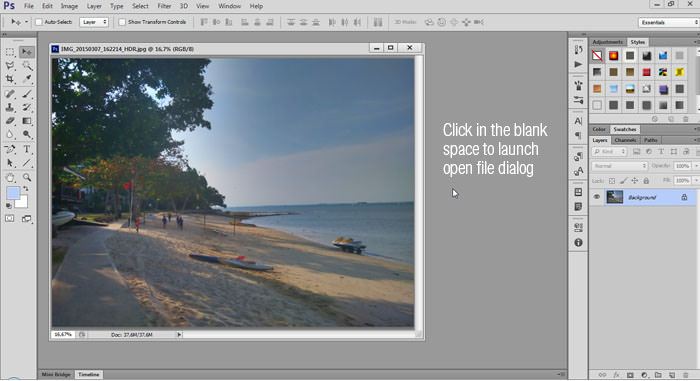
24. How to Open a File Quickly
There are two commonly known ways to open a file in photoshop: File > Open and Ctrl + O keyboard shortcut. Alternatively, we could also double-click on the pasteboard inside Photoshop (the bit outside the main canvas) to automatically bring up the Open dialog box.
Note that in recent versions of Photoshop, because of the multi-tab document interface, this trick will only work if you don’t have another document open.
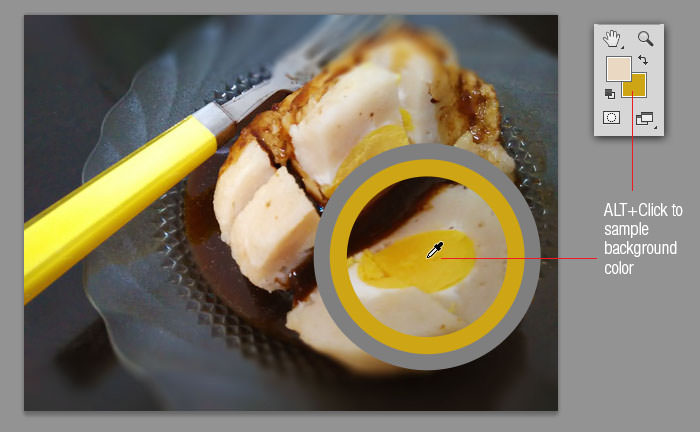
25. How to Sample Background Colors Quickly
I guess you already know that to change the foreground color, you can click a sample color using the Eyedropper tool. What you might not know is that by holding Alt while clicking a sample color this will change the background color.
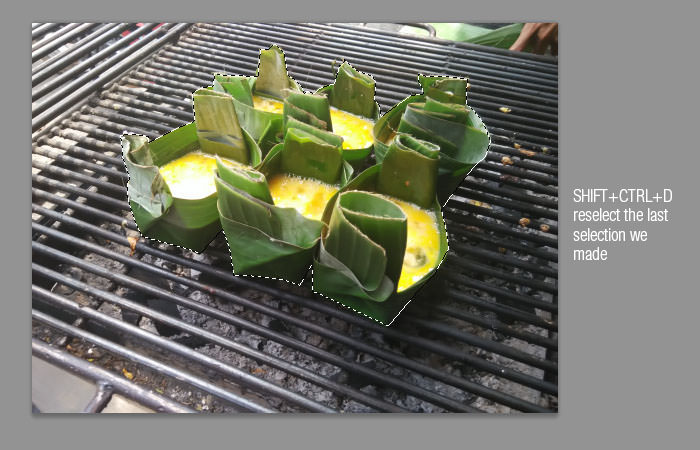
26. How to Get a Selection Back
Ever accidentally lose a selection you have created? The Undo command is not applicable here but you can press Ctrl + Shift + D (Cmd + Shift + D on the Mac) to get the previous selection back.
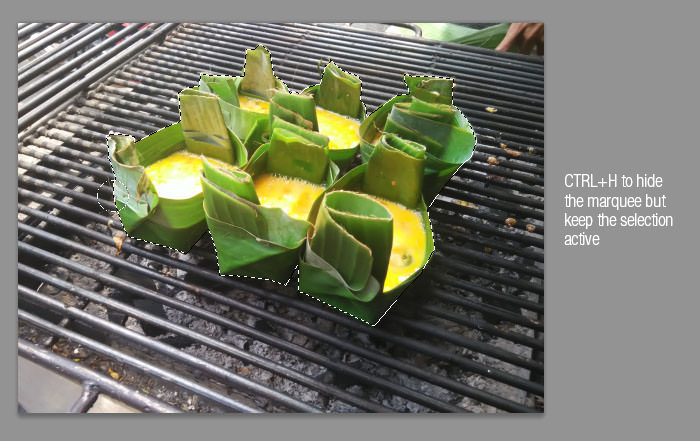
27. How to Hide the Selection But Keep it Active
If the selection marquee animation is distracting your work, hide it with the Ctrl + H (Cmd + H on the Mac) shortcut. The selection is not visible, but it is still there. Don’t forget to turn it back on (press Ctrl + H again) or you might wonder why things aren’t working the way you expect them to work.
29. How to Show Transformation Handles Quickly
Remember when we drag a large layer from one document to another? If the destination document has a smaller canvas, we can’t see the transformation handle when pressing Ctrl + T. To view the transform handle, press Ctrl + 0 (zero) (or Cmd + 0 on the Mac) to shrink the image so the sizing handles are all visible.

30. How to Reveal the Reset Button
Most photoshop dialogs only have a pair of buttons that read OK/Apply and Cancel. Often, you need to hit Cancel and then re-open the dialogue. You can reset many of these modal pop-ups to their original settings or at least some version of the original settings by holding the Alt key (Option on the Mac) when you are inside the dialog. The Cancel button will turn into a Reset button when you do this.

31. How to Access All New Features in New Version
Upgraded to a newer version of Photoshop recently? You might want to catch up with all the new features. Just navigate to Window > Workspace > New in Photoshop CS6. Photoshop will close all the panels and replace them with a panel showing all the new features. In addition, if you now return to the Window menu, you will see various features highlighted.

32. How to Apply The Same Effect to Multiple Files
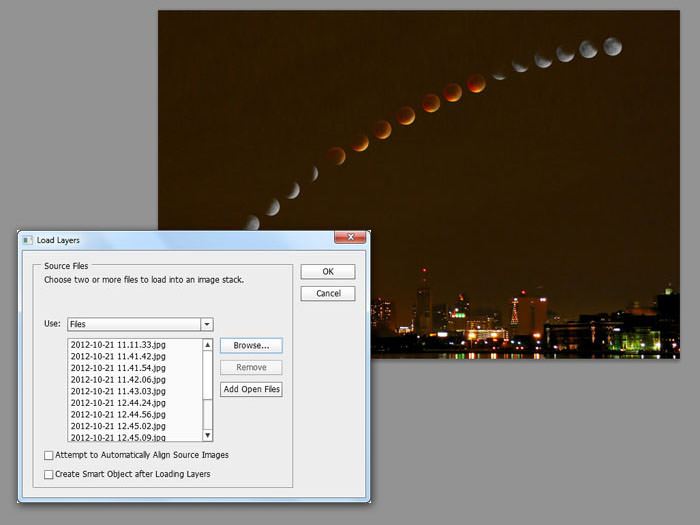
You can load multiple files into a single document then apply effects to the whole stack or selected files of the stack (you can also use a folder). To do so, navigate to File > Scripts > Load Files into Stack.
A clever example to use of this feature is to create star trail photos from several images shot at one location. Just loads all the images, selects all the layers (with the exception of the background), and choose ‘Lighten’ for the blending mode. This produces the star trail effect you want.
33. How to Make an Image Bigger With No Quality Loss
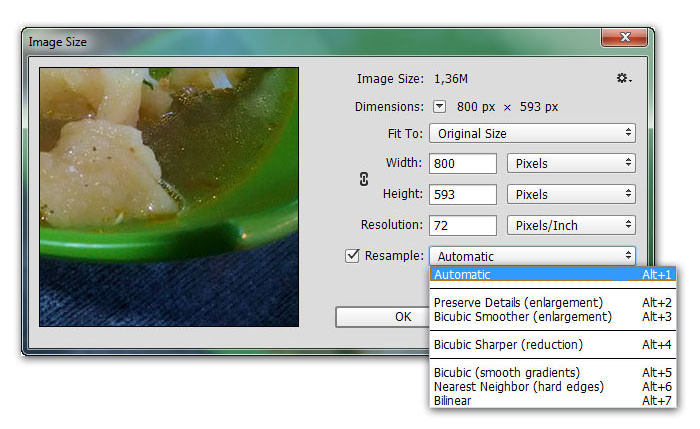
In the past, increasing image size would blur and generate artifacts. Fortunately, there is a new feature In Photoshop CC that allows us to increase bitmaps size with minimum quality loss.
To activate it, navigate to Image > Image Size. In the screen shot below, note the Resample option at the bottom of the dialog box. This gives you many options for controlling the quality of the image as you increase the size. In case you need more information on the subject, here is a link to an Adobe Photoshop tutorial on this subject.
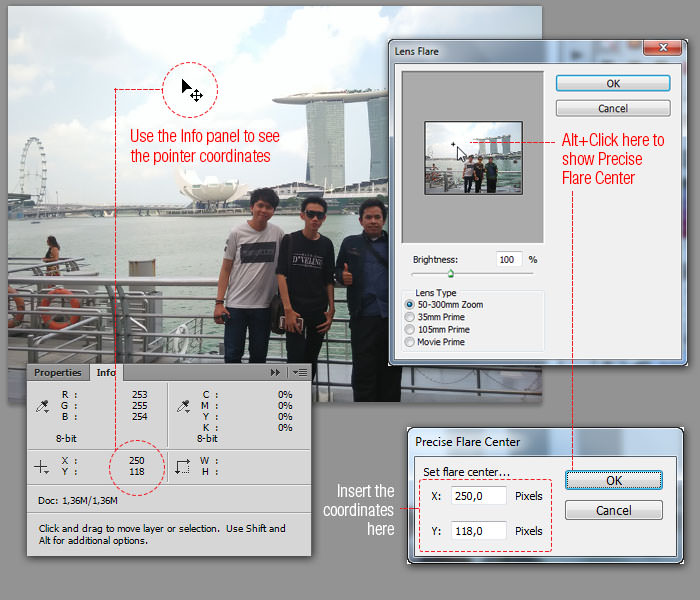
34. How to Add A Precise Lens Flare Placement
When using the Lens Flare filter, you can bring up a special "Precise Flare Center" window to set the exact lens flare location in your image. To do so, hold the Alt key while clicking the preview box. To make this box useful, you should know the coordinates (see pointer coordinates in the info panels). Note that because the Precise Flare Center uses pixels, you should change your document unit into pixels to use it.
35. How to Generate High Contrast Clouds Filter
Usually to get the clouds effect, we go to Filter > Render > Clouds. But if you hold Alt when go through the Filter > Render > Clouds menu, you will get the high contrast clouds instead of the usual clouds layer.

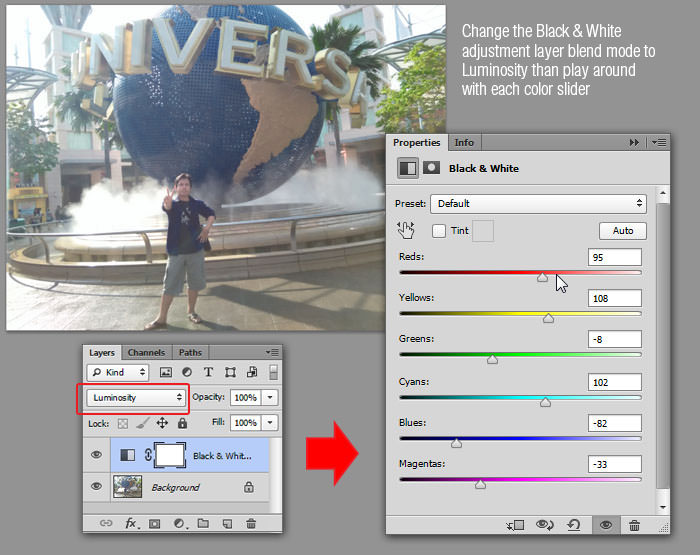
36. How to Use Color Control with the Black & White Adjustment Layer
You can use the Black & White Adjustment Layer to control the luminance of specific colors in your photo. Open your photo, then create a new Black & White adjustment layer. Change the blend mode to Luminosity. Now if you play around with the Reds value, only the red hue will be affected.
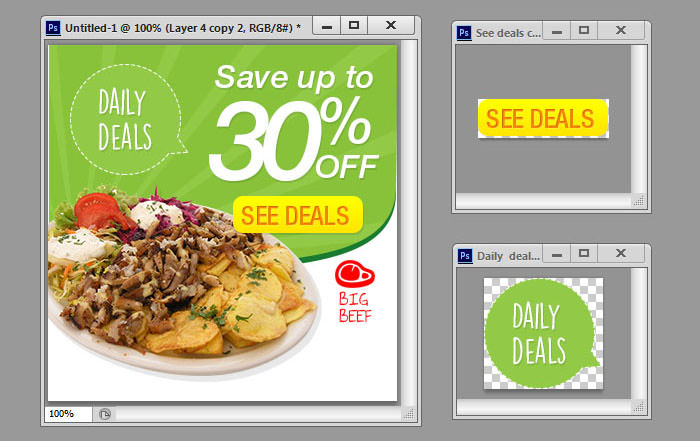
37. How to Open the Same Document In 2 Windows
Do you know that Photoshop allows us to have the same photo opened in two windows side-by-side, with one view zoomed in and one view zoomed out? To do this, navigate to Window > Arrange > New window for [document name]. Both windows will display the same document, so whatever you do would affect both of them.

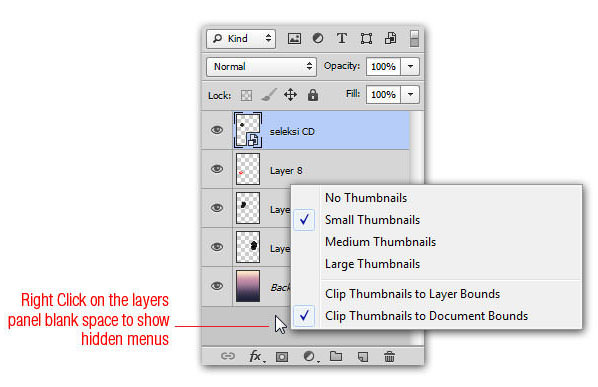
38. How to Clip Thumbnails to Layer Bounds
Thumbnail sizes in the Layers panel can be easily customized at any time. Right click on a layer thumbnail, select Clip Thumbnails to Layer Bounds if you want to see only the layers’ content for each layer’s thumbnail; use Clip Thumbnails to Document Bounds if you want to see the whole canvas.
Alternatively, you could apply the same setting for all layers by right clicking in the blank area inside Layers panel and selecting the aforementioned menu.
39. How to Use Smart Objects
When you want to do non-destructive workflow in Photohoshop, smart objects are essential elements. Smart objects not only save the original resolution of layers, they can also be used for grouping layers together and thus preventing clutter in the layers’ panel.
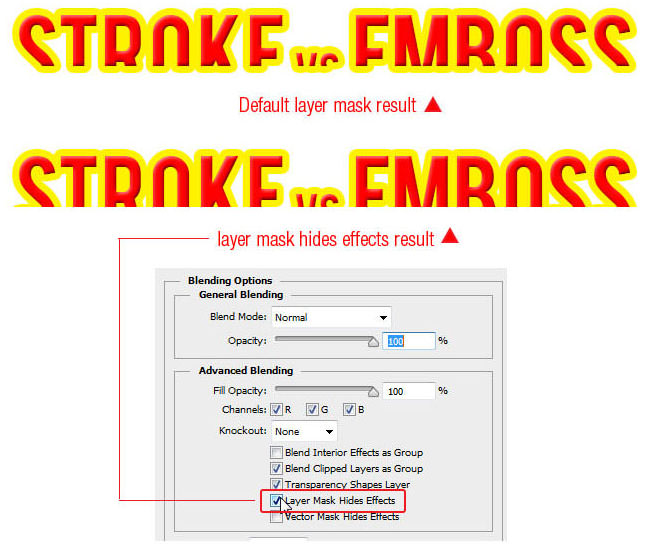
40. How to Make Masking Effect Affect Layer Styles
When you do masking on a layer that has applied layer styles in it, notice that your masking doesn’t affect those layer styles. This could be useful or annoying depending on what you want to achieve as the result.
In case you want the masking to affect layer styles, right click on the layer then select Blending options. Check the Layer Mask Hide Effects option. Click OK and you’re ready to go.
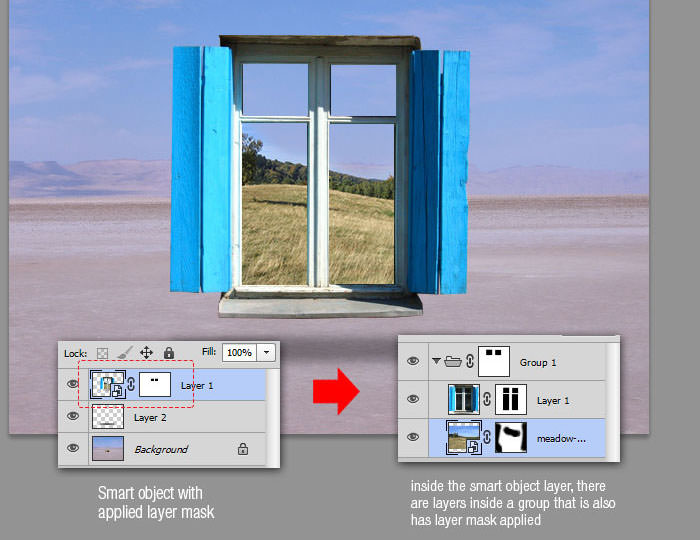
41. How to Use Multi-Level Masking
It is possible to apply several Layer Masks on the same layer. To be exact, you can go up to 11 pixel masks and another 11 vector masks using Layer Groups with masks applied to them. That’s 22 masks in total, but note that we have not even started creating Smart Objects yet.
You probably will not need that many masks for the same layer, but you might find it useful to separate different parts of your mask. For example we can separate the inside and outside of this window into two layer masks.
42. How to Change Measuring Units Fast
Photoshop allows us to set measuring units when creating a new doucment. But sometimes in the process, we need to switch between different units. Usually we have to select the options Photoshop > Preferences > Units & Rulers (or, on a PC, Edit > Preferences > Units & Rulers).
But there is a quicker way! Just right-click on a ruler (Cmd/Ctrl + R to show your rulers if they’re not already visible) and choose the new measuring unit you need.

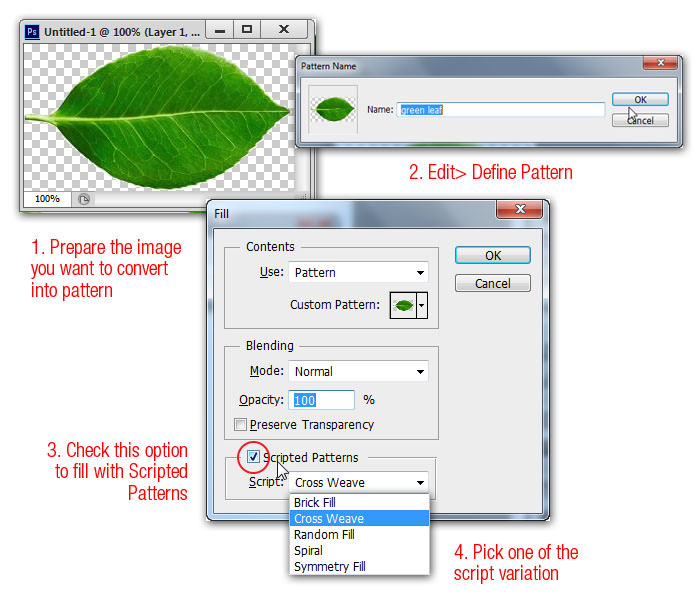
43. How to Fill With Scripted Patterns
In Photoshop CS6 and above, there is a new pattern fill option based on a script. When you finish isolating an object on a transparent background and have defined it as a pattern (Edit > Define Pattern), navigate to the fill command as you normally would (Edit > Fill or Shift + F5). Choose Pattern as the fill type, then select your isolated object from the pattern drop-down.
Finally, tick the Scripted Patterns checkbox and choose one of the options from the predefined scripts. All bar spiral will add a colour and brightness shift randomly to your object as part of the fill operation. If you have the time and knowledge, you can write your own scripts to use in this dialogue.

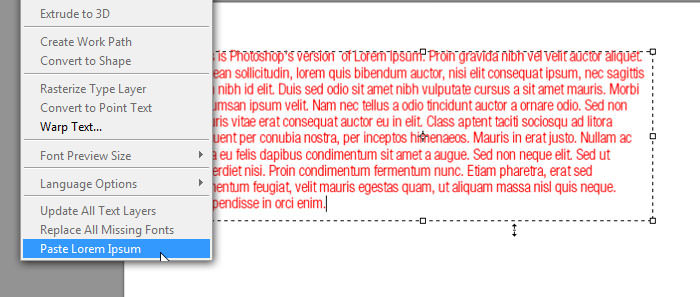
44. How to Automatically Insert Placeholder Text
I like that in Photoshop cs6 and above, there is this small new feature that automatically fills your type area with placeholder text (lorem ipsum). Definitely a time saver when producing mockups inside Photoshop. To use it, first, draw an area type box by clicking and dragging out a selection. Now choose Type > Paste Lorem Ipsum.
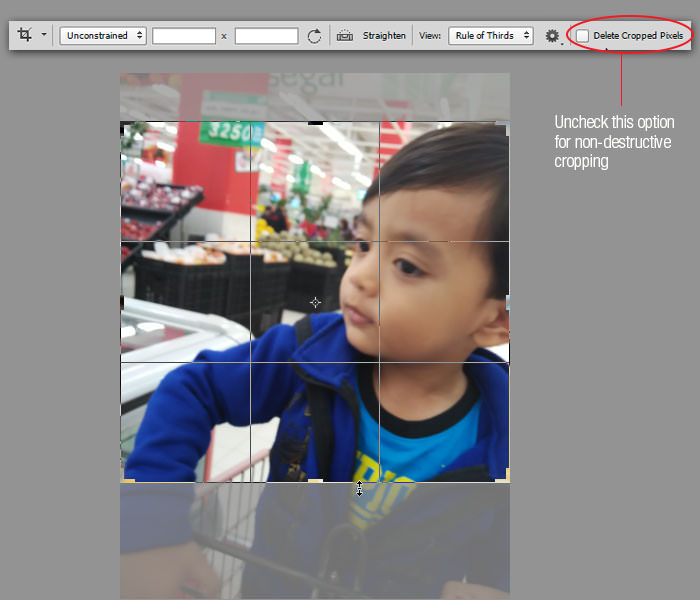
45. How to Enable A Non-Destructive Crop tool
In Photoshop CS6 and above you no longer have to lose the parts of an image that didn’t make the Crop cut. If you choose the Crop Tool and uncheck the new Delete Cropped Pixels option, you can apply cropping to any image without fear that what is cropped out will disappear. To access areas outside the cropzone, just choose the crop tool again and adjust your crop size accordingly.