Auto-GPT: What It Is and How to Install and Use It
Auto-GPT is an open-source project available on GitHub that facilitates communication among different GPTs, allowing agents to function autonomously and complete tasks with minimal or no human intervention.
Unlike the ChatGPT that we commonly use, where we submit one prompt at a time and receive a response before moving on to the next prompt, Auto-GPT operates differently. When given an assignment, it uses a combination of prompts to execute the task.
What Auto-GPT Does?
To provide a clearer perspective, let’s consider the scenario of organizing a birthday party for a child. With Auto-GPT, you can simply specify your requirements, such as the number of attendees (50 adults and children) and the distance from your location (within 5 kilometers), and it will generate a task list accordingly.
Auto-GPT will then search for suitable venues in the vicinity that are child-friendly, create a schedule, set a budget, and even generate a checklist to streamline the planning process. Its objective is to complete all the tasks on the list, adding new ones as each is completed.
In short, Auto-GPT takes care of all the details involved in planning the event, allowing you to review and proceed with the given information.
The current state of AI goes beyond simple question-and-answer prompts, as it now has the capability to handle complex tasks and adapt its task list based on prior interactions.
We have reached a stage where AI can be likened to a personal assistant, capable of managing intricate tasks and ensuring their successful completion.
Installing Auto-GPT on a Mac: A Step-by-Step Guide
1. Install Homebrew
First, you will need Homebrew. If you haven’t installed it on your Mac, here’s how to do it:
Go to the Homebrew website, copy the link provided under “Install Homebrew,” paste it into your Terminal, and press Enter.

This will display what will be installed. Press Enter again to proceed.
Note: The installation process is going to take a while.
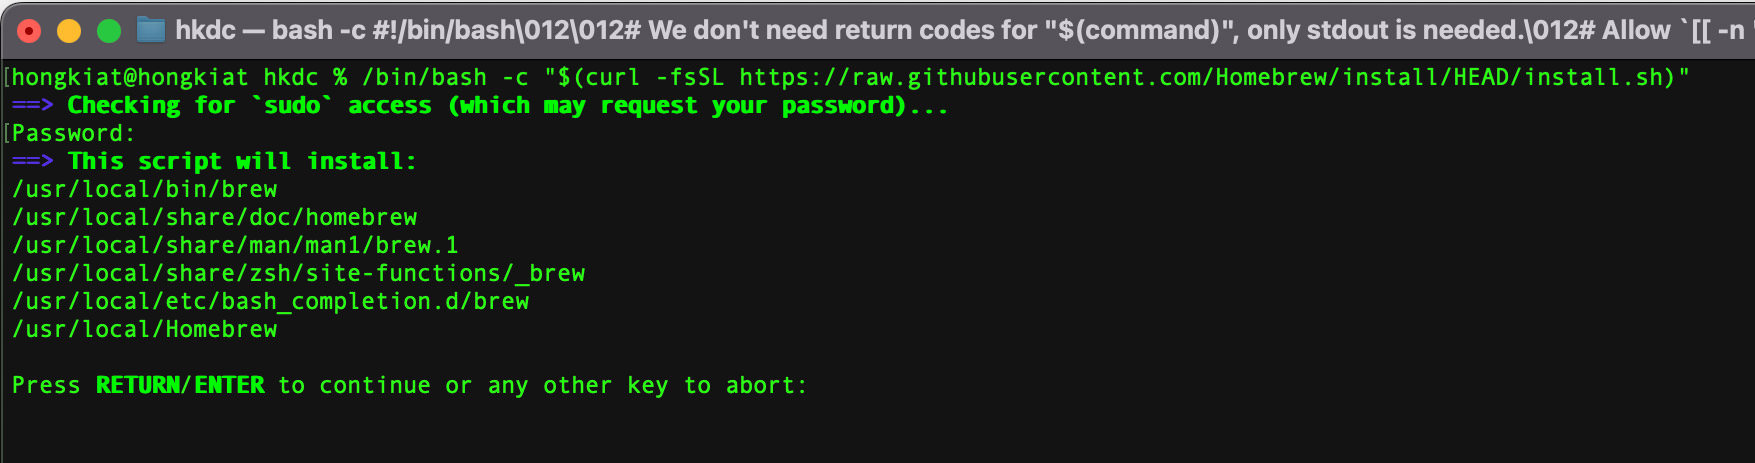
After it’s finished, paste the following command into the Terminal and press enter. You should see something similar to the screenshot below, confirming that Homebrew is now installed.
brew --version

2. Install Git
Next, we need to install Git. Here’s how to do it:
In the Terminal, enter the following command and press Enter:
brew install git

Note: Alternatively, you can visit this page for additional methods of installing Git on your Mac.
After installing Git, paste in the following command.
git --version
If you see a Git version, it means Git has been successfully installed.

3. Install Python
Now, we need to install Python on your Mac. Follow the steps below to install Python:
In the Terminal, paste the following command and press enter:
brew install python

Once it’s finished, paste the following command into the Terminal and hit Enter.
python3 --version
If it returns a version of Python, it indicates a successful installation.

4. Install Auto-GPT
Now that everything is in place, it’s time to download and install Auto-GPT.
Head over to Auto-GPT’s github page, click the “Code” button and copy the HTTPS link.

Now, in the terminal, type git clone followed by the URL you just copied and press Enter. This will create a copy of Auto-GPT on your computer. The complete command should look something like this:
git clone https://github.com/Significant-Gravitas/Auto-GPT.git

5. Configure Auto-GPT
Once Auto-GPT is downloaded, it’s time to configure it.
In your Terminal, type the following command and press Enter to navigate to the Auto-GPT folder:
cd Auto-GPT

Inside the folder, type the following command and press Enter. This will install all the necessary dependencies for Auto-GPT:
pip3 install -r docs/requirements.txt

6. Get an API from Open AI
While the installation is in progress, you can visit OpenAI’s website to obtain an API. However, in order to obtain an API, you must first create an account by signing up.
Go to https://platform.openai.com/account/api-keys and then click on “Sign up“.

Once you have signed up, log in and click on “API keys” on the left sidebar.

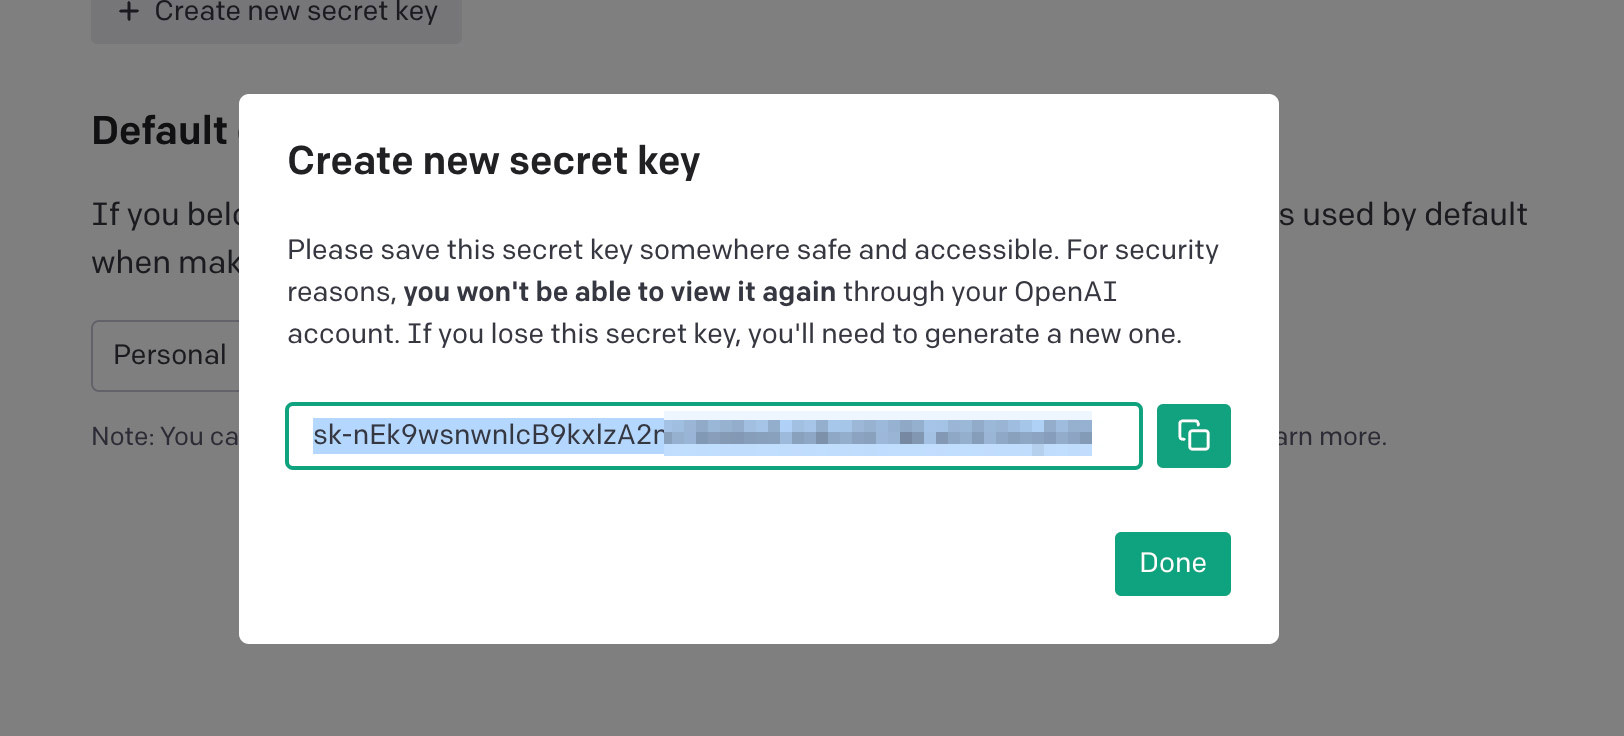
Click on “+ Create a new secret key“, provide a name for it, and then click on “Create secret key“.

You will then be provided with a secret key. Click on “Copy” to copy the secret key to your clipboard.
7. Edit .env.template
Launch your favorite code editor and open the file named “.env.template” inside the Auto-GPT folder.

Look for the following line:
OPENAI_API_KEY=your-openai-api-key
Replace your-openai-api-key with your API key, enclosed in double quotes (“”). It should look something like the following:
OPENAI_API_KEY="sk-nEk9wsnwnlcBxlzA2mT3BlbkFJBF4D1F9y3l0l"
Now, save the file as “.env“.
Note: You opened the .env.template file, but will now save it as .env.
8. Running Auto GPT
That’s it! Now, go back to the Terminal and make sure that you are still inside the Auto-GPT folder. Type in the following command and hit Enter to run Auto GPT on your Mac.
python3 -m Auto-GPT
