How to Set Up and Print Wirelessly with Google Cloud Print
Printing is usually the last step in preparing documents. However, you might not always have quick access to a printer, or you may have multiple devices with only one connected to the printer, requiring you to ‘hijack’ the plugged-in device just to get your stuff printed. When did printing become such a hassle?
Wouldn’t it be easier if you could connect all your devices — including your tablets and phones — to one particular printer and print straight from any one of the devices, from anywhere, as long as you’re connected to the Internet?
This can actually now be done with the help of Google Cloud Print (GCP), a cloud service by Google that connects your printer with multiple devices via cloud connect, so you can print from any of your devices. With GCP, you do not have to worry about installing a printer driver on your computer, which can be a hassle when it is not supported by certain operating systems or versions.
How Google Cloud Print Works
GCP works as a platform to submit and manage print jobs via the Internet cloud. Printing jobs can be sent from multiple platforms, whether from a native computer, mobile app, or web app. When a printing job is sent, GCP is responsible for sending these instructions to the designated printer, selected by the user.
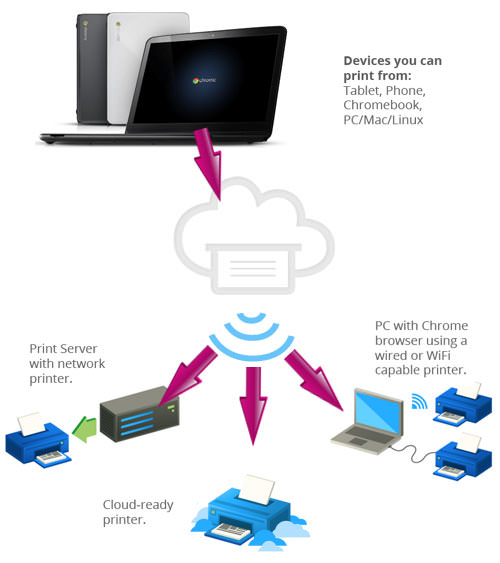
Using GCP over a secure HTTPS web connection keeps your contents safe and makes it very convenient to send printing jobs from various devices, not just a computer. Additionally, you get to share printer usage with your friends and colleagues. In an office setting, the management can invest in one better printer rather than several average-quality ones.
Using Google Cloud Print
To start using GCP, you need to connect your Google account to the service. You first need to have Google Chrome installed on your computer, whether it is a Mac or PC. Windows XP users need to have the Microsoft XML Paper Specification Pack installed together.
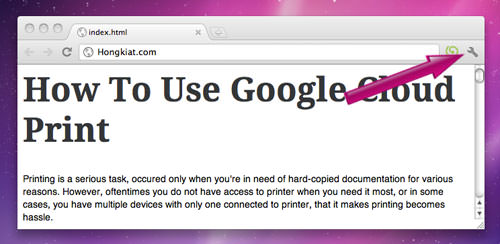
1. Launch Google Chrome
Once you have Google Chrome installed and launched, click on the wrench icon at the top right corner of the browser, next to the address bar, and look for the sub-menu ‘Options’ (or ‘Preferences…’ if you are on a Mac).
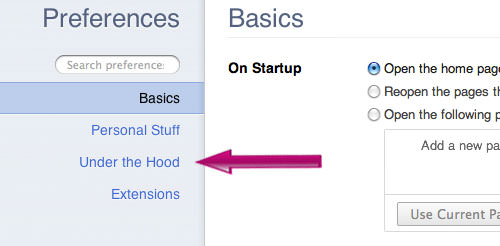
2. Under the Hood
In the Options/Preferences window, go to ‘Under the Hood’ on the left menu.
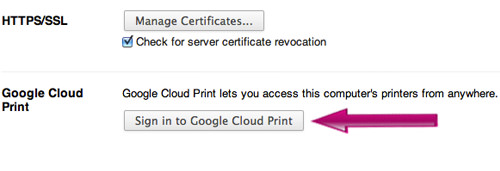
3. Sign in to Google Cloud Print
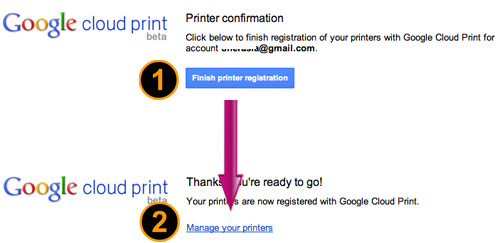
Under the Hood, scroll down to the bottom of the page and click on ‘Sign in to Google Cloud Print’.
Proceed to manage your printers.
4. Connect to Printer
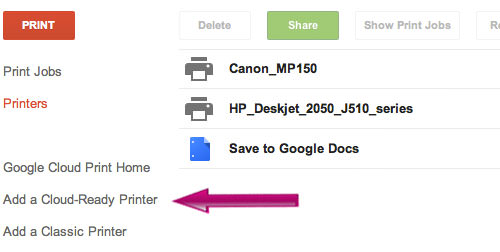
If you are using a standard printer, consider your job done. GCP recognizes almost any type of printer, so when you click on ‘Manage your printers’, you will see your printer already listed and ready for use.
But if you own a Cloud-Ready printer, you need to first register it on the product website before you can use the GCP service. Click on the ‘Add a Cloud-Ready Printer’ menu on the left.
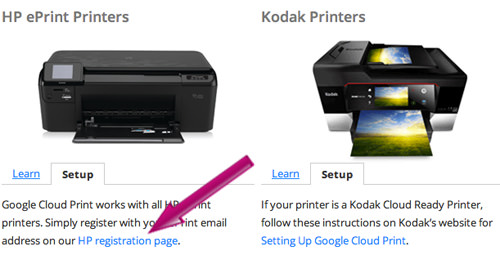
You will be redirected to a page with instructions to add these printers, along with links to the registration page. Simply follow the instructions and enter the email address registered with the product.
5. Share Your Printer
One of the great features provided by GCP is the ability to share your printer with others. To start sharing printer usage or to authorize other users to use the printer, highlight any printer from your list and click on the green ‘Share’ button.
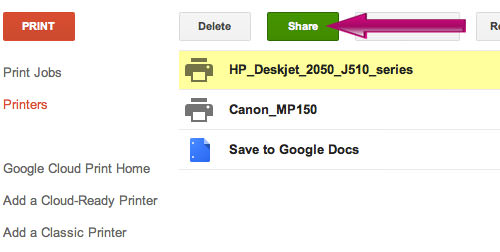
A small window will pop up. Simply type in the email of the person you want to authorize to use your printer, and click ‘Share’.
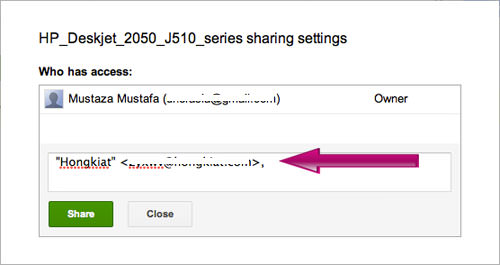
You will be able to see the name of the person in the list. Note that you can remove authorized persons at any time.

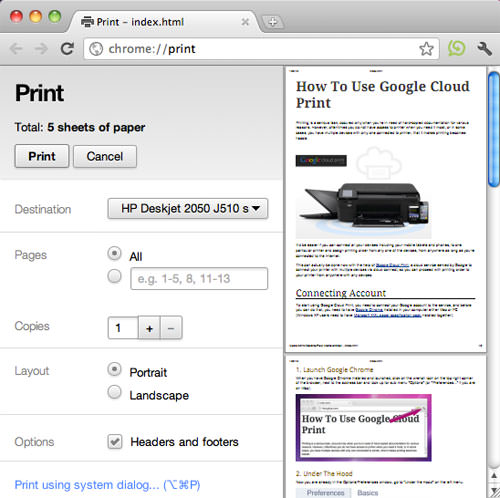
6. Start Printing!
Your printer is now connected to GCP, and you can start printing from anywhere as long as you are connected to your Google Account on Google Chrome. Whether it’s your own printer or a friend’s, printing is simple as long as the printer is listed in your GCP account.
To start printing from your Chrome, press Ctrl+P or select ‘Print’ from the wrench menu. A new window or tab will appear with printing details and a preview. Click on the ‘Print’ button, and the printing job is sent to be executed.
Conclusion
Google Cloud Print has made printing easier and more accessible. Printing requests can now be sent from many associated Google Apps, not limited to Google Chrome. You can also give printing instructions from many available apps, such as:
- PrintCentral Pro on iOS devices,
- Mobile Google App from mobile platforms, and
- many more apps for Android such as PrinterShare and Easy Print.