Photoshop-Style Rulers and Guides for Web Design with RulersGuides.js
One of the best things about Photoshop is its easy-to-use guide lines that can be pulled from the rulers. Those guides can make the designing process a lot easier when it comes to positioning an item and getting the balance just right.
Much to our delight, Mark Rolich has implemented this particular feature for use on the Web. He has created RulersGuide.js based on Photoshop’s rulers and guide lines.
RulersGuide.js has the ability to add a Photoshop guide line style interface onto a web page. Lines that have been created can be saved for future use as well. It provides you with three usage options: as a javascript library, as a bookmarklet or as a Chrome Extension.
The Javascript
RulersGuide.js requires some other dependencies to work well. As it works via dragging and dropping lines into the page and requires some event utilisation, you’ll need to add Dragdrop.js (available here) and Event.js (available here). Then, include those dependencies along with the RulersGuide.js source (download here) like so:
 <script type="text/javascript" src="js/Event.js"></script>
 <script type="text/javascript" src="js/Dragdrop.js"></script>
 <script type="text/javascript" src="js/RulersGuides.js"></script>
If you don’t like the default style, you can edit its CSS to suit your taste. Then, initialize those packages with the following script:
 <script type="text/javascript">
 var evt = new Event(),
 dragdrop = new Dragdrop(evt),
 rg = new RulersGuides(evt, dragdrop);
 </script>
Bookmarklet And Chrome Extension
For convenience, you can use this tool as a bookmarklet or Chrome extension and open it whenever and wherever you want.
Bookmarklet Installation
For the bookmarklet, just install it as usually you do. Since Internet Explorer sometimes works in a different way, this tool accommodates that by differentiating the bookmarklet installer for the IE and Non-IE user. Simply drag and drop the appropriate link below to your bookmarklet bar.
Chrome Extension Installation
If you are a Chrome lover, you might like this option. Unfortunately, RulersGuide is not yet available in the Chrome Webstore. The only choice is to install it manually.
First, grab the extension file here. The browser will ask you to confirm the file; just hit continue. The extension won’t be automatically installed because Chrome has its security protocol to keep you safe.

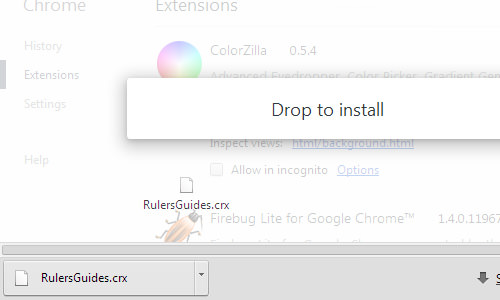
Open it by navigating to Option > Tools > Extensions or open a new tab then copy and paste chrome://extensions into the address bar. Then, drag and drop the downloaded RulersGuide.crx file to the extension page as shown below.
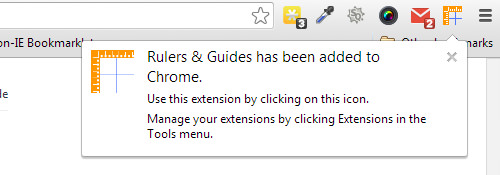
The extension is now ready.
Working With RulersGuide
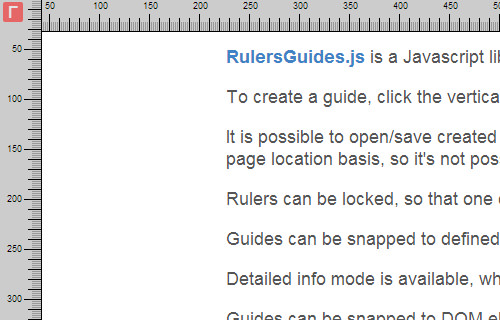
As mentioned, RulersGuide works exactly like the Photoshop ruler and guide line. When you enable this tool, you’ll get rulers at the top and left side of your browser. You can pull out some lines from those rulers.
And in the top left of the page, you can get more options from the available menu. From this menu, you can customize whether you want the lines to be shown, saved, locked and more.
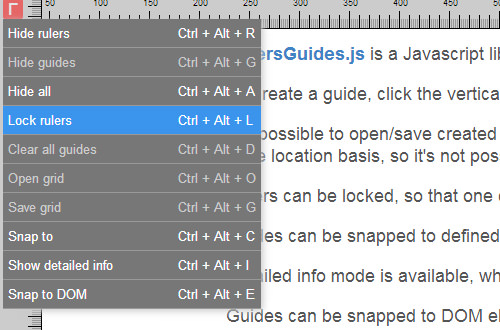
Let’s get to know the options better.
- The hide option is used to hide both rulers and guides as you desire. Even when the rulers are hidden, you can still see the menu option.
- If you hit Unlock, the rulers will stay visible in the page as you scroll. Clear all guides is useful when you want to erase all the guides you’ve made.
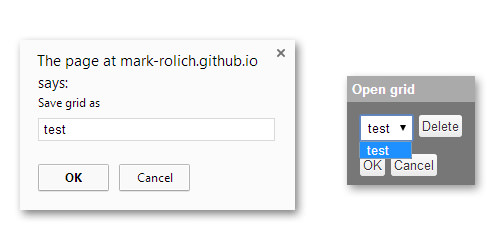
- The Save grid option is used to save the grid you’ve made. The grid will be saved based on page location, so you may not use the same grid on other browser windows/tabs. And as one would expect, the Open grid option is to open your saved grids.
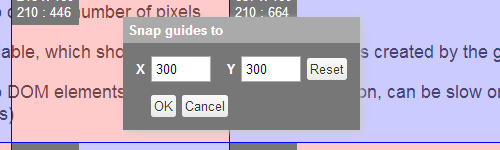
- When you hit Show detailed info option, the detailed info mode will be enabled. It can show you the position and size of regions of the grid you create as well as any changes you make to the guide’s position.

- The last one is the snapping option. This is what I like about RulersGuide. You can snap the guides to the DOM element or use it with the defined pixel size. Note that, the Snap to DOM option is still in its experimental stage at the time of writing. It may slow down or be unresponsive on a page with many elements.
Conclusion
Unfortunately, there’s still a slight drawback. It can’t remove a single guide like in Photoshop. You can only remove all guides, and sxtart creating them from scratch. Still, if you work on web layouts frequently on browsers, then this tool is for you.