How to Use <DETAILS> and <SUMMARY> HTML Tags
Among several new tags that are available in HTML5, Specifications (such as: figure, figcaption, and aside), detail and summary tags, in my opinion, are the most useful. With these new tags you can hide some of the long content and display only the summary.
We actually often see this effect around, but most of them are still built upon JavaScript or its brother: jQuery, which most people don’t understand. Now, with these new elements – details and summary – things will get easier.
So, let’s see how tags work in a real case scenario.
Beginner’s Guide to Building HTML5/CSS3 Webpages
Learn how to build stunning webpages using HTML5 and CSS with this step-by-step guide. Perfect for beginners and... Read more
In this demo we are going to summarize a product description. First let’s create a ‘details’ tag and then put all the content along with the ‘summary’ tag inside it, like in the example below:
 <details>
 <summary>MacBook Pro Specification</summary>
 <ul>
 <li><strong>13.3-inch LED-backlit glossy widescreen display</strong> with edge-to-edge, uninterrupted glass (1280 x 800-pixel resolution).</li>
 <li><strong>2.4 GHz Intel Core i5 dual-core processor</strong> with 3 MB shared L3 cache for excellent multitasking.</li>
 <li><strong>Intel HD Graphics 3000</strong> with 384 MB of DDR3 SDRAM shared with main memory.</li>
 <li><strong>500 GB Serial ATA hard drive</strong> (5400 RPM)</li>
 <li><strong>4 GB installed RAM</strong> (1333 MHz DDR3; supports up to 8 GB)</li>
 </ul>
 </details>
In that example, I’ve added MacBook Pro specification detail, and now let’s see how the browser renders those tags.
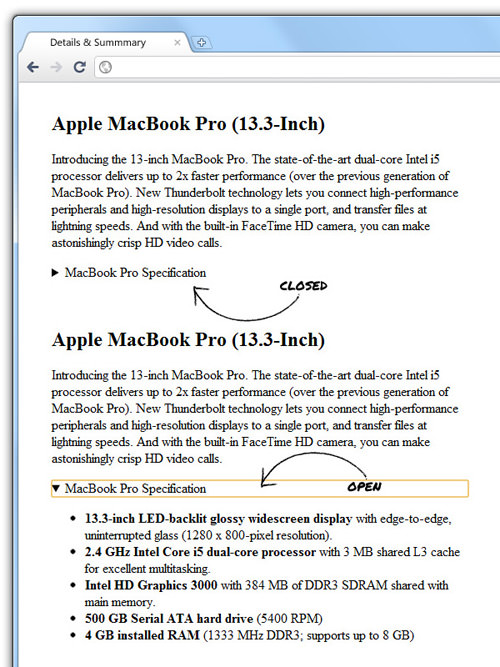
I also have added a title and more descriptions of the product above the details to make the above demo more sensible to you. So, what do you think? It’s quite easy, right?
Browser Supports
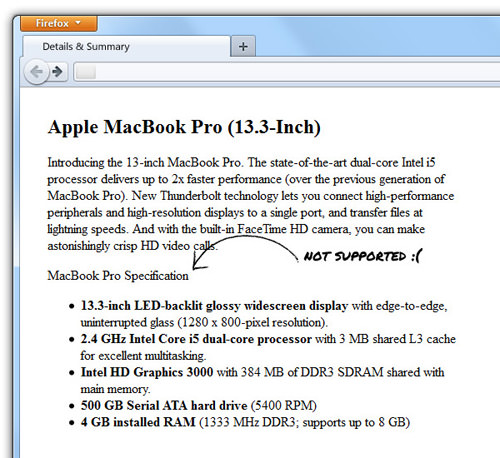
However, before you rush to apply this tag to your entire website, it should be noted that the details and summary tag is currently only supported on Chrome 12 and above.
Even the latest Firefox doesn’t support them yet.
So, if you want to apply this tag, you need to include a fallback function for unsupported browsers. The good news it, it’s simple; you can use this details polyfill, which will automatically replicate the tag functionality for old browsers.
Download this file and link it to the html document along with the jQuery (1.7+ at minimum) and make sure you place the polyfill before the close body tag.
And inside the head tag, insert the following conditional tag to include HTML5shiv for IE8 and earlier, otherwise the Internet Explorer will not recognize these new tags.
<!--[if lt IE 9]><script src="http://html5shiv.googlecode.com/svn/trunk/html5.js"></script><![endif]-->
Now let’s see how it turns out in Internet Explorer:
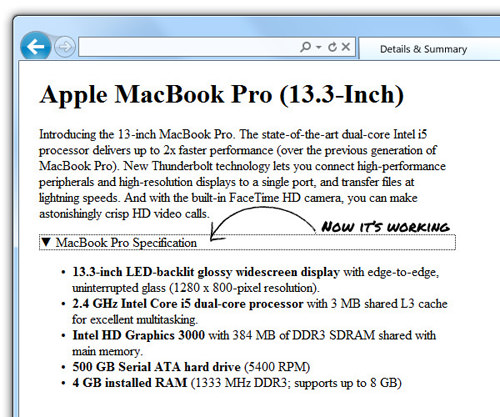
And it now works on Internet Explorer as well.
Conclusion
Creating such a hide-and-show effect with JavaScript or jQuery is actually relatively easy, but having it natively supported from the browser is definitely a much easier solution for many people. Whether you want to do it in JavaScript or in HTML5, it’s your decision. Thanks for reading, and I hope you enjoyed it.