Create Cinemagraphs Easily Using Cliplets
You might have checked out our post on cinemagraphs and are now wondering how to create your own. Well, let us tell you a secret; it is not very hard to do.
Check out this picture of a skateboard wheel we did in less than 5 minutes! Although it is not the most exciting picture, it sure has a cool effect.

Today, we’re going to run through a few steps on how to make your own cinemagraph with an easy-to-understand program with help from Cliplets.
How Cliplets Work
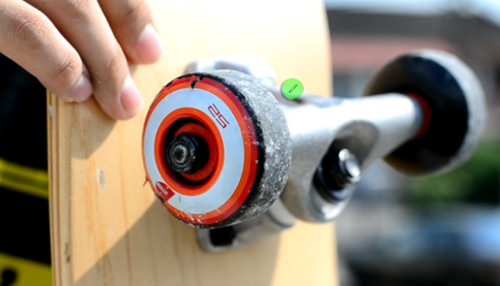
Cliplets works by ‘pausing’ the background while only a selected area of the video ‘plays’ in a loop.

So in the case of the image above, the green area is the selected area that ‘plays’ in a loop; while the background is ‘paused’ at some point.
Getting Started
To start off using Cliplet, click here to download the 32-bit version for the 64-bit version. Note that it currently only works with Windows 7.
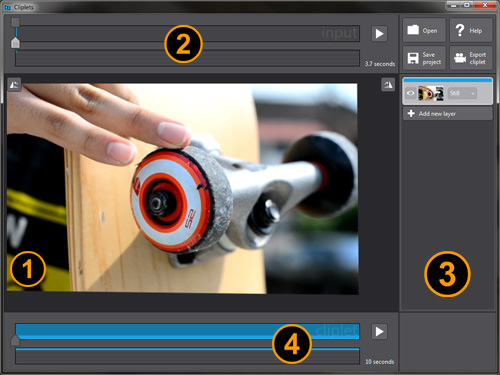
Let’s first take a look at the user interface of the Cliplets software (numbered for your convenience):
- The viewing area where you see the video playback.
- Timeline that controls your imported video.
- Panel of layers that are used for editing.
- Timeline of the final project with a play button to see the final effect.
Creating The Cinemagraph
Next, get a short clip of what you want to turn into a cinemagraph. Make sure that the video is recorded with a steady hand, and that it is not too jerky. Now, go ahead and drag your short clip into the project viewing area.
Try hitting the play button on the top. You will notice that your video is stabilized with almost no shaky movements. Do not worry about the edges moving about, and not ‘staying put’, as those are the effects of stabilizing the video.
1. Choosing the Still Background Frame
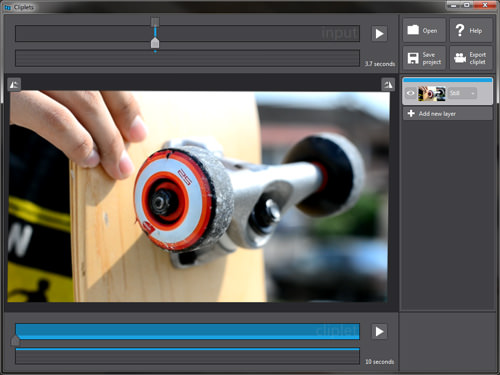
So, the first step is to choose that ‘paused’ background. You select a background by sliding the top square along the timeline.

You’d want to pick a background where the object you want to ‘animate’ is not moving about too much. The background chosen (and shown) here is after the hand had spun the wheel and is resting on the board. The wheel is steady around the centre of the screen.
2. Selecting the ‘Animated’ Timeline
Next thing you have to do is click on Add new layer located on the layers panel on the right. A new layer titled ‘loop’ will be created. Select a small part of the clip with the animation you want to feature. Move the orange area on the imported clip timeline to indicate where the ‘loop’ starts and ends. .

Remember that the ‘animated’ area goes in a loop. In this example, we have chosen to feature the wheel going one full round. There is no limit as to how long or short the loop should cover but to ensure smoothness of the effect, you may want to adjust this a few times to get the effect just right.
3. Outlining the ‘Animated’ Area
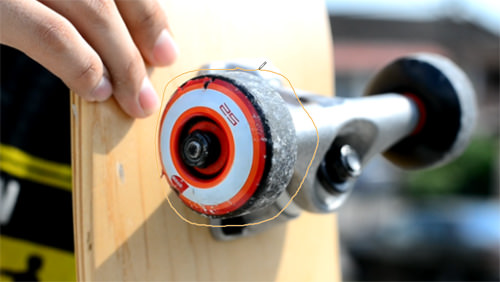
Once you’ve done that, draw around the area you want to ‘animate’.
Notice that your cursor now looks like a pen; highlighted in green. This is for you to draw an outline of the area you want to ‘animate’. In this caes, it’s the rotating wheel you see below.
Hit the play button at the bottom to see if the effect works well. If you’re not satisfied with the results, try fine tuning Step 2; by either adding or removing one or two frames to the the ‘animated’ selection.
If it still does not look perfect, here is a little tip. Enable ‘Smooth’ located under the Play button at the project timeline. When hit the Play button you’d notice that the transition is smoother.

4. Exporting your Cinemagraph
Once you’re satisfied with your cinemagraph, hit the ‘Export Cliplet’ button and you will see three file formats to export to: .gif, .mp4 and .wmv. Our example is a .gif file format.
Conclusion
The Microsoft Research team has created something simple that everyone can use to create cinemagraphs. If you are interested to learn more, they have some more advanced tutorials that you can check out, as well as a gallery of working cinemagraphs to marvel at.
For some ideas on creating your own unique cinemagraph, take a look at these amazing examples.
We hope that your cinemagraph turned out as you expected, enjoy!