How to Enhance Your Projects with Bower Configuration
In Part 1 of our Bower series, we explored Bower’s essential features, including installing, updating, and removing website libraries. Bower offers more than just these basics. In this article, we’ll guide you through configuring Bower to strengthen your projects effectively.
How to Install, Update & Remove Web Libraries with Bower
To build a website, we often use various libraries, including CSS or JavaScript. For instance, creating a small... Read more
Customizing the Bower Directory
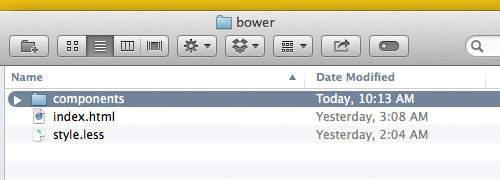
By default, Bower creates a directory named bower_components. If you prefer a different name, it’s easy to change. Start by creating a new file named .bowerrc and include the following configuration:
{
  "directory": "components"
}
This configuration directs Bower to store installed libraries in a folder named components.
Creating a Bower JSON File
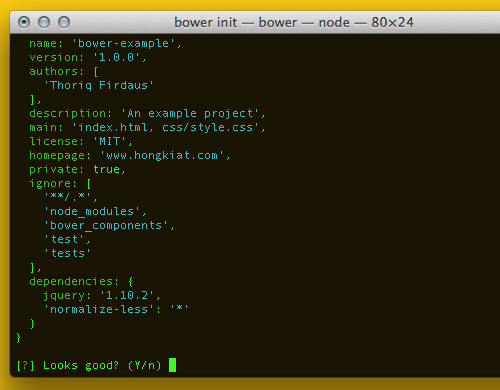
The Bower JSON file defines your project as a Bower package. This file includes details like project name, version, and dependencies, which are crucial for tracking and documenting your project.
To start, navigate to your project directory and run bower init. You will answer a series of prompts to specify details such as name, description, version, and more. If your libraries are already installed, choose Y when asked to set currently installed components as dependencies. Bower will automatically register these in your Bower JSON file.

After confirming the details, Bower will create a new file named bower.json in your project directory.

Migrating Old Projects to Bower
Integrating Bower into your existing projects can streamline library management. Consider a project using direct links to libraries in its <head> tag:
<link rel="stylesheet" href="http://cdnjs.cloudflare.com/ajax/libs/normalize/3.0.0/normalize.min.css">
<link rel="stylesheet" href="css/style.css">
<script src="http://ajax.googleapis.com/ajax/libs/jquery/1.9.1/jquery.min.js"></script>
<script src="js/accounting.js"></script>
As shown in our previous tutorial on Accounting.js, these libraries are vital dependencies. Run bower init in your project directory, then open the bower.json file to define these libraries as dependencies:
"dependencies": {
  "jquery": "1.10.2",
  "normalize-css": "3.0.1",
  "accounting": "0.3.2"
}
Execute bower install to install the dependencies listed in your Bower JSON file. This approach allows you to replace old library links with ones managed by Bower, simplifying future updates and maintenance.

Conclusion
Bower provides a range of configurations to enhance your project management. To discover more about its capabilities, you can run bower help for a comprehensive list of commands. Whether your project is small or large, Bower can significantly aid in its organization and manageability.