Version Control in Visual Studio Code with Git [Guide]
Integrated Git support is one of the greatest features of Visual Studio Code, Microsoft’s new source code editor. Git is a distributed version control system, that allows you to track your work, move back and forth between versions, and work on different branches at the same time. It’s also used by Github, the popular Git repository hosting service.
Visual Studio Code supports Git by default, which means you don’t have to install any packages or extensions to use it. The Side Bar contains a separate Git View you can quickly open by clicking on the Git icon in the View Bar (see VS Code’s parts), or by hitting the Ctrl+Shift+G key binding.
Read more: Increase productivity in Visual Studio Code with key binding
Install Git
As Visual Studio Code uses the Git install of your computer, first you need to install Git. You can quickly download it from Git’s official website. You need to install at least version 2.0.0 to make VS Code’s Git features work properly.
Although Visual Studio Code allows you to manage Git visually, if you also want to learn how to use Git from the command line, here are some useful resources:
- Github’s interactive Git tutorial
- Atlassian’s Git tutorial — Atlassian is the company behind the Bitbucket source code hosting platform (similar to Github)
- Atlassian’s Git Cheat Sheet (PDF) — this is the fastest way if you’ve already used Git, but don’t remember one or two commands
- The entire Pro Git handbook
Initialize Your Repository
If your workspace isn’t yet tracked by Git, first you need to initialize a new repository. To do so, click on the Initialize git repository button in the Git View.

VS Code will create a .git folder inside your workspace (you can’t see this from VS Code, as it’s a hidden directory, but you can find it in your file manager in the root folder of your project), and it will also add your untracked files to the Side Bar.
Stage Changes
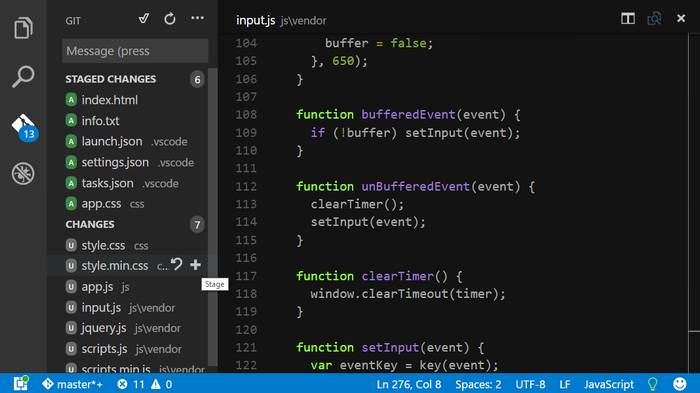
After your Git repository is set up, it’s time to create your initial commit (a commit is a recorded state of your whole repository you can later move back to). Before committing, you need to add the files you want to track with Git to the staging area, or in other words you need to stage the changes. Click on the + button that appears on hover next to each file to stage them.
After you click on the files you want to stage, Visual Studio Code moves from the Changes folder to the Staged Changes folder, that means that now they are in the staging area. If you want to stage all your files at once, there’s a + button next to the Changes subtitle as well (it appears on hover), and click on it.
Commit Changes
Staged changes are not yet recorded, you also need to commit them, so that later you can have a look at or move back to the current state of your repository. In order to commit the staged changes, you need to add a commit message that describes the changes you made since your previous commit.
As in our example this will be the initial commit, let’s use the striking “Initial Commit” message. Type your commit message into the input bar at the top of the Side Bar, and click on the little tick icon. Now you are ready with your first commit, the initial state of your repository is recorded.

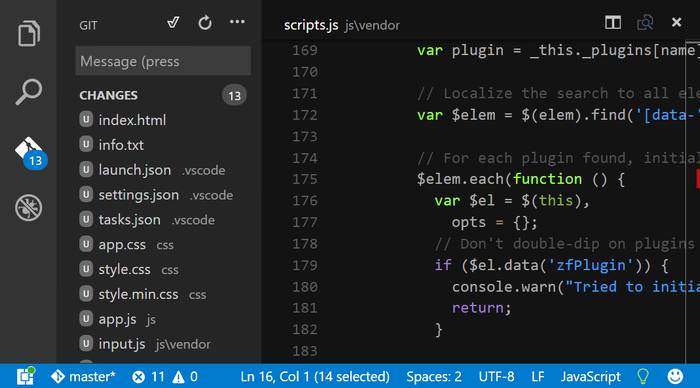
Your Git working directory is clean, all the changes you made so far are tracked, and your Git View says there are 0 changes (it always compares to your last commit). If you make new changes in your workspace, the new changes will appear again in the Side Bar, and you’ll need to commit them again once they reached the amount that’s worth committing.
On the screenshot below you can see how your code editor needs to look like right after committing.

Follow Changes
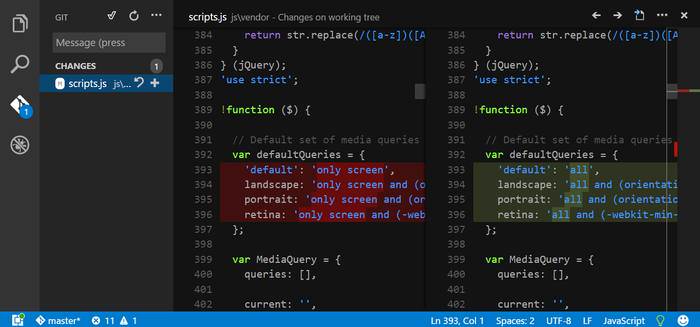
When you go on with your work, if you are not sure about how the current version compares to your last commit, you can quickly check the differences. In the Git View, you only need to double click on the file you want to analyze, and VS Code will show the current and the previous versions side by side, so you can quickly compare them.
When speaking about following changes, it’s also important to know about Visual Studio Code’s gutter indicators that annotate the changes compared to your previous commit, even when the side by side view is not open. VS Code uses 3 kinds of gutter indicators:
- a red triangle for every line deletion
- a green bar for every line addition
- a blue bar for every line modification
Create Branches
Git allows you to work on different branches at the same time. This is not only good for experimenting with new solutions, but can also significantly facilitate teamwork where developers can work on different branches (however this is not obligatory, as they can also stay on the same branch).
In Visual Studio Code, you can create new branches by opening the Quick Open palette by hitting Ctrl+P (Cmd+P on Mac), then typing the git branch command into the input bar. You also need to add the name of your new branch to the end of the command.
As the name of the new branch in our example will be test-branch, I’ll use the git branch test-branch command, but you can use any other name. In the left side of the status bar (blue bar at the bottom of the screen) you can always quickly check which branch you are currently working on. On the screenshot below, you can see that I’m currently on the master branch.

Checkout Branches
To switch between branches, type git checkout into the Quick Open palette (Ctrl+P/Cmd+P), and you can choose from your available branches. On the screenshot below, you can see from the status bar that I’m currently on the branch called test (I created it after test-branch), and if I want to move to a different branch, I can now select from the master and test-branch branches.

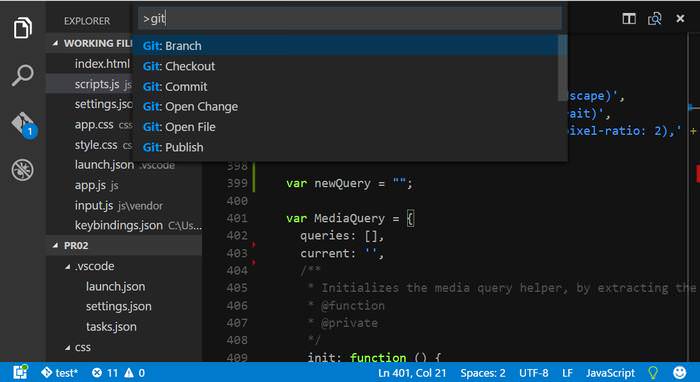
Use Git Commands from the Command Palette
You can access Git commands from the Command Palette (F1 on Windows and Linux, Shift+Cmd+P on Mac) as well. You don’t have to do anything else, just type the command Git inside the Command Palette, and you get a dropdown list of the available commands you can quickly choose from.
Advanced Git Operations
So far, we have looked at how to use basic Git operations in Visual Studio Code to track our work. VS Studio Code has advanced Git features as well, such as managing remote repositories, merging conflicts, and you can even configure VS Code as your external Git editor.
The Visual Studio Code Marketplace also contains Git-related extensions that can make your Git workflow even more professional.

I myself found the extension Git History to be very useful, as it makes it possible to quickly have a look at the details of each commit, and to compare any two previous commits side by side. You can also read on the Git History extension in my previous article about VS Code extensions for front-end developers.