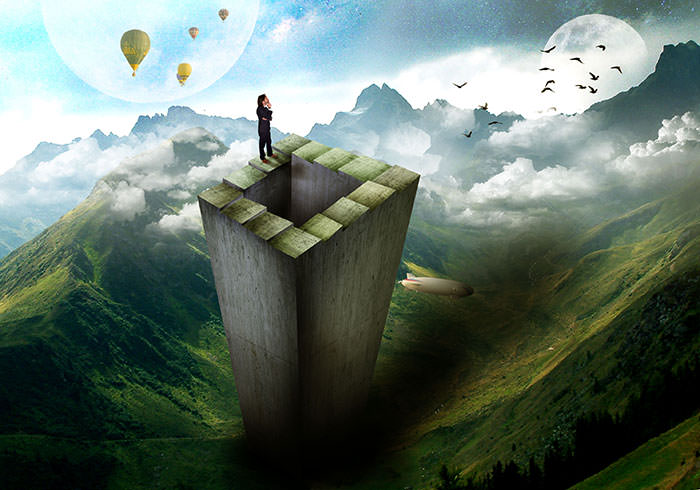
Create Surreal Staircase Illusion: Photo Manipulation Tutorial
In my previous tutorial, I showed you how to make a car fly. In this tutorial, we’ll be creating a looping staircase tower. It has a surreal, dream-like look to it.
The idea stemmed from visualizing the looping staircase illusion, one of the most famous being the Penrose stair (you might have seen it in the movie Inception). Our main objective is to create the looping staircase from scratch, using a bunch of shape layers and then applying concrete texture to its surfaces.
We will also play around with the brush tool to illustrate shadows, using the dodge and burn tool to darken and lighten desireable texture and will also be utilizing custom brushes. This will be the end result after 78 steps.
Resources
Before we start though, grab these resources we will be needing:
- Business Man
- Zeppelin
- Hot Air Balloons
- Cloud Brushes
- Concrete Wall 1
- Concrete Wall 2
- Flying birds
- Milky way
- Mountain View
- The Moon
Step 1: Preparing the Background
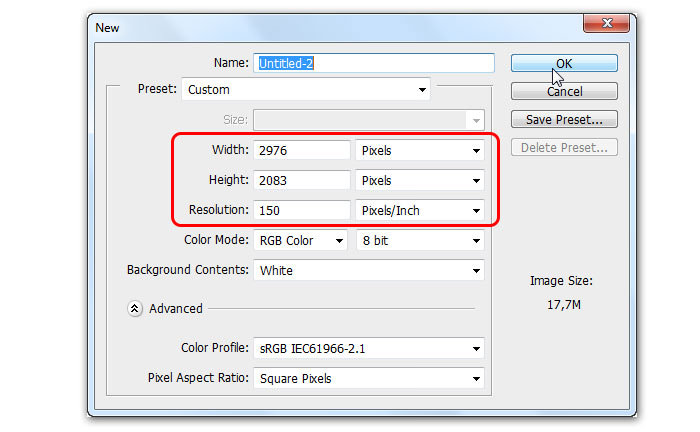
Create a new document. Set the width: 2976 pixels wide and Height: 2083 pixels, with the resolution at 150 pixels/inch.
Step 2
Click File > Place to insert the mountain view image as a smart object. Use Edit > Free Transform to tilt the mountain to the left . Press Enter to apply.

Step 3
We need to remove the road within this mountain view image, which could easily be done with the Spot Healing Brush tool. Unfortunately, because we placed the mountain view image as a smart object in the previous step, we can’t use the Spot healing brush tool yet.
The solution is by changing the smart object layer into a normal image layer. Do this by right-clicking the mountain-view smart object layer, select Rasterize Layer from the pop-up menu. Grab the Spot Healing Brush tool, select Type: Content-aware from the option bar, then use it to replace the road with the appropriate surrounding textures.

Step 4
Continue using Spot Healing brush tool until all of the roads are replaced with appropriate surrounding textures. It looks something like this.

Step 5
Press Ctrl+M to show Curves window. Manually drag the curve to increase contrast between light and dark colors. I prefer the simple way by selecting Preset: Strong Contrast, then click OK.

Step 6
Show Levels window by pressing Ctrl+L. Adjust input level sliders to bring more contrast, or simply select Preset: increase contrast 2. Click OK to apply.

Step 7
Press Ctrl+B to show Color Balance. Drag color sliders right or left until overall color is more bluish. In this example, my color levels are -25, +16 and +43.

Step 8: Building the Stairs
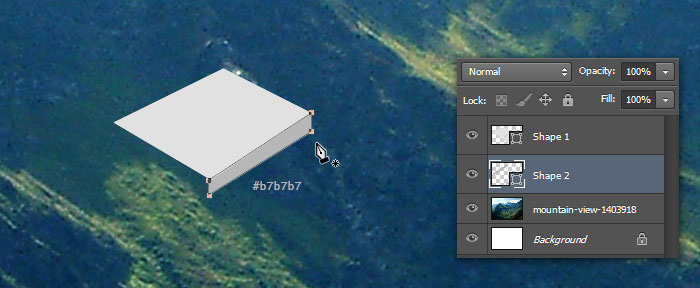
Let’s start creating the first ladder-step for our looping stairs. Grab the Pen tool, set the option to Shape. Create a skewed rectangle as our first step. Fill the shape with grey color (#e1e1e1) and set the stroke color to none.

Step 9
Our next step is creating the ladder-step’s height. Using the Pen tool, draw a second shape and fill it with darker grey color. Make sure you do this step in a new shape layer, underneath Shape 1 layer.
Step 10
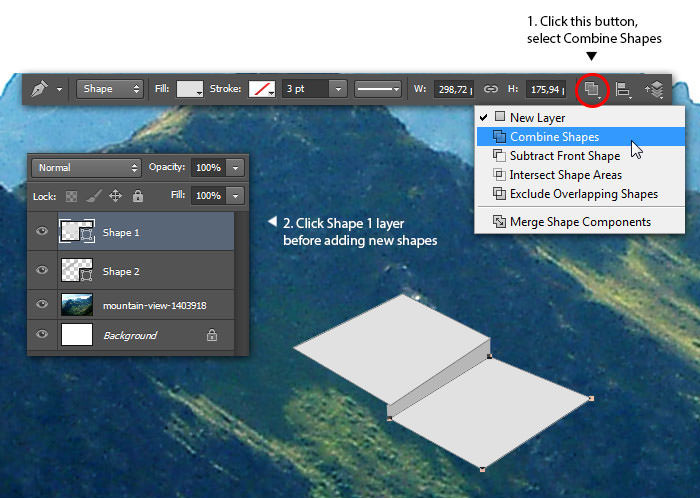
Still using Pen tool, select Combine Shapes option (this option will combine the new shape with the old one, depending on which shape layers are selected at the time). Click back the Shape 1 layer to select it, then draw another skewed rectangle as the second ladder-step.
Step 11
Click to Shape 2 layer to select it. Repeat the previous step, which adds height to the second ladder step.

Step 12
Repeat the process to create a third ladder-step using Pen tool.
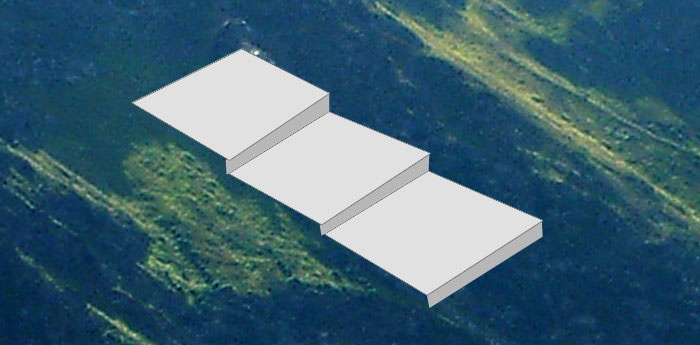
Step 13
Still using the Pen tool, draw the first wall (it also works as the height of our stairs tower). We place this shape on a new layer, on top of another shape layer. Make sure the tops of the side wall align perfectly with the ladder steps. Here is the image for your reference.
Step 14
Add the fourth ladder-step shape. Make sure you create it in a new shape layer.
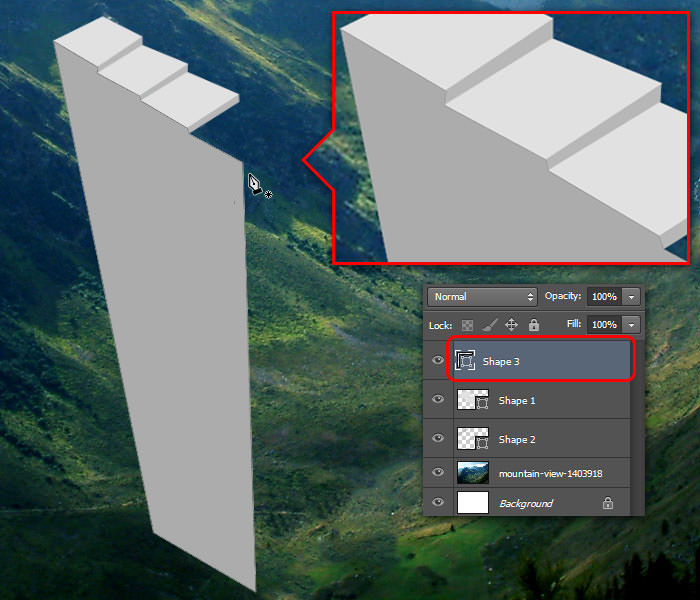
Step 15
Add four more ladder-steps, each in separate shape layers. To make those new ladder-steps easier to identify, give different fill colors for each of them.
Step 16
Draw the tower’s right-side wall, set the fill to a darker grey. Do this step in a new shape layer, above all shape layers.

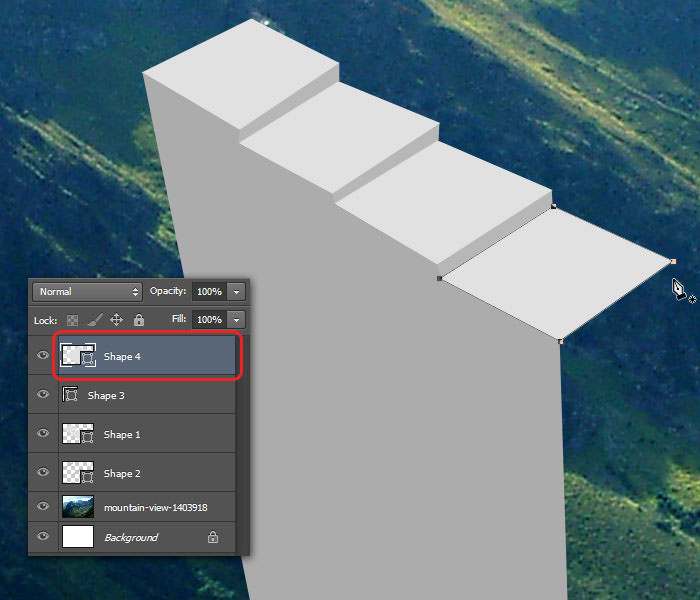
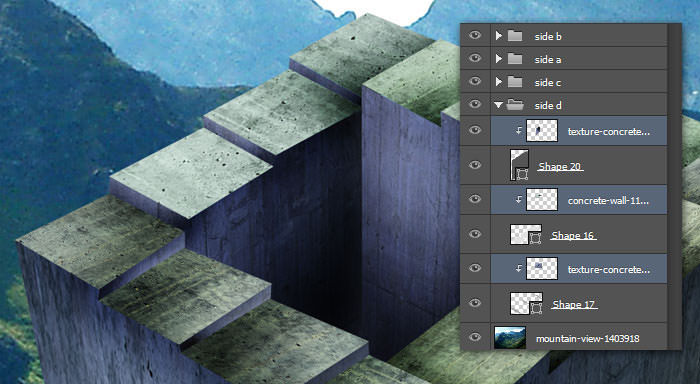
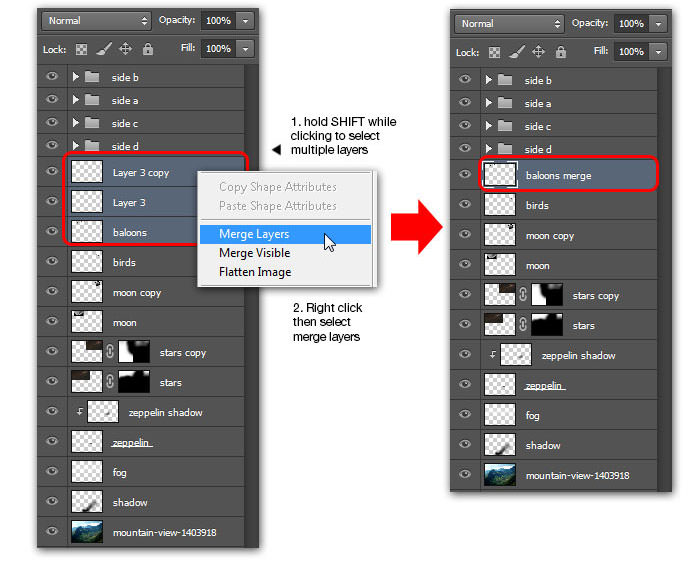
Step 17: Layer management
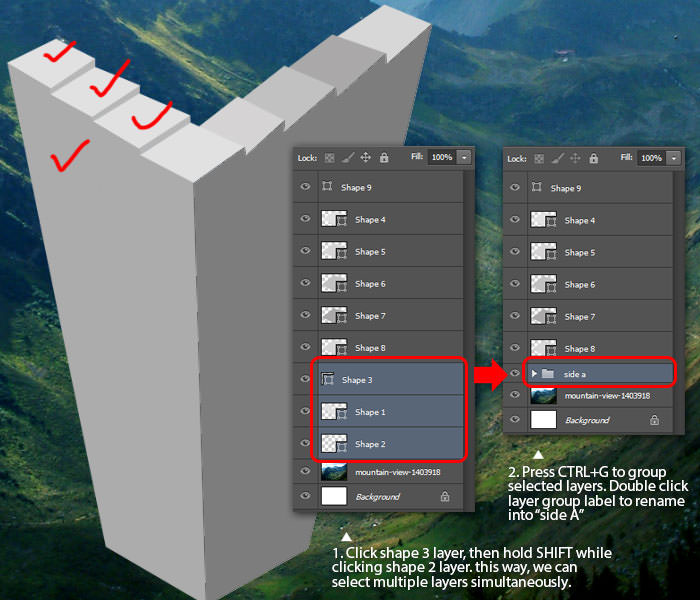
We just made a couple of ladder-steps, and there was way too many shape layers to identify them all. In this state if we continue adding shapes, I’m afraid it will too overwhelming. To make things easier to identify, lets do some layer management.
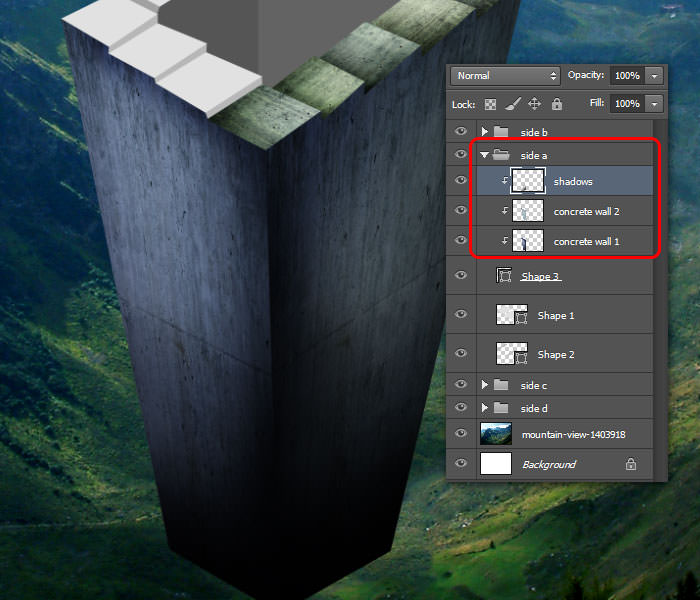
Select the first three ladder-steps, which is Shape 1, Shape 2 and Shape 3 layer. Group them into a new folder, name it "side a".
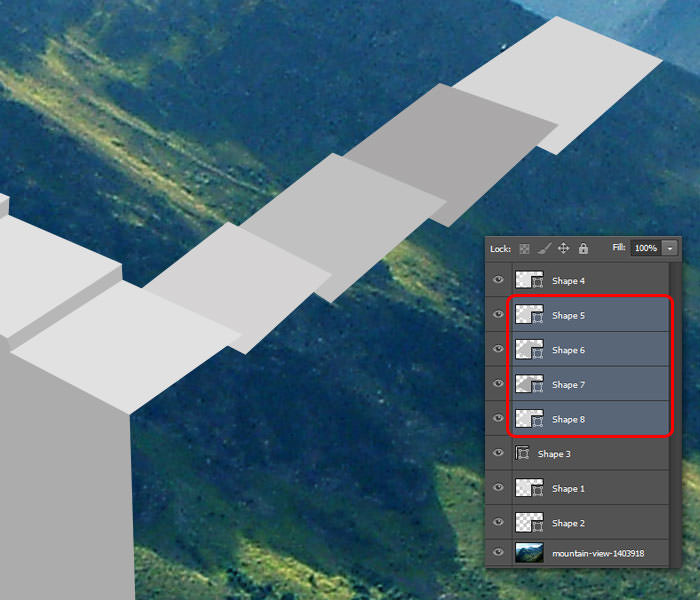
Step 18
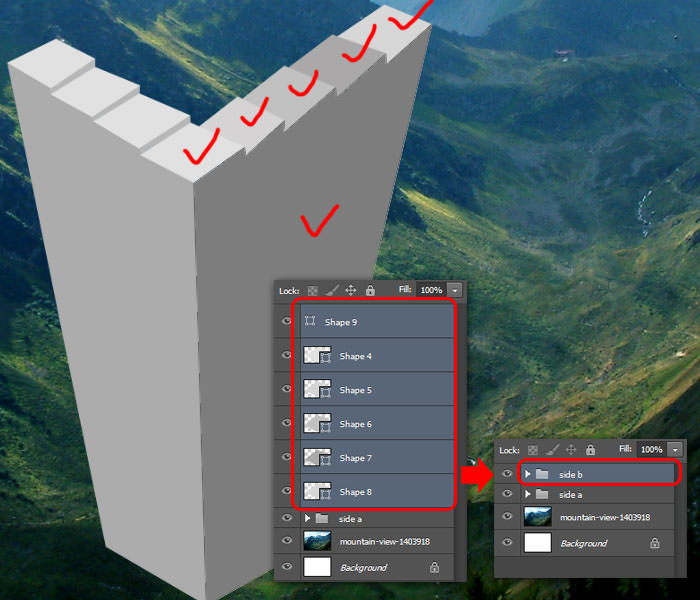
Repeat the previous step to group the rest of the shapes layers. Name it "side b".
Step 19
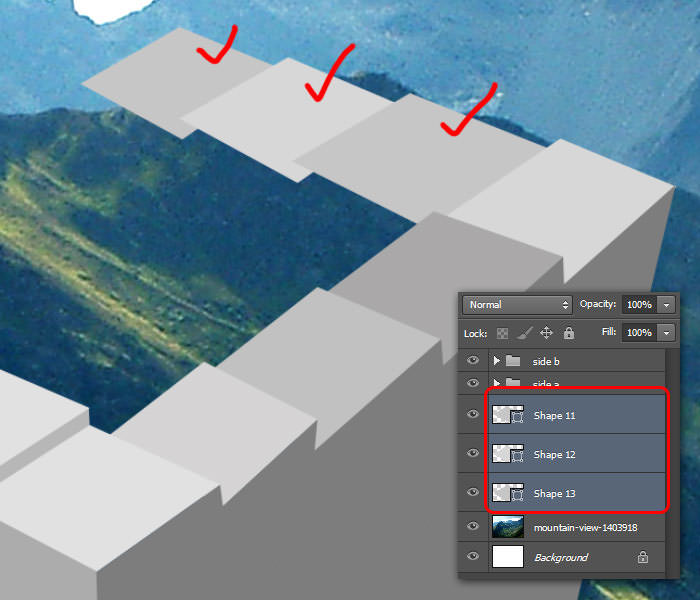
Add three more ladder-steps, each in three separate layers. As usual, fill each ladder-steps with different colors for easier identification.
Step 20
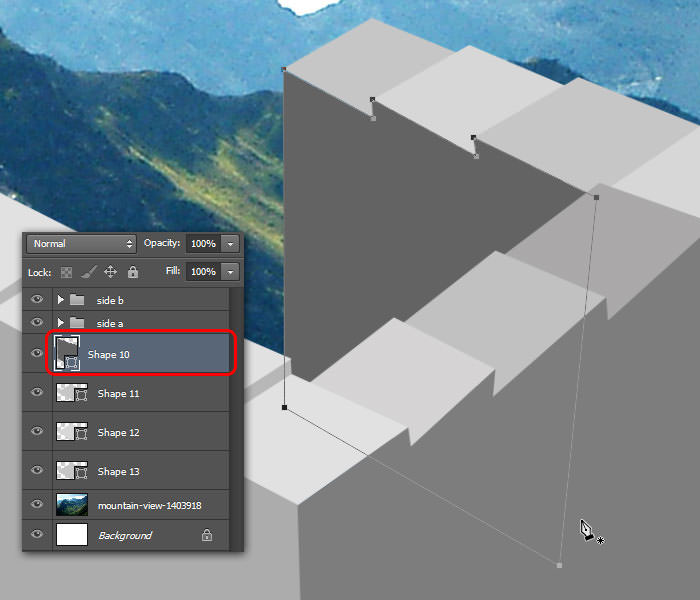
Draw the tower’s inside wall. Do this step in a new shape layer. See image below as your reference.
Step 21
Select the 4 shape layers we just created, group them into a new folder named "side c".
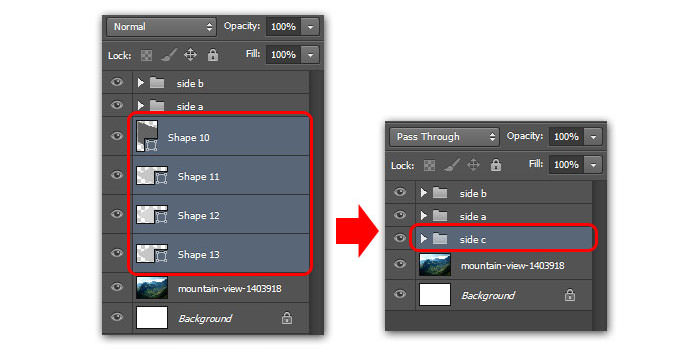
Step 22
Repeat with the last side, then name it "side d".

Step 23: Applying Textures
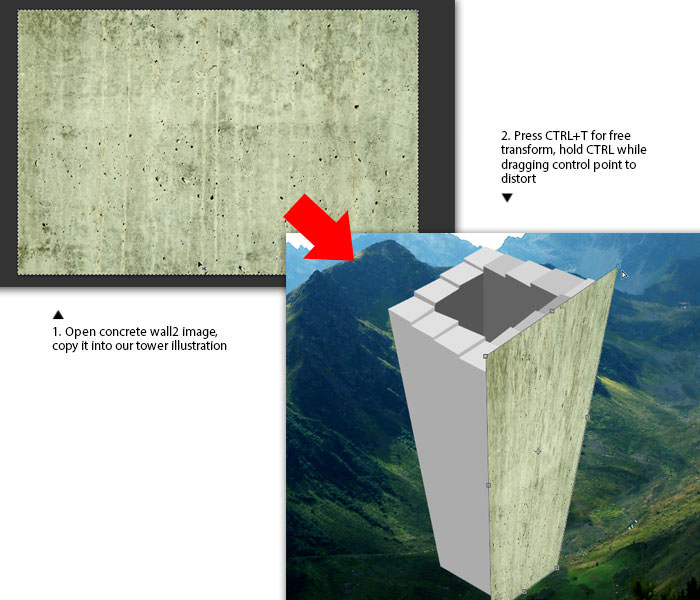
Open concrete-wall 1 image. Press Ctrl+A to select all, then copy the concrete wall texture into our document.
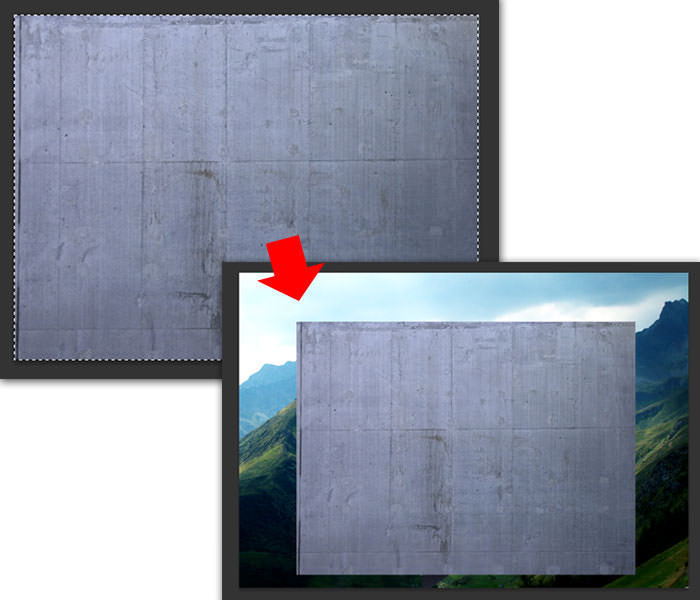
Step 24
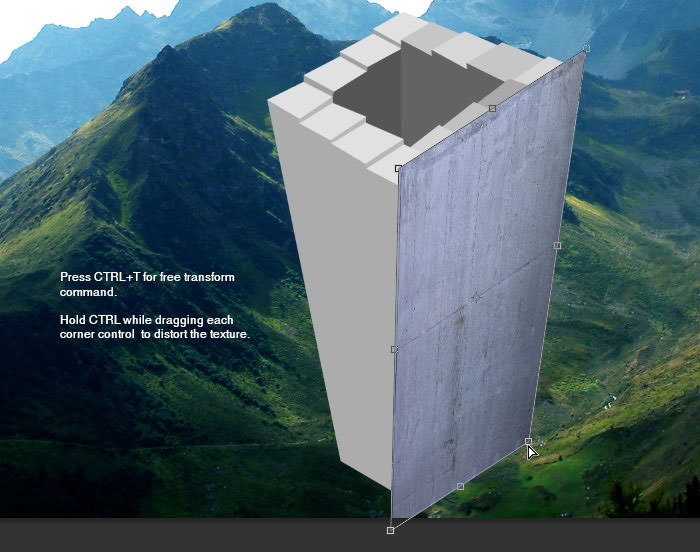
Our next job is to cover the tower’s right side with the concrete wall texture. Go to Edit > Transform > Distort to change the texture perspective, height and width following the tower’s shape.
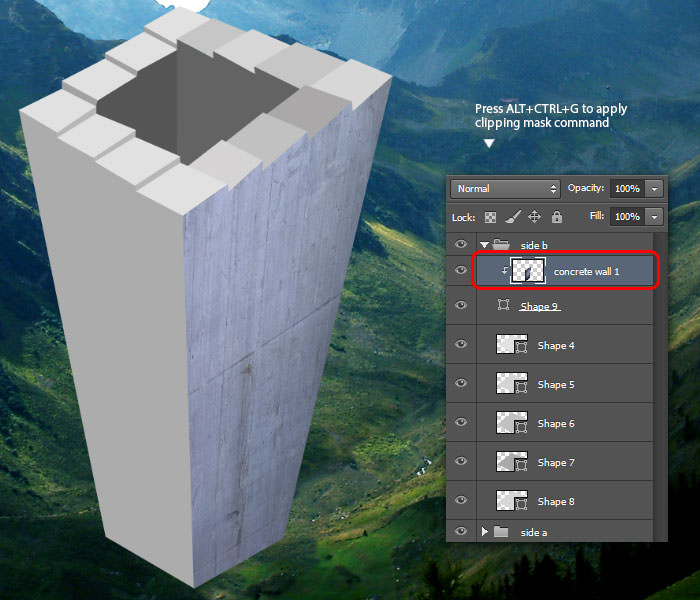
Step 25
Make sure to place the concrete wall layer on top of the Shape 9 layer (tower’s right wall from "side b" group). Go to Layer > Create Clipping Mask to convert concrete wall 1 layer into a clipping mask layer. This will make the concrete wall texture appear "placed inside" the Shape 9 layer.
Step 26
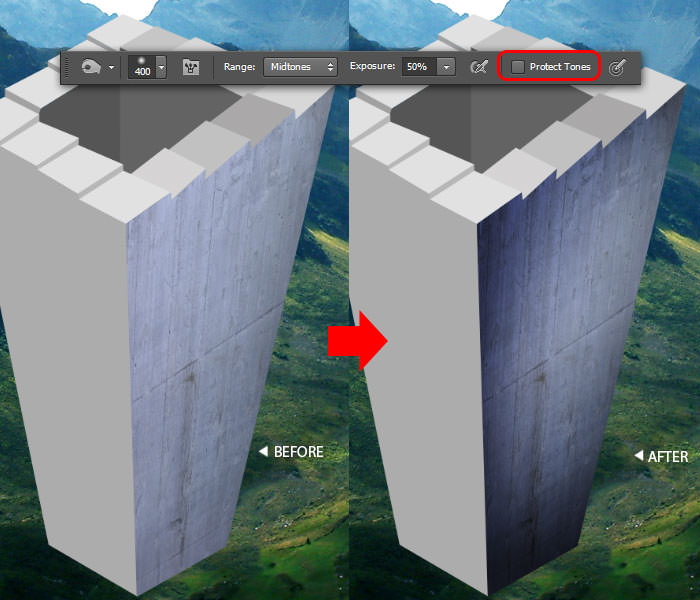
To add realism, some shadow is needed at the edge of the concrete wall texture. Use the Burn tool to do the job, but set the Exposure: 50% and turn off the Protect Tones option.
Step 27
Open Concrete wall 2 image. Press Ctrl+A to select all, then copy it into our document. Repeat the same treatment as a previous texture, distort and apply it as the tower’s wall texture.
Step 28
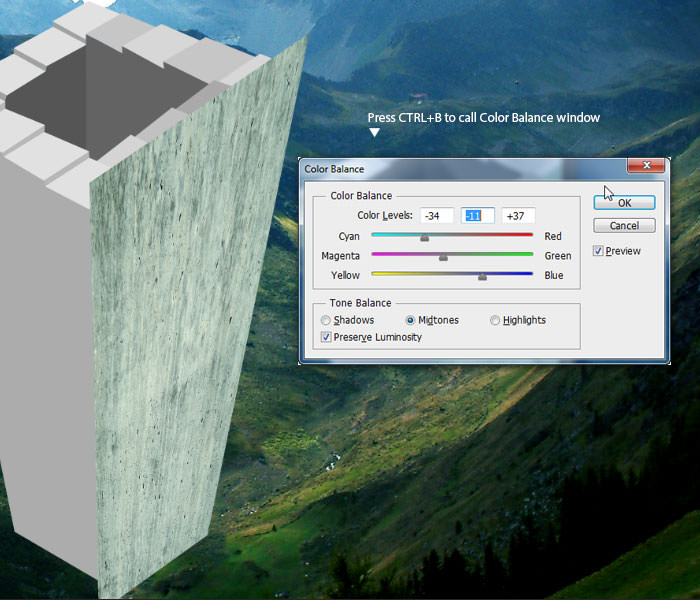
Go to Image > Adjustment> Color Balance menu. Within Color Balance window, drag each color slider left or right until overall concrete texture color is bluish. Click OK to apply Color Balance.
Step 29
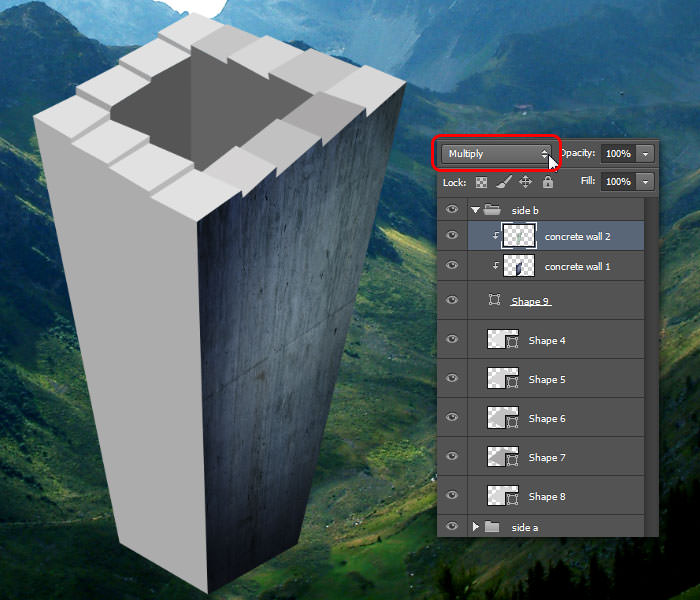
To blend both concrete texture nicely, change the "concrete wall 2" layer’s blend mode to Multiply.
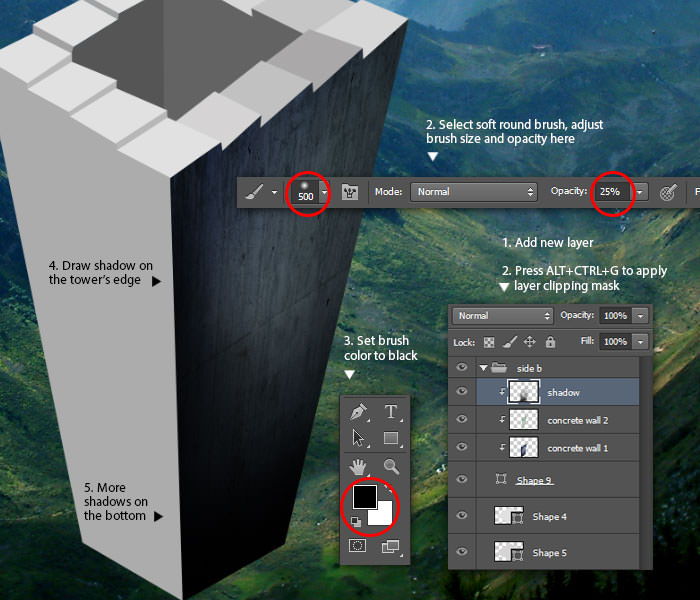
Step 30
We need darker shadows. Achieve this by adding more shadows using the black soft round Brush tool with low opacity. Make sure you do this in a new clipping mask layer above concrete wall 2 layer. See the image below for your reference.
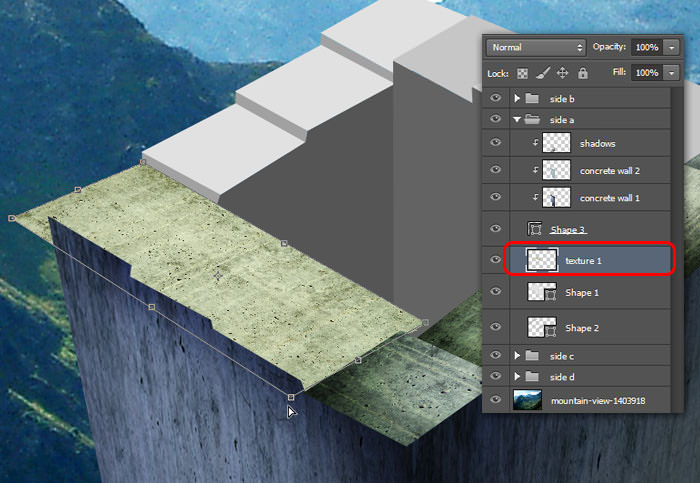
Step 31
Go back to the "concrete wall 2" window. Use the Rectangular Marquee tool to create single square selection, then copy the selected area into our document. Rename the layer into "texture 1" then drag it under Shape 9 layer.
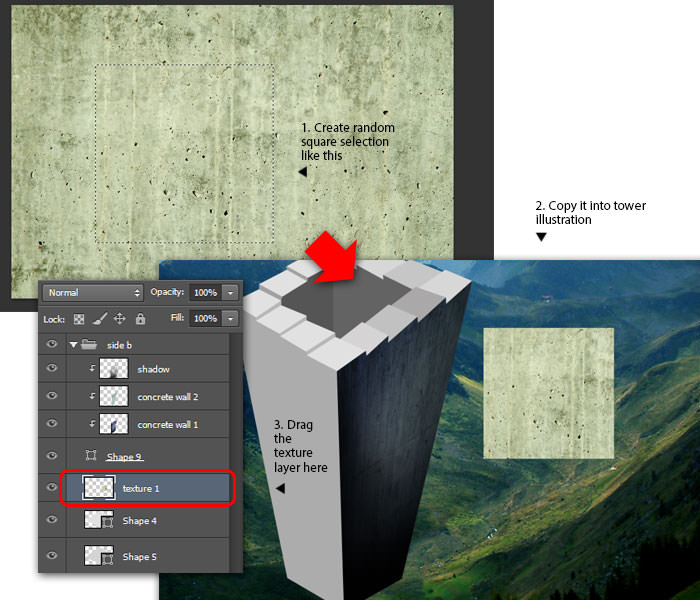
Step 32
Use the Edit > Transform > Distort menu to manually distort texture 1. The objective is to cover the first ladder-step in layer group "side b" with this texture, and also with the right angle.
Step 33
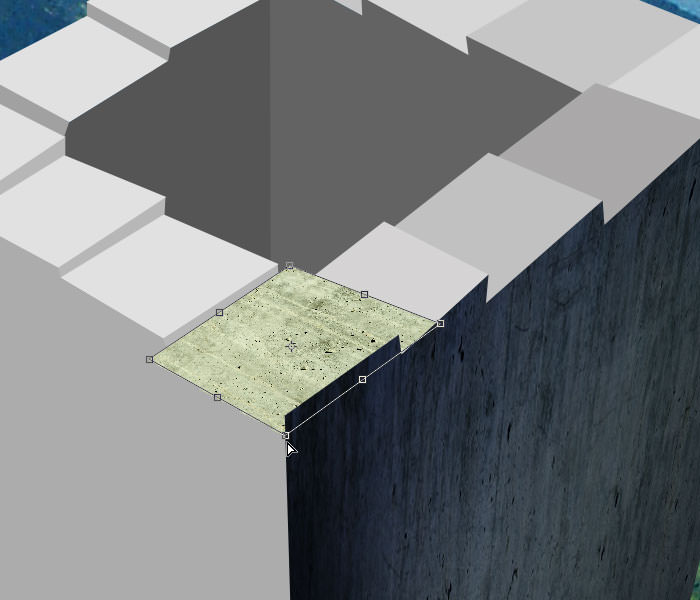
Convert "texture 1" layer into clipping mask, then change the color tone bluish using the Color Balance window.

Step 34
Use the Burn tool to darken the texture’s edge. See the image below for reference.

Step 35
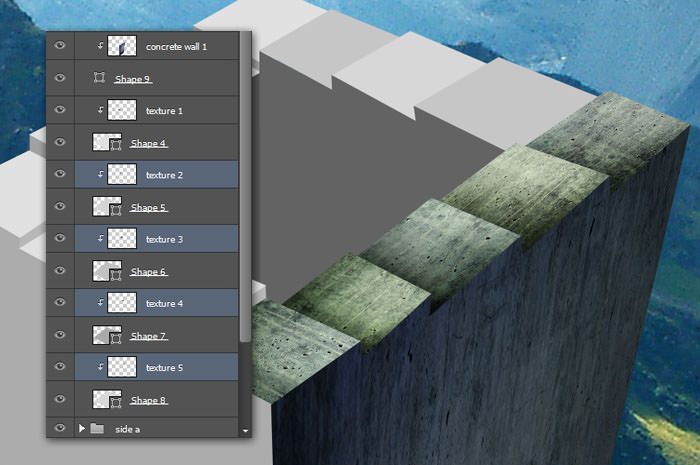
Repeat the texturing process for the rest of the ladder-steps inside group "side b". Distinguish each ladder step with a different texture to make it unique. See this image below for reference.
Step 36
Now we move to the "side a" layer group. Apply texturing and add shadows for the walls (repeat Step 27 to 30). See the image below as reference.
Step 37
Apply the same texture for ladder step "side a". This time, use the full texure from" concrete wall 2" image. Usethe transform distort command to apply the texture.
Step 38
Still in the same texture layer, convert it into clipping mask (make sure the texture layer is placed above Shape 1 layer before doing this). Since we only use one texture for three ladder-steps, we must first create a selection before darkening the edge with the Burn tool.

Step 39
Repeat selection and darken the texture for the rest of the ladder-steps using a combination of Polygonal Lasso tool and Burn tool. See image below for reference.

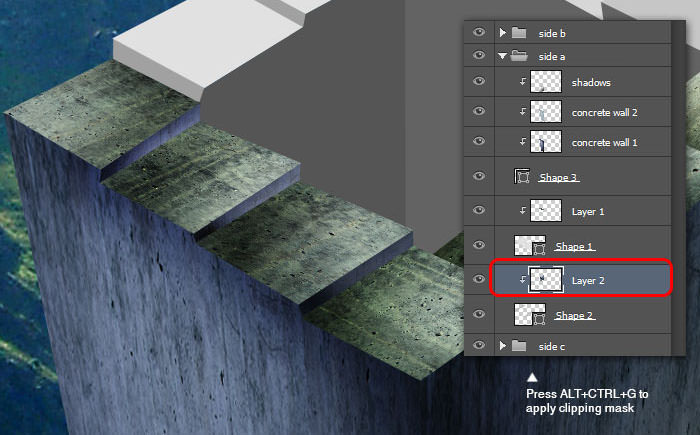
Step 40
Now we apply texture to the ladder-step height. Use the "concrete wall 1" texture, copy and place it above the Shape 2 layer. Then, again distort the texture shape following the ladder-step’s height and perspective.

Step 41
Still in the texture layer, convert it into clipping mask. Grab the Burn tool again, so you can darken the texture to make a simple "fake shadow". See image below for reference.
Step 42
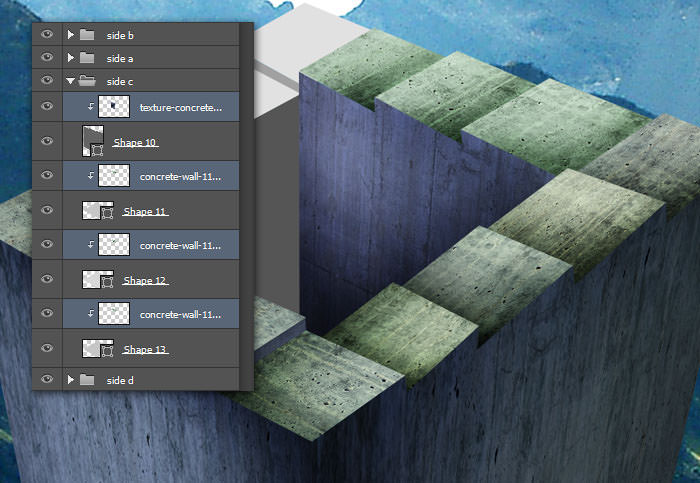
Continue applying texture for ladder-step in the folder "side c". Give each ladder-step their own texture layer with the clipping mask technique. Don’t forget to darken the texture with the Burn tool.
Step 43
And finally, apply the texture for ladder-step in the "side d" folder (with Step 37 to 41).
Step 44
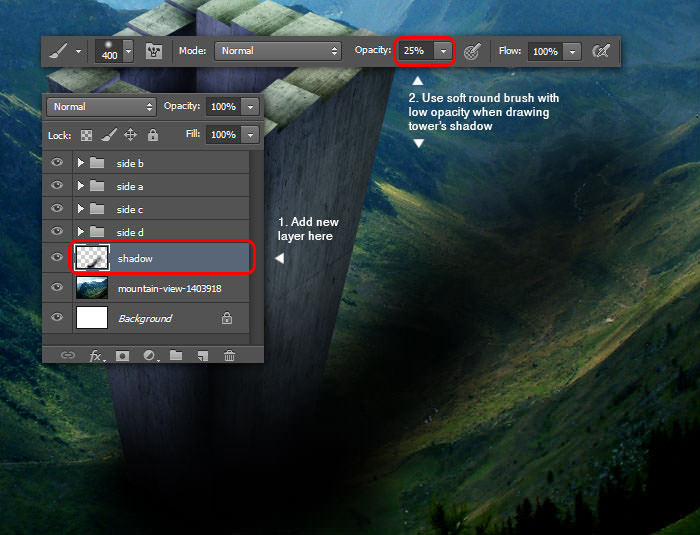
Add new layer above mountain-view layer. Draw the tower shadow using black colored soft round Brush tool with low opacity. See image below for reference.
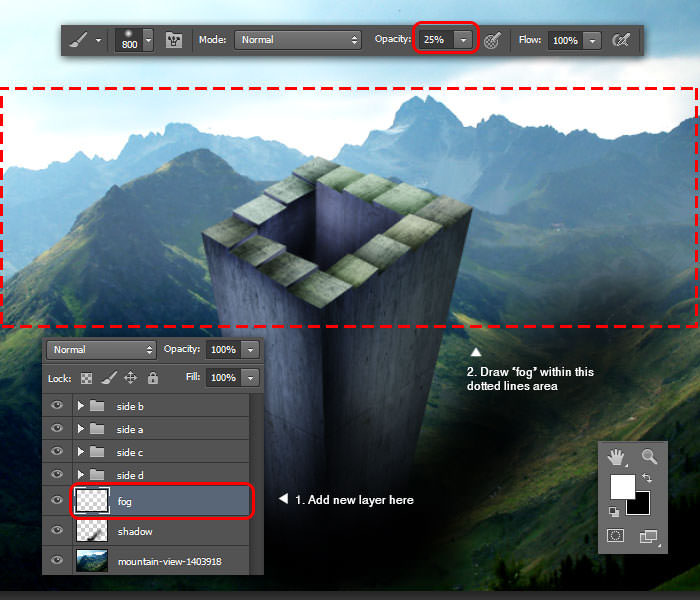
Step 45: Adding Foggy Atmosphere
Add a new layer above the shadow layer. Set the Brush color to White and the size: 800 px. Draw a "fog" horizontally within the red dotted square (see below). Drag from left to right. In case the fog becomes too thick, try lowering the layer opacity.
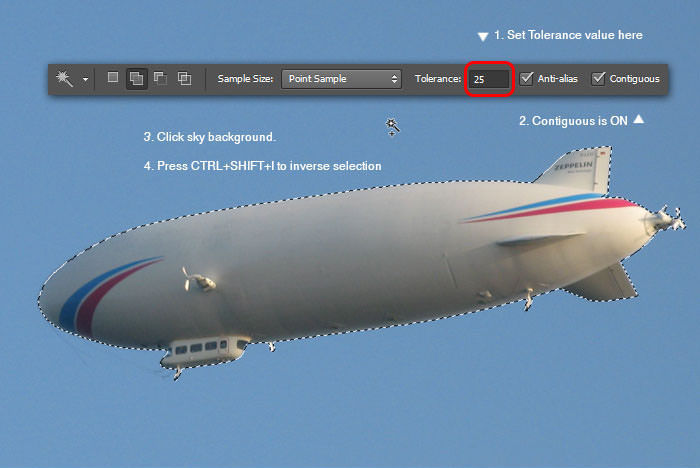
Step 46: Adding the Zeppelin
Open the zeppelin image. The fastest way to select the zeppelin is by using the Magic Wand tool because of the plain background. First, set Tolerance: 25 (lower value means smaller color range to select), turn on Anti-alias and Contiguous option. Select the sky background, then inverse the selection with Select > Inverse.
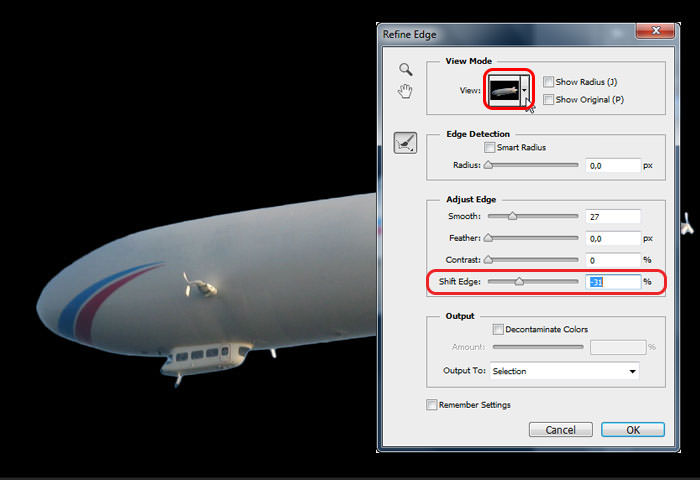
Step 47
Go to Select > Refine Edge or press Alt+Ctrl+R. I think it will be easier to look at the selection edge result when the view mode is set to black background. Inside the Refine Edge window, drag the Shift Edge slider to the left, around -31.
Click OK to apply refine edge settings. Press Ctrl+C to copy selected zeppelin.
Step 48
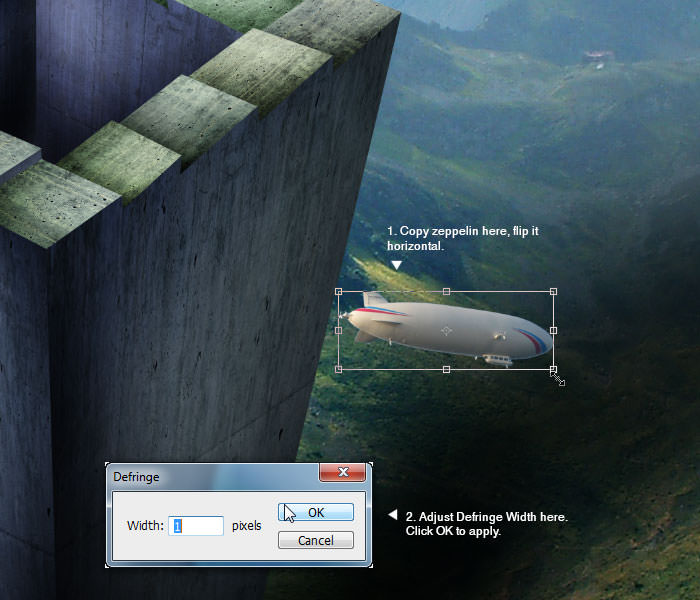
Paste the zeppelin into our document. Use the Transform command to adjust its size and place it on the tower’s right side. Go to Edit > Transform > Flip Horizotal to flip the zeppelin horizontally.
Go to Layer > Matting > Defringe. Within the Defringe window, set width value to: 1 then click OK. Using defringe will tell Photoshop to remove the remaining unwanted pixels on the edges of the zeppelin. The bigger the defringe width value, the larger the area to remove.
Step 49
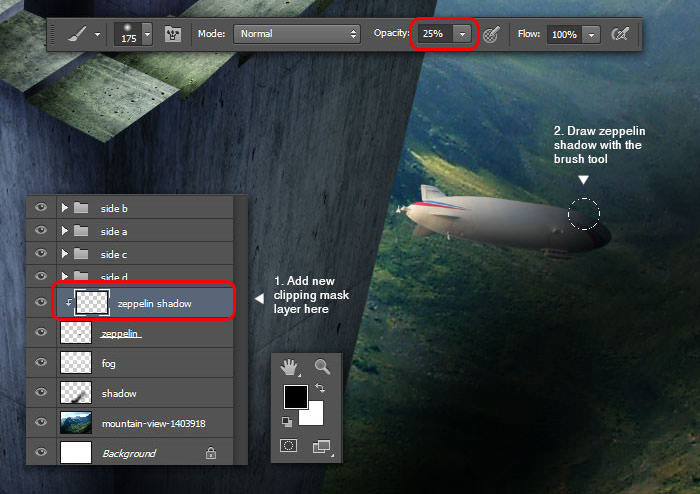
Add a new clipping mask layer above the zeppelin layer, name it "zeppelin shadow". Use a black soft round Brush tool with lower opacity to draw the tower’s shadow "covering" the front part of the zeppelin.
Step 50: Adding Starry Skies
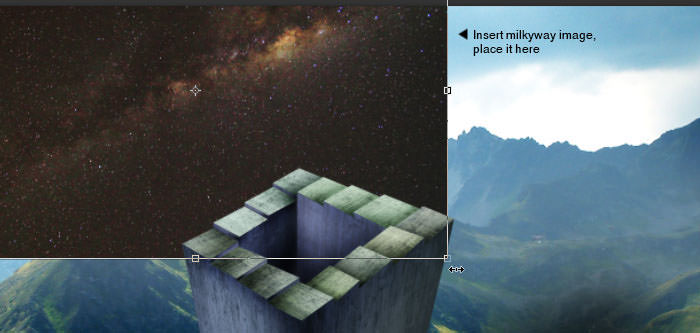
Open the milkyway image, then copy it into our document. Resize and place it on the top-left side of the canvas.
Step 51
Rename milky way layer to "stars". Adda layer mask to this layer, then use black colored soft round Brush tool with 100% opacity to hide the parts of the stars that are covering the mountains.
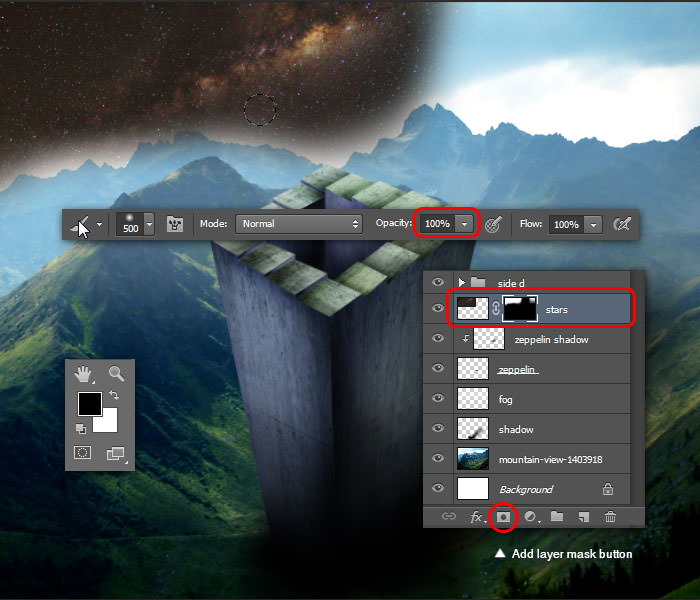
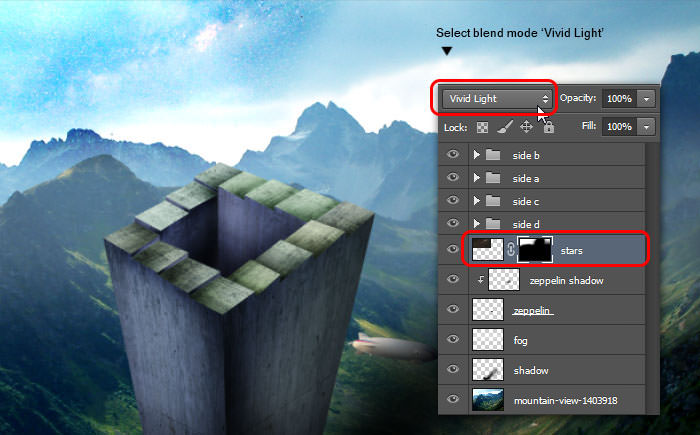
Step 52
Change the stars layer blend mode to Vivid Light. This step will blend the stars into the blue sky, creating a dreamlike scene.
Step 53
Duplicate the stars layer by pressing Ctrl+J. Move the stars copy to the right side.

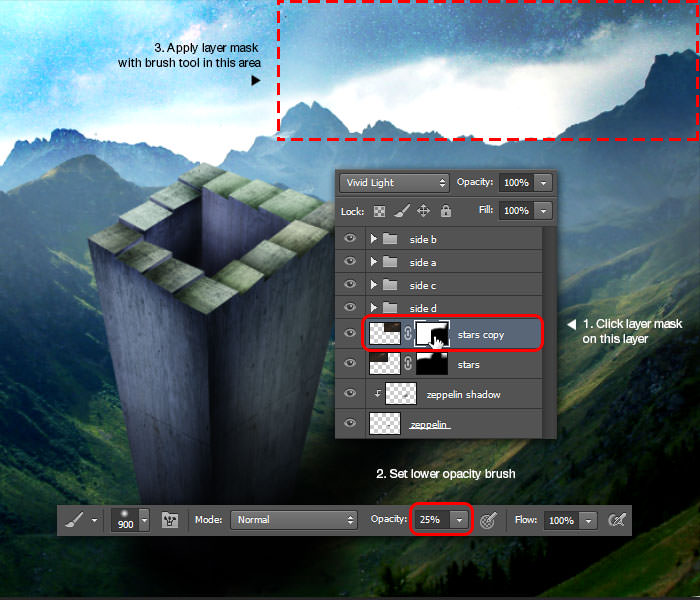
Step 54
Click stars copy Layer Mask thumbnail to activate it. Use black colored soft round Brush tool with 25% opacity to make the stars becoming semi-transparent.
Step 55
Open the moon picture. Using the Rectangular Marquee tool, select the moon.
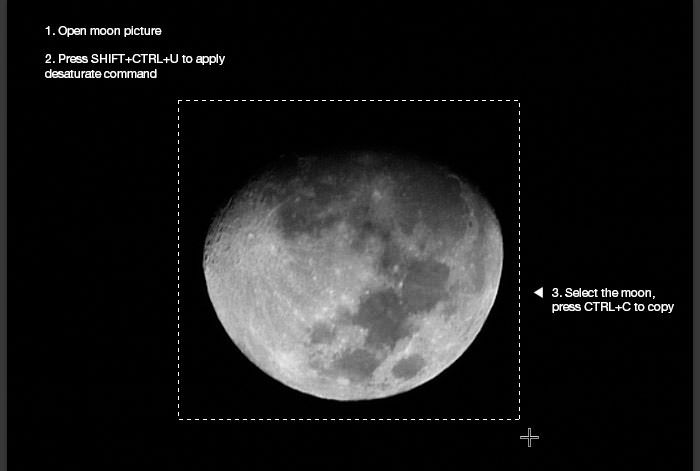
Step 56
Copy and paste the moon into our document. Adjust its size and place it on top of the mountains.
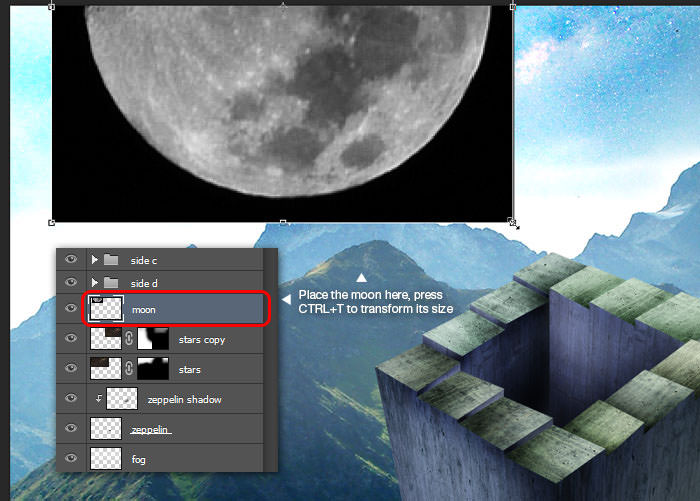
Step 57
Set the moon layer blend mode to Screen. This will "blend" the moon with the blue sky and stars behind it.

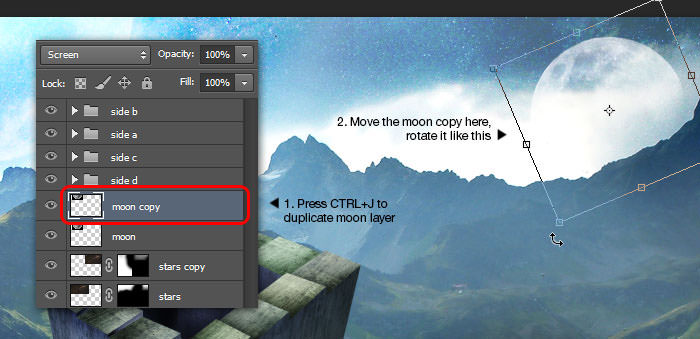
Step 58
Duplicate the moon layer. Move it to the right. Use the free transform command to rotate and downscale the moon copy.
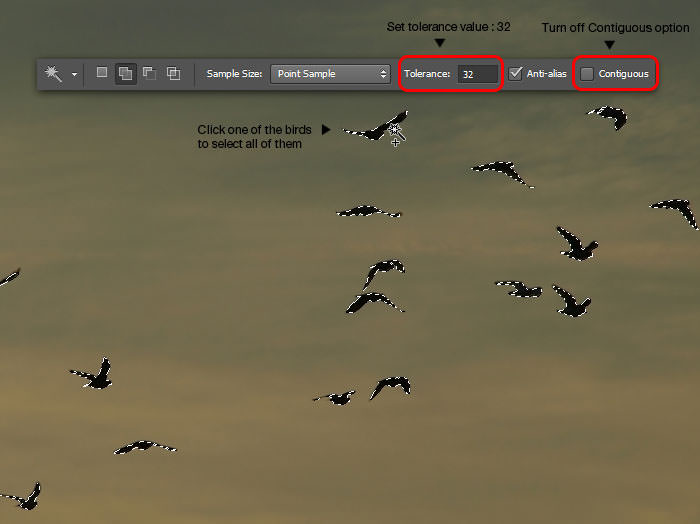
Step 59: Adding Birds
Open flying bird image, we need to select all of the birds. The fastest way to do this is with the Magic Wand tool. First, set the Tolerance value: 32 and turn off the Contiguous option (with this option turned off, magic wand tool will able to select the same range color in an image, even if the color is not connected directly).
Click one of the birds with the Magic Wand tool, all the birds should now be selected. Don’t copy it yet.
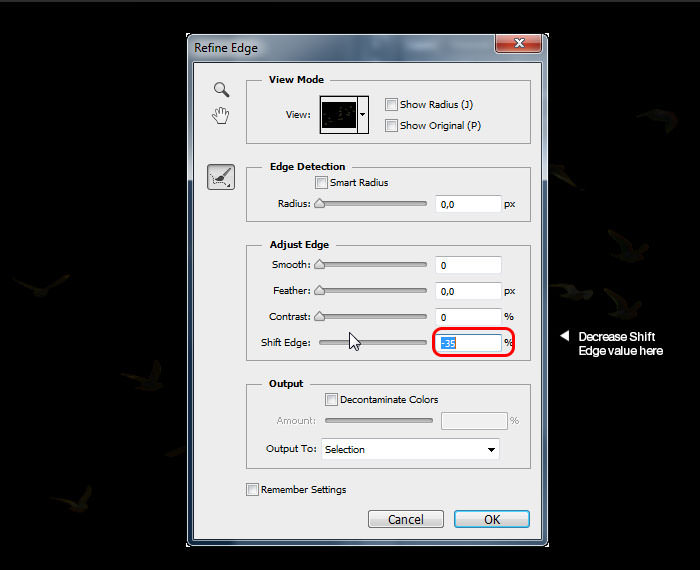
Step 60
Press Alt+Ctrl+R to show Refine Edge window. Drag the Shift Edge slider to the left, around -35, this will decrease the selection edge. Click OK to apply Refine Edge. You’re free to copy now.
Step 61
Place the birds into our document. Adjust its size and position with the free transform command. Quick tip: Hold Shift while dragging corner tranformation point to keep the image ratio. See image below for reference.

Step 62: Adding Hot Air Balloons
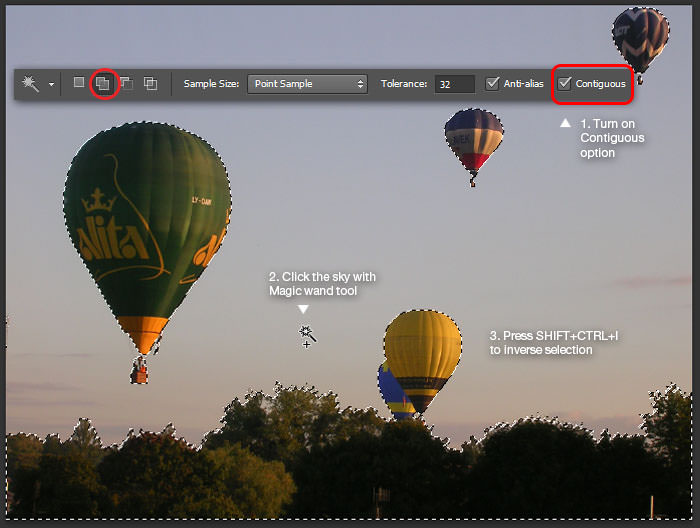
Open air balloon image. Again, we’ll be utilizing the Magic Wand tool to do fast selection. Turn on the Contiguous option, then click on the sky with the Magic Wand tool to create selection. Go to Select > Inverse to invert selection areas.
Step 63
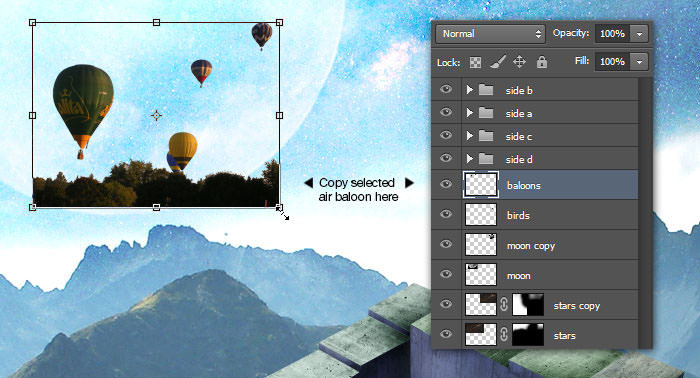
Copy the selected air balloons into our document. Place it in front of the moon. Don’t worry about those trees, we’ll deal with them in the next step.
Step 64
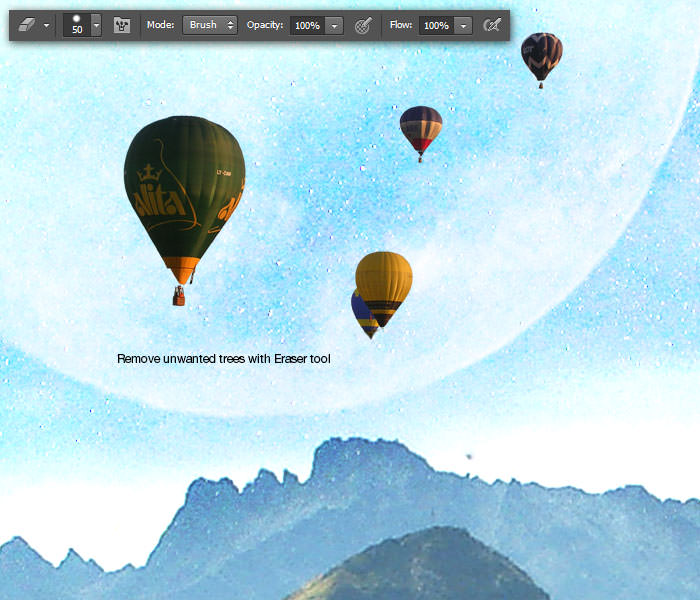
Time to remove those annoying trees. With the Eraser tool, remove unwanted trees.
Step 65
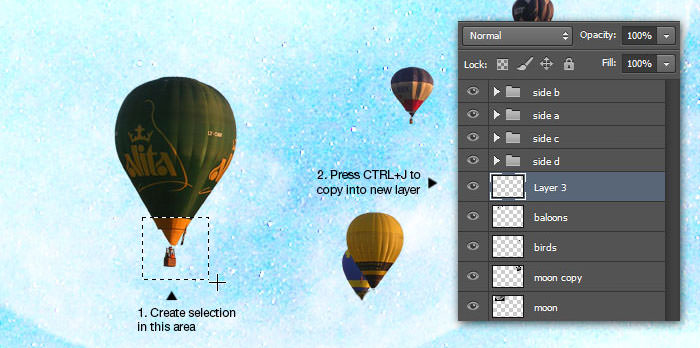
You probably noticed that the yellow hot air balloon and the blue one behind it, do not have passenger baskets. We will fix this by copying the basket from the green air balloon. Using Rectangular Marquee tool, create square selection around passenger basket. Copy selected area into a new layer by pressing Ctrl+J.
Step 66
Move the passenger basket copy layer, place it under the yellow balloon. Adjust its size with the free transform command.

Step 67
Press Ctrl+J to duplicate once more. This time, move the passenger basket under the blue balloon. Don’t forget to re-adjust its size.
Step 68
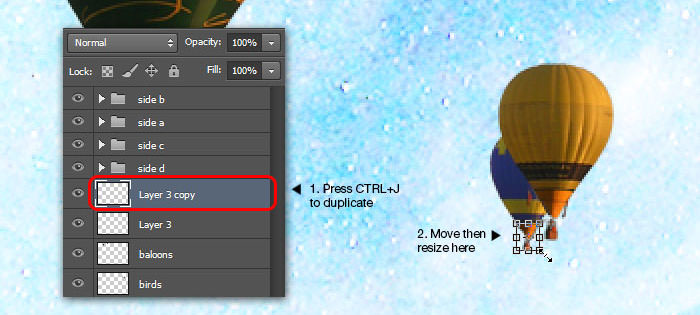
If you follow three previous steps, you should get 3 layers from the air balloons. Select all three layers, then merge them into one.
Step 69
Press Ctrl+L to show Levels window. Drag midtones slider to the left, around 2.90 value. This will make the air balloon color look pale. We do this to mimic the distant object rules in photography: colors pale as objects are moved farther into the background.

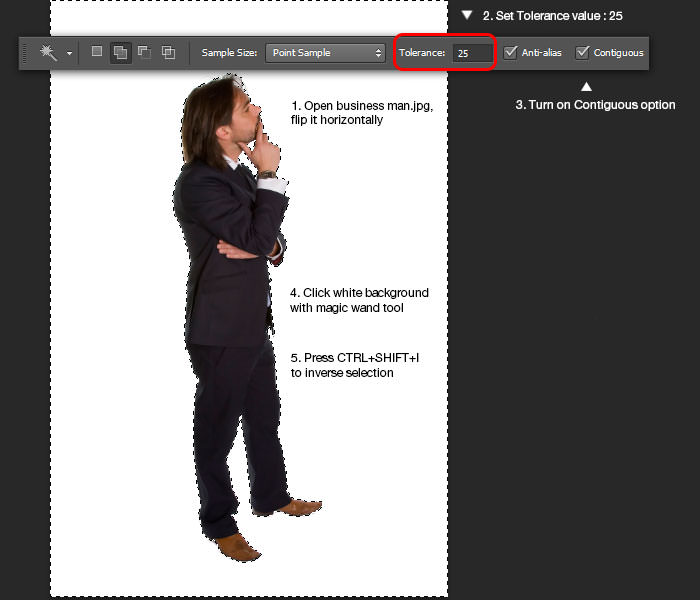
Step 70: Inserting the Business Man and Clouds
Open the business man image. Flip the image horizontally using Edit > Transform > Flip Horizontal menu.
Repeat the same trick with the Magic Wand tool to select the business man. First, set the Tolerance to 25 and turn on the Contiguous option. Select the white background, then invert the selection.
Step 71
Copy the selected business man, adjust its size then place it on one of the ladder-steps.

Step 72
Show the Color Balance window, adjust the color levels to around -31, -15 and +40 until the business man’s color is looking bluish.

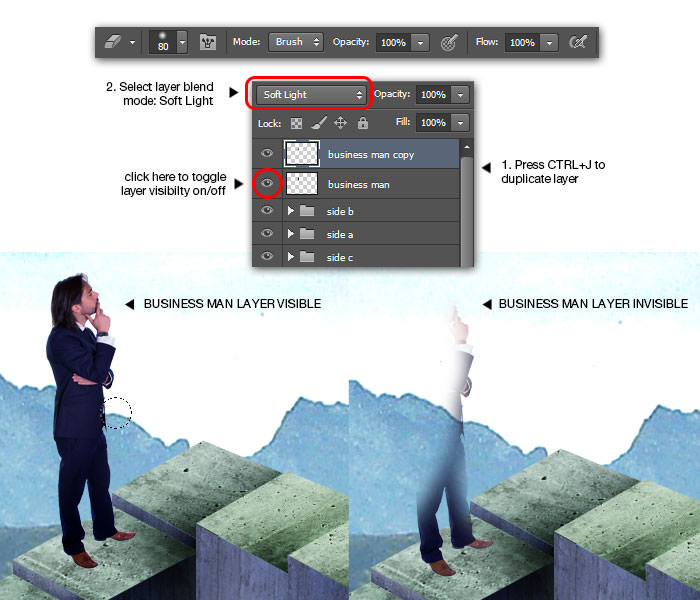
Step 73
Duplicate the business man layer. Change the business man copy layer blend mode to Soft Light. However, this makes business man appear too dark. We need to fix this, specially on the upper body area. Use Eraser tool to remove unwanted areas. See image below for erasing reference.
Step 74
Add a new layer below business man layer, name it "shadow". Use the black soft round Brush tool with low opacity to manually draw business man’s shadow. I suggest using a small brush size to get a more precise shadow.
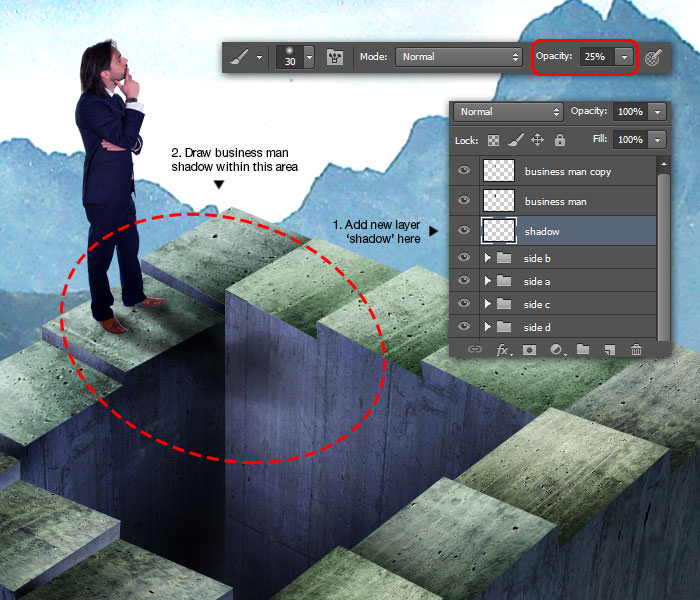
Step 75
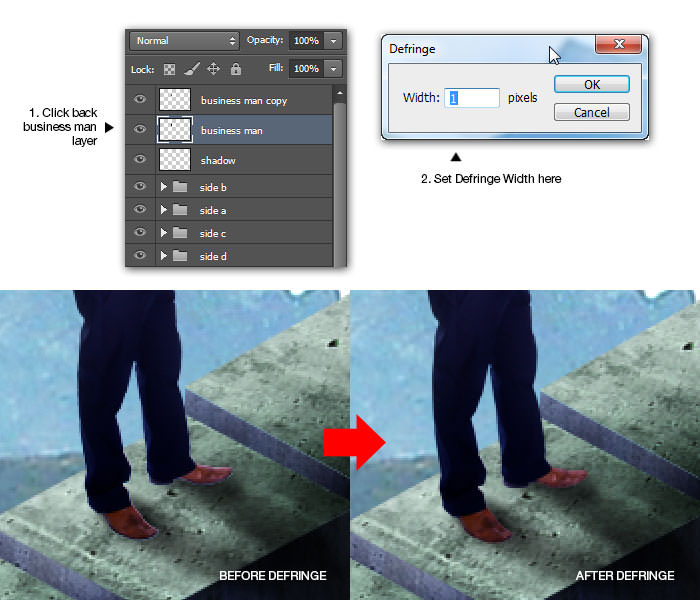
You probably has notice the white pixels under business man’s shoes. This is the remaining pixel we get when we select the business man in the previous step.
We can easily remove this unwanted pixel, by going back to business man layer, then use the Layer > Matting > Defringe menu. Set the Defringe Width: 1 pixel is more than enough. Click OK to apply defringe.
Step 76
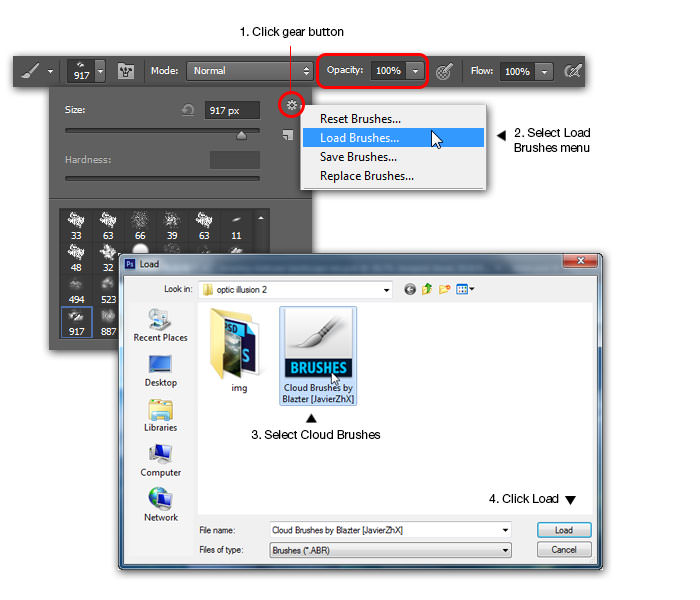
This step is about loading custom brush, if you already know how to do this then you can skip it and just load the cloud brushes we got from here.
To load custom brush, click the gear button then select Load Brushes menu. Find and select the cloud brush from your computer, then click the Load button.
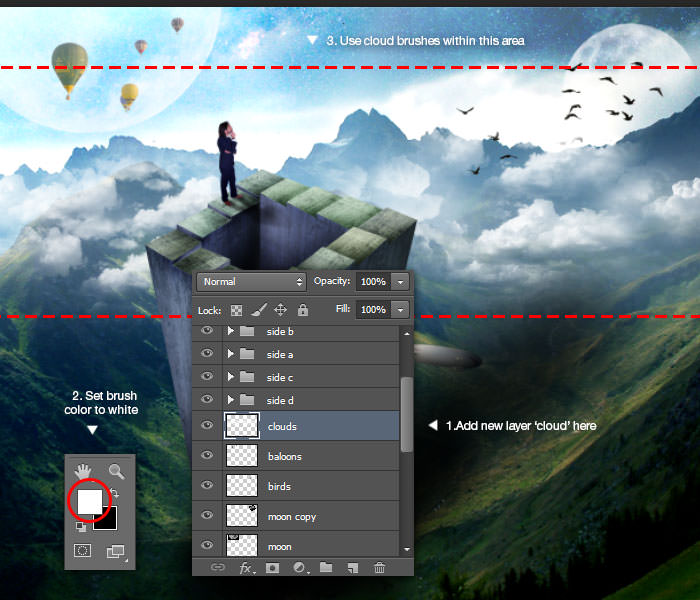
Step 77
With the cloud brushes loaded, now you can easily pick and try one of them to create awesome cloud compositions. Don’t forget to create a new layer named "clouds" below "side d" group and set the brush color to white before adding the clouds.
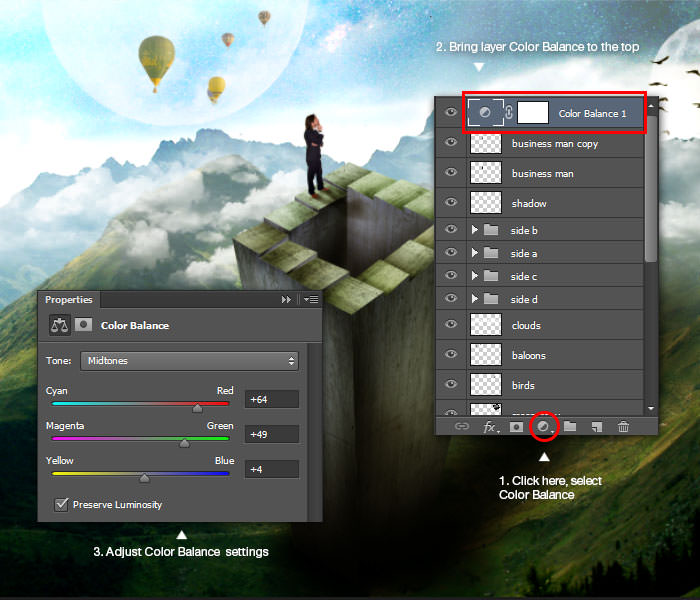
Step 78
Add a new adjustment layer Color Balance on top of layers stack. Set the color value around +64, +49, +4. One reason to do this step is to match the overall color tone, blending the composition nicely.
Congrats! you finished the tutorial
Don’t forget to save! If you have questions, let me know in the comments section.