Boost Productivity with Visual Studio Code Key Bindings Management
Visual Studio Code, Microsoft’s lightweight source code editor introduces keyboard-only navigation that’s not only an advanced accessibility feature, allowing users to navigate within the editor without a mouse, but also speeds up coding.
In today’s post, we’ll delve into how to effectively manage key bindings in VS Code, have a look at a curated list of the most commonly used keyboard shortcuts, and see an example on how you can create your own custom keys.
How to Customize Visual Studio Code
Visual Studio Code, Microsoft's new open-source code editor provides developers with many awesome features that significantly facilitate the... Read more
Find Key Bindings Quickly
You don’t necessarily need to learn keyboard shortcuts by heart right when you begin to use VS Code, as there are two easy ways to quickly find them.
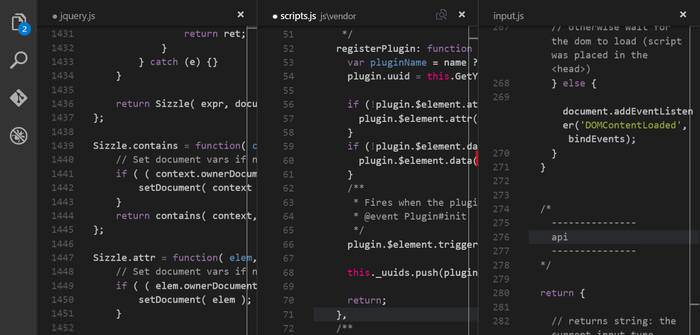
In the top menu bar, you can find the preset key binding next to every menu point (1), and the Command Palette (F1) also lists them next to each command (2).
Visual Studio Code displays key bindings that match to your operating system by default (so on a Windows machine you’ll see the Windows commands, on a Mac the Mac commands, and on a Linux box the Linux commands).
If you don’t mind to leave your code editor, you can also find the full list of preset key bindings in the VS Code Docs.
Preset Key Bindings
Visual Studio Code provides developers with many key bindings, in the following list I curated those I’ve used the most often while edited JavaScript files. You may find that others fit better to your own workflow, so it’s also worth browsing the full list by yourself.
All key bindings can be customized in VS Code, we will have a look at how to do that in the last part of this article.
Now let’s see 36 frequently used keyboard shortcuts, respectively for the 3 main operating systems (Win, macOS, Linux), many of which may be familiar from other Microsoft softwares.
Navigation
| Description | Windows | Linux | Mac |
|---|---|---|---|
| Command Palette | F1 – Shows all commands or type a command | ||
| Quick open, Go to file | Ctrl + P | Cmd + P | |
| Show symbols in file | Ctrl + Shift + O | Shift + Cmd + O | |
| Go to line | Ctrl + G – Go to a specific line | ||
| Show errors and warnings | Ctrl + Shift + M | Shift + Cmd + M | |
| Go back | Alt + Left | Ctrl + Alt + – | Ctrl + – |
| Go forward | Alt + Right | Ctrl + Shift + – | Ctrl + Shift + – |
| Commands available | ? – Available commands inside Command Palette (F1) | ||
File and Editor Management
You can find the full list for this section in two different places in the VS Code Docs, in Editor/Window Management, and in File Management.
VS Code can open 3 editor panes at the same time, Commands #5 to #7 only work if more than one editor panes are open.
| Description | Windows | Linux | Mac |
|---|---|---|---|
| New file | Ctrl + N | Cmd + N | |
| Open file | Ctrl + O | ||
| Save | Ctrl + S | Cmd + S | |
| Split editor | Ctrl + \ | Cmd + \ | |
| Focus into the first editor pane | Ctrl + 1 | Cmd + 1 | |
| Focus into the second editor pane | Ctrl + 2 | Cmd + 2 | |
| Focus into the third editor pane | Ctrl + 3 | Cmd + 3 | |
Basic Editing
To make the key bindings below work, you don’t have to highlight the whole line, it’s enough to navigate the cursor anywhere in the line you want to edit.
| Description | Windows | Linux | Mac |
|---|---|---|---|
| Cut line | Ctrl + X | Cmd + X | |
| Copy line | Ctrl + C | Cmd + C | |
| Delete line | Ctrl + Shift + K | Shift + Cmd + K | |
| Move line down | Alt + Down | Option + Down | |
| Move line up | Alt + Up | Option + Up | |
| Select current line | Ctrl + I | Cmd + I | |
| Indent line | Ctrl + ] | Cmd + ] | |
| Outdent line | Ctrl + [ | Cmd + [ | |
Rich Languages Editing
As of May 2016, VS Code has built-in rich editing support for JavaScript and TypeScript, but you can download language support extensions for many other languages from the VS Code Marketplace.
Here in the Docs you can check out the options you have for the language you want to use. Note that as VS Code is still in its early days, rich editing support may come for other languages as well.
| Description | Windows | Linux | Mac |
|---|---|---|---|
| Trigger suggest | Ctrl + Space | ||
| Trigger parameter hints | Ctrl + Shift + Space | Shift + Cmd + Space | |
| Peek definition | Alt + F12 | Ctrl + Shift + F10 | Option + F12 |
| Show references | Shift + F12 | ||
| Trim trailing whitespace | Ctrl + Shift + X | Shift + Cmd + X | |
Display
| Description | Windows | Linux | Mac |
|---|---|---|---|
| Toggle full screen | F11 | Ctrl + Cmd + F | |
| Zoom in | Ctrl + = | Cmd + = | |
| Zoom out | Ctrl + – | Cmd + – | |
| Toggle sidebar visibility | Ctrl + B | Cmd + B | |
| Show Debug in left sidebar | Ctrl + Shift + D | Shift + Cmd + D | |
| Show Explorer in left sidebar | Ctrl + Shift + E | Shift + Cmd + E | |
| Show Git in the left sidebar | Ctrl + Shift + G | ||
| Show Search in left sidebar | Ctrl + Shift + F | Shift + Cmd + F | |
How to Customize Key Bindings in VS Code
Customizing key bindings can be useful for three main things.
Firstly, if you have already got used to certain keyboard shortcuts in a different code editor, you don’t need to learn new ones.
Secondly, some of the preset key bindings are just too hard to remember, for instance take the Ctrl + K + F12 Windows shortcut for the command Open definition to the side.
Thirdly, there are also unassigned key bindings in VS Code, such as Open User Settings, and Open Workspace Settings (find them here in the Docs) you may want to use them.
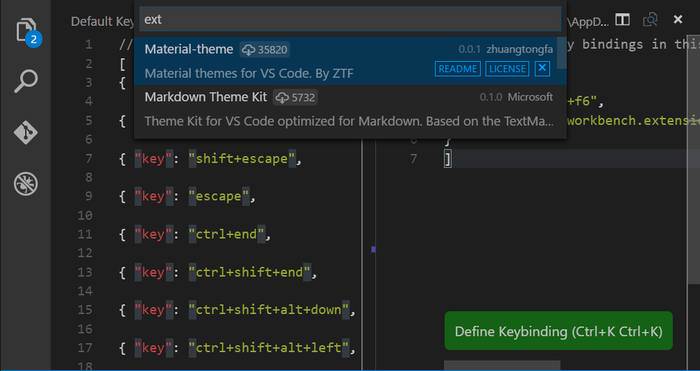
You can customize key bindings with the help of a JSON format configuration file, in a way similar to how you can customize User and Workspace Settings. The file you need to edit is called keybindings.json, and you can open it by clicking on the File > Preferences > Keyboard Shortcuts menu in the top menu bar.
When you click on it, VS Code opens two editor panes next to each other, one for the default keyboard shortcuts on the left, and one for your customized key bindings on the right.
You don’t have to do anything else, just copy-paste the keys from the left to the right maintaining the JSON format, and rewrite the key to the custom one.

Let’s see a quick example. Say you want to easily access the Show Installed Extensions command that doesn’t have an assigned key binding by default. In this case, it’s not enough to only copy-paste from the left side to the right, as unassigned keys aren’t included in the default list.
You’ll need to stick to the syntax key bindings follow in Visual Studio Code:
{
  "key": "",
  "when": "",
  "command": ""
}
Check out some real-life examples on how to properly set keyboard rules. The when part is optional, you don’t have to use it to set global key bindings, it’s only used when a certain shortcut is bound to a certain screen or mode, such as in the case of inDebugMode.
In our example, we will set a global key binding, which means we only have to set the values of “key” and “command” in our custom keyboard rule.
First, let’s look up the command id that belongs to the Show Installed Extension command. We can easily do this in the docs, that shows us that the command id we need is workbench.extensions.action.listExtensions.
The other piece of data we need is the key. The custom key we will bind to the Show Installed Extension command cannot be used by any other key binding rules, and must follow the proper key syntax, which means it needs to be made of a modifier (see the accepted modifiers by OS), and the key itself.
As I work on a Windows machine, I’ll choose the Ctrl + F6 key, as it meets every requirement, but you can choose any other key that suits your needs the best.
My keybindings.json file will look like this:
[
  {
    "key": "Ctrl + F6",
    "command": "workbench.extensions.action.listExtensions"
  }
]
The new rule takes effect at once, as Visual Studio Code updates the rules at runtime. You can test it without restarting the editor, you just need to press Ctrl + F6, or the key you chose, and a list of your installed extensions will pop up in your editor.
In the screenshot below, you can see my testing results, on pressing Ctrl + F6, I got a list of the two extensions I currently have.
You can add as many rules as you want to your keybindings.json file. Just follow the regular JSON syntax, which means you need to place each rule inside a pair of curly brackets, and separate them with a comma, as you can see below.
[
  {
    "key": "Ctrl + F6",
    "command": "workbench.extensions.action.listExtensions"
  },
  {
    "key": "Shift + F6",
    "command": "workbench.extensions.action.installExtension"
  }
]