20 Dropbox Tips and Tricks for 2024 (Updated)
If you think of Dropbox as just another cloud storage service, you might be surprised by the depth of its features. Beyond basic file saving and sharing, Dropbox offers a plethora of lesser-known functionalities that enhance its utility and performance.
Known for its simplicity and power, Dropbox stands out among cloud storage options. This post will unveil various hidden tips and tricks to help you master Dropbox, enabling you to do much more than merely store and sync files. Let’s dive into these insights.
- Request files, get in Dropbox
- Preview any file format
- Protect Dropbox account with two-step verification
- Access deleted folders
- Track everything you’ve shared
- Check recent activities of your files
- Collaborate on files with teams
- Customize Dropbox notifications
- Access files without the internet
- Boost sync speed
- Delete files without traces
- Access folder versions of files
- Smart bookmarks with Dropbox
- Get direct download links
- Share screenshots quickly
- Add comments to files
- Backup desktop and document folders
- Custom sync files and folders
- Check Dropbox file activities
- Auto-sync memories
Request files from anyone, get them in Dropbox
Did you know that anyone can send files to your Dropbox, even if they don’t have an account? The File Requests feature makes this possible. It allows you to collect and receive files of any size directly into your Dropbox, offering a convenient way for others to send you what you need.
Here’s a step-by-step guide to request files anonymously:
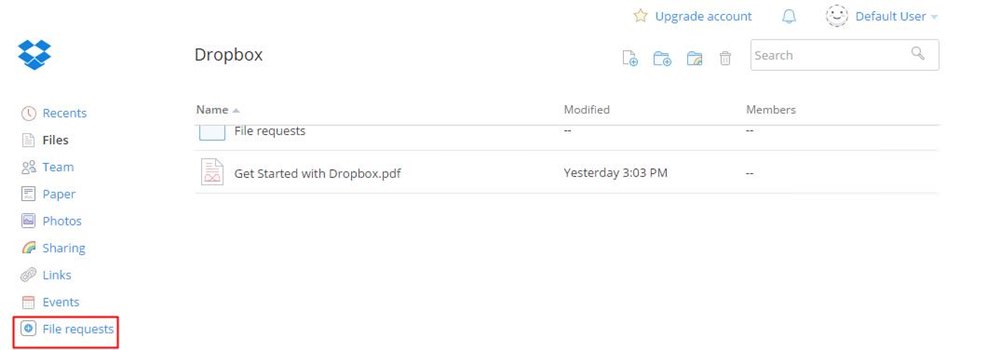
- Log in to your Dropbox account.
- Access the “File requests” option from the left sidebar.
- Select “Create a file request”.
- Provide a brief description for your request and choose “Change folder” to specify where the incoming files should be stored. Then, click “Next”.
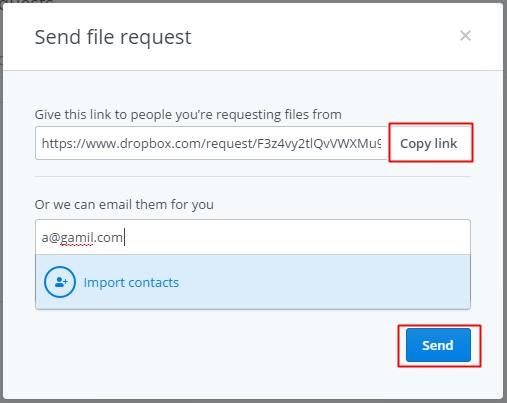
- Copy the provided link and share it with anyone from whom you wish to receive files. Alternatively, enter their email addresses and hit “Send” to invite them directly.

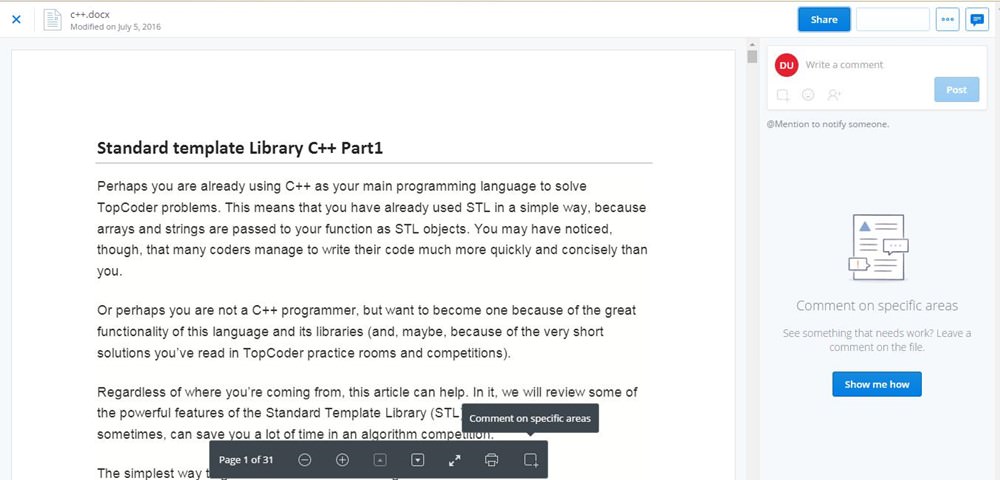
Preview almost any file format
Struggling to open a file on your computer? Upload it to Dropbox and use its versatile “file preview” feature. This handy tool lets you peek into various file types such as PDF, PSD, AI, PNG, JPG, SVG, and BMP, among others.

Enhance your productivity with the integration of Office Online, allowing you to read and edit documents, spreadsheets, and presentations right from your browser for free.
Here’s how to preview or edit files in Dropbox:
- Click on any file to open it in Dropbox.
- In the preview window, look for the arrow next to the “Open” button and click it.
- Select from options like “Microsoft Word/Excel/PowerPoint Online” to start editing.
Protect your account with two-step verification
To enhance the security of your Dropbox account against unauthorized access, it’s highly recommended to enable two-step verification. This security measure introduces an additional layer of protection by sending a unique code to your phone each time a sign-in is attempted from an unfamiliar device.
Though it may seem like an additional task, the increased security for your account is substantial. Activating this feature is straightforward and can be done through the security settings of your account. Here’s how:
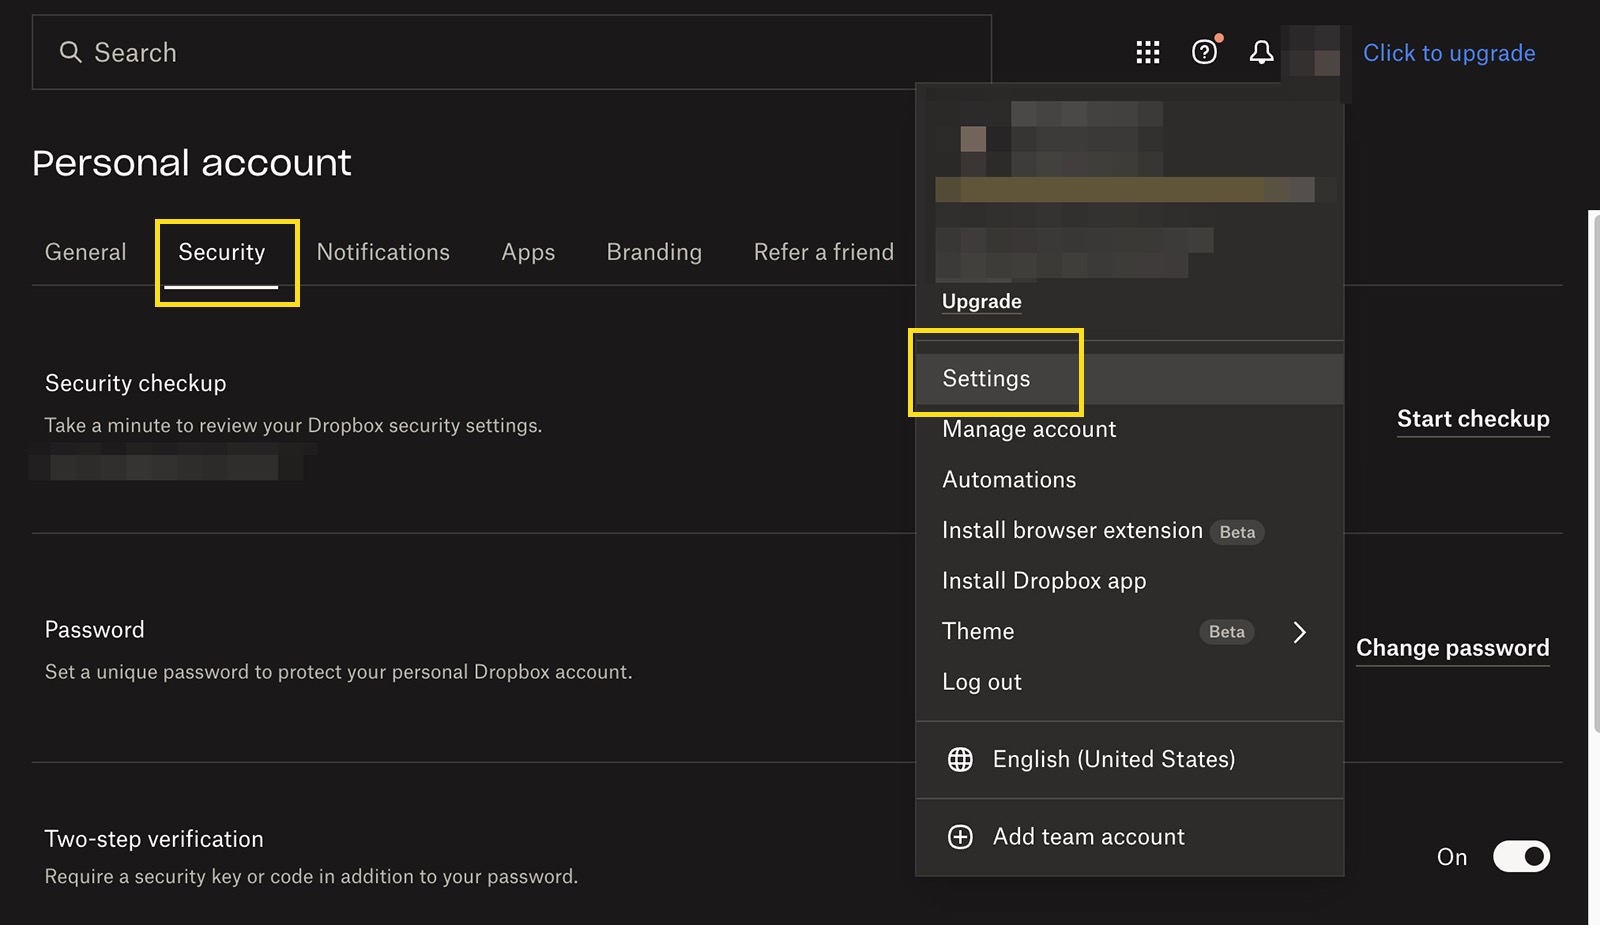
- Sign in to dropbox.com using your credentials.
- Navigate to Settings > Security.
- In the “Two-step verification” section, choose and set up your preferred verification method.
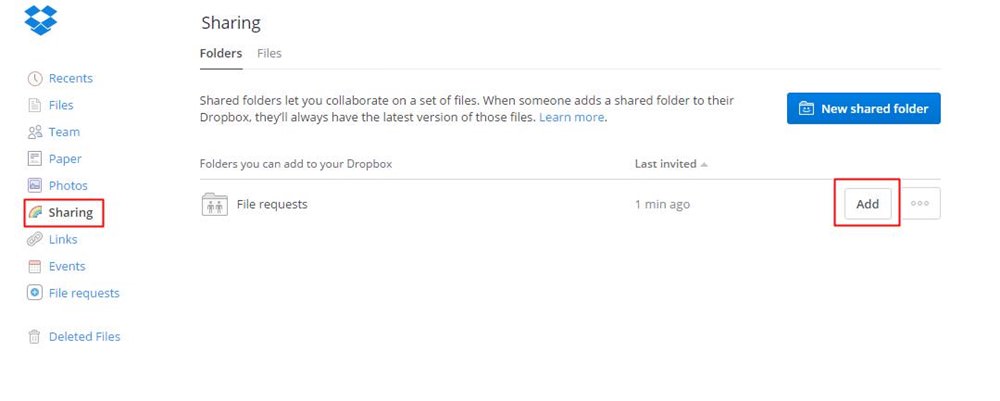
Re-access deleted or left-shared folder
Ever left or deleted a shared folder and needed it back? With Dropbox, retrieving it is straightforward. Here’s how you can re-access shared folders:
- Go to “Sharing” in the left sidebar of your Dropbox.
- Under the “Folders you can add to your Dropbox” section, find the folder you wish to rejoin and click “Add”.
Track everything you’re sharing
Ever wondered what exactly you’ve shared on Dropbox? It’s easy to keep track and ensure you haven’t accidentally shared something unintended. Dropbox provides a straightforward feature to view all your shared items.
Simply log in to your Dropbox account and select the ‘Shared’ option in the left sidebar.
You’ll see a list of all your shared folders and files, including last modification dates. This list encompasses both the folders you’ve directly shared and those you have access to but haven’t added to your space. You can also manage who has access, adding or removing contributors as needed.
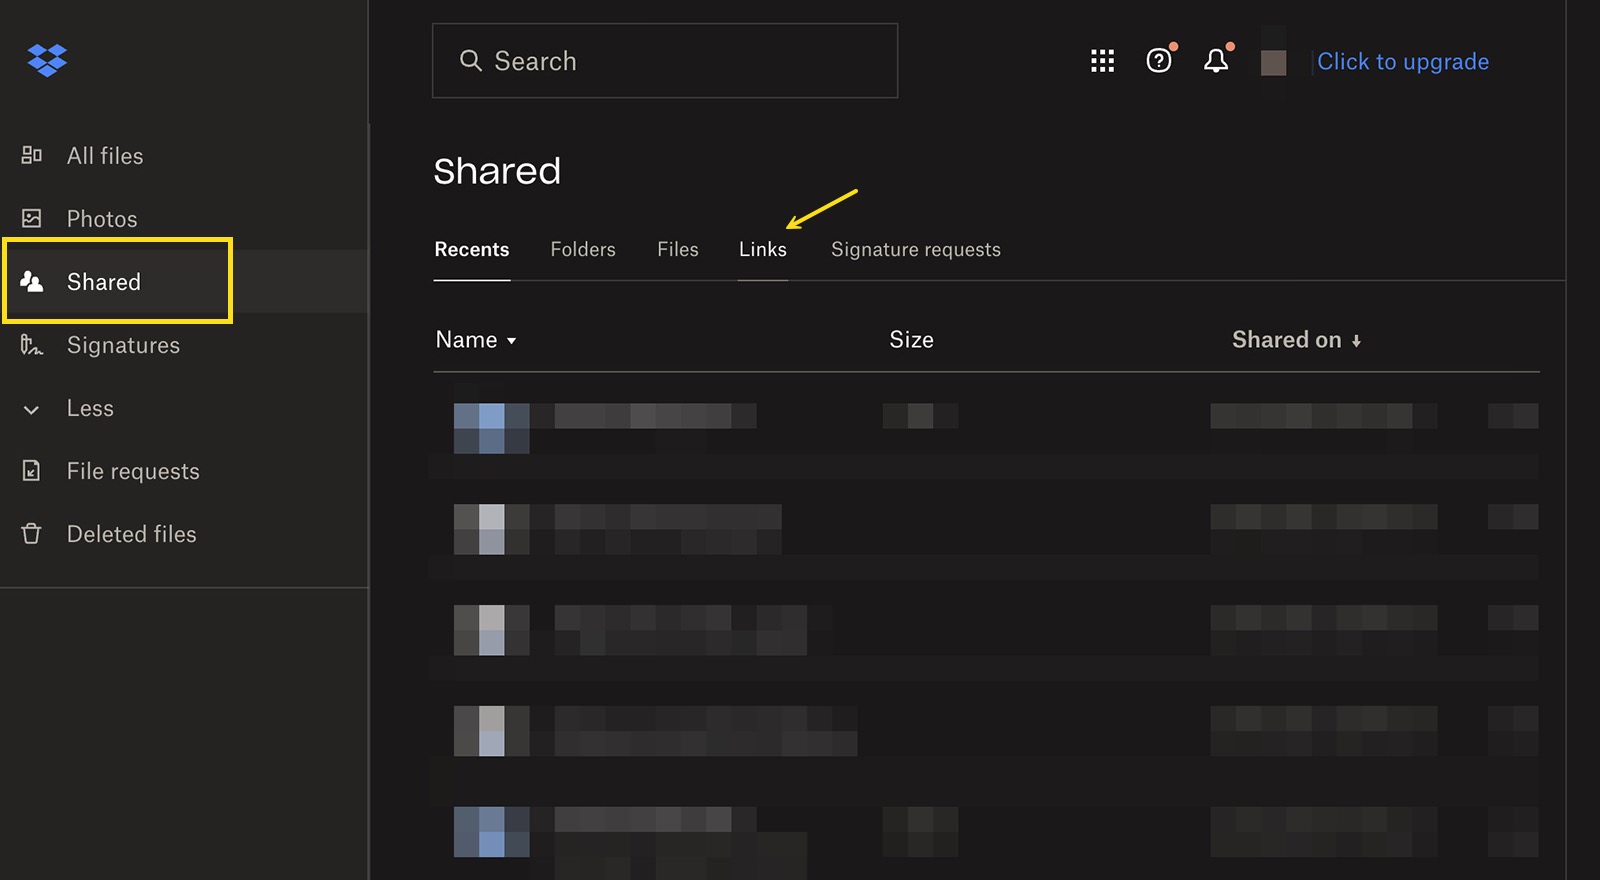
For a detailed look at each link-shared file or folder, click on the ‘Links’ tab. Here, you can review the sharing date for each item and, if necessary, delete any link to revoke access, ensuring complete control over your shared content.
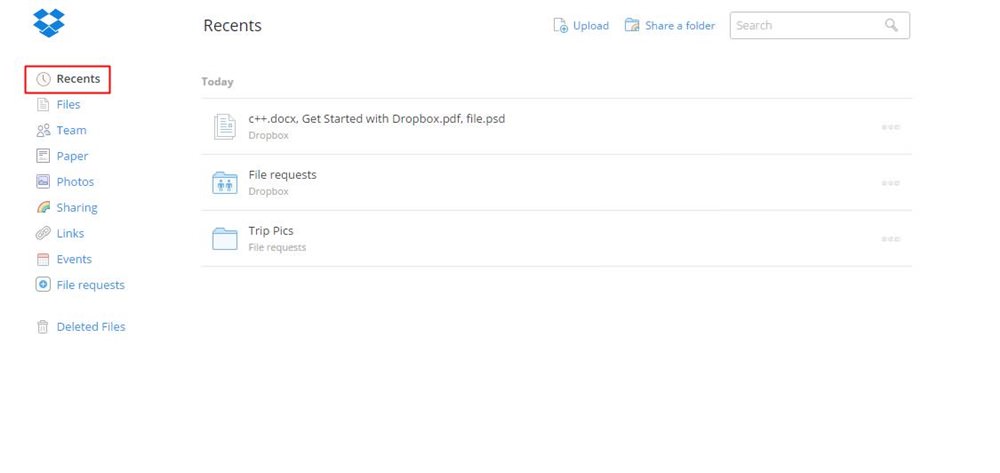
Check recent activities of your files
Looking for the latest updates or the last file you worked on? Dropbox makes it easy with the “Recents” section in the left sidebar. This feature provides an updated list of recently opened or modified files, so you’re always in the loop.
From here, you can share, download, comment, delete, or view previous versions of your files with ease.
Work on files as a team
Team collaboration is a breeze with Team Dropbox. It’s a feature designed for groups to share and manage files efficiently, offering different privileges to team members. And the best part? It’s free!
Start by sharing a single folder with the entire team or specific groups. You can manage access, organize content, and even create groups to share files with everyone in the group instantly, similar to Friend Lists in Facebook.
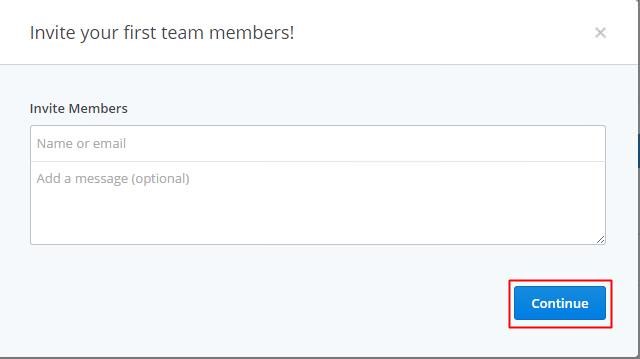
Setting up a new Team Dropbox account is easy:
- Select the “Team” option from the left sidebar in Dropbox and choose “Create free team”.
- Enter your team’s name, create a new Team Dropbox, and provide your personal/work email and password for the team, then click “Continue”.
- Invite members to your team as needed and proceed by clicking “Continue”.
- Finalize by clicking “Create team Dropbox”, and you’re all set.

Customize Dropbox notifications
For those heavily using Dropbox, the influx of email and push notifications can become overwhelming. Fortunately, customizing these alerts is a straightforward process to keep only the most relevant updates coming your way.
Managing Email Notifications
Begin with email notifications by heading to Dropbox.com and adjusting the ‘Notification settings’ under your ‘Personal account’. Tailor these settings to receive only the notifications you find most pertinent.

Configuring Desktop Notifications
For desktop alerts, dive into your Dropbox settings and select the ‘Notifications’ tab under Preferences. This area allows you to specify which updates you want to see on your desktop.

By fine-tuning these settings, you can streamline your notifications to ensure you’re only alerted about the most critical updates, helping maintain focus and reduce unnecessary interruptions.
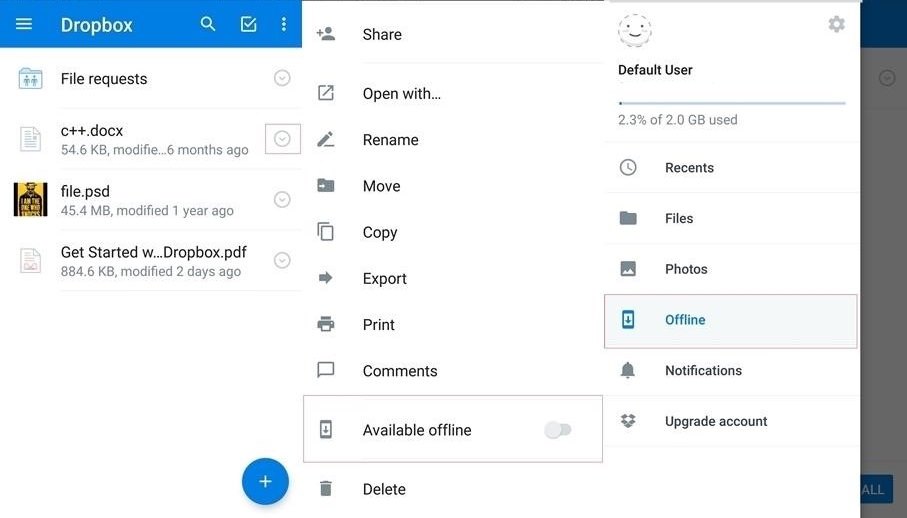
Access files without Internet
Need to access certain files on the move, but stuck without internet? No problem. Dropbox’s Offline feature allows you to keep important files accessible on your mobile device, anytime, anywhere.
To make files available offline, simply:
- Open the Dropbox mobile app and navigate to the files you want to access offline.
- Tap the icon to the right of the file and switch on the “Available offline” toggle. Dropbox will download the files to your device, making them accessible without an internet connection.
- Access these offline files anytime by tapping on “Offline” in the app.
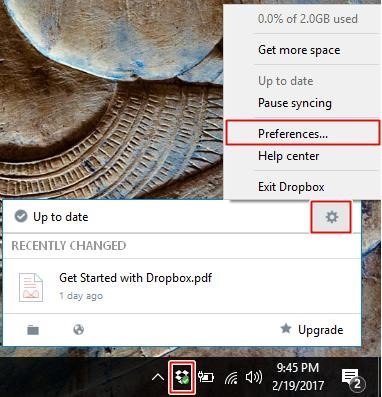
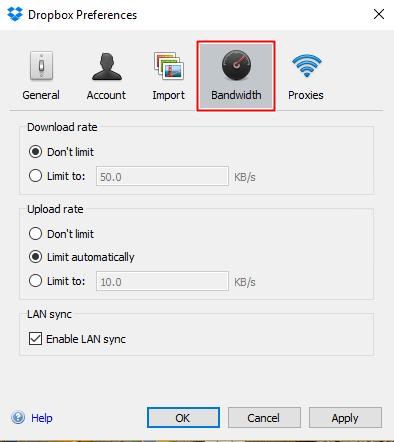
Boost synchronization speed
Dropbox is designed to be considerate of your internet usage, typically using only 75% of your maximum upload speed. However, if you’re looking to speed up your uploads or syncs, you can adjust this setting.
To maximize Dropbox’s bandwidth usage:
- Right-click the Dropbox icon in your system tray.
- Click the gear icon and select “Preferences”.
- Go to the “Bandwidth” tab.
- Choose “Don’t limit” under the “Upload rate” to allow Dropbox to use the full speed of your internet connection for uploads.
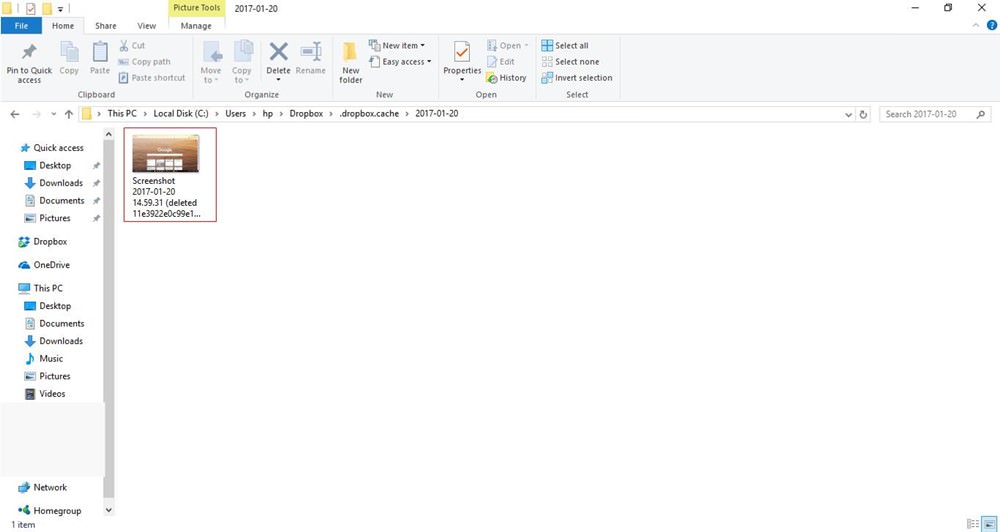
Delete files without leaving tracks
Accidentally stored a sensitive file in Dropbox and need to remove it discreetly? Dropbox’s cache folder, “.dropbox.cache”, is a hidden folder where deleted files are temporarily stored. Clearing this cache ensures that files are completely removed.
To clear the Dropbox cache and delete files permanently:
- Open your file manager and enter
%HOMEPATH%\Dropbox\.dropbox.cachein the location bar, then press Enter. - This takes you directly to the Dropbox cache folder, where you can permanently delete any files or folders you no longer want.
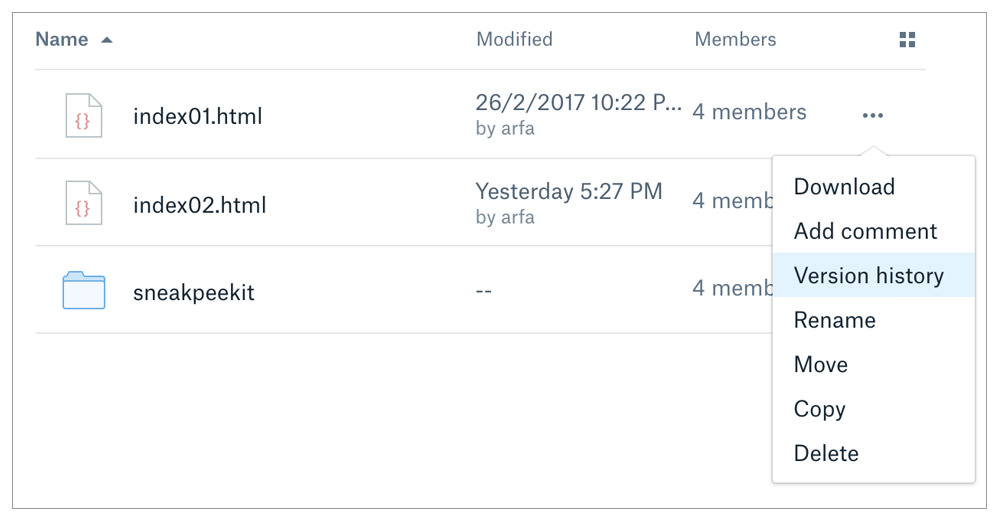
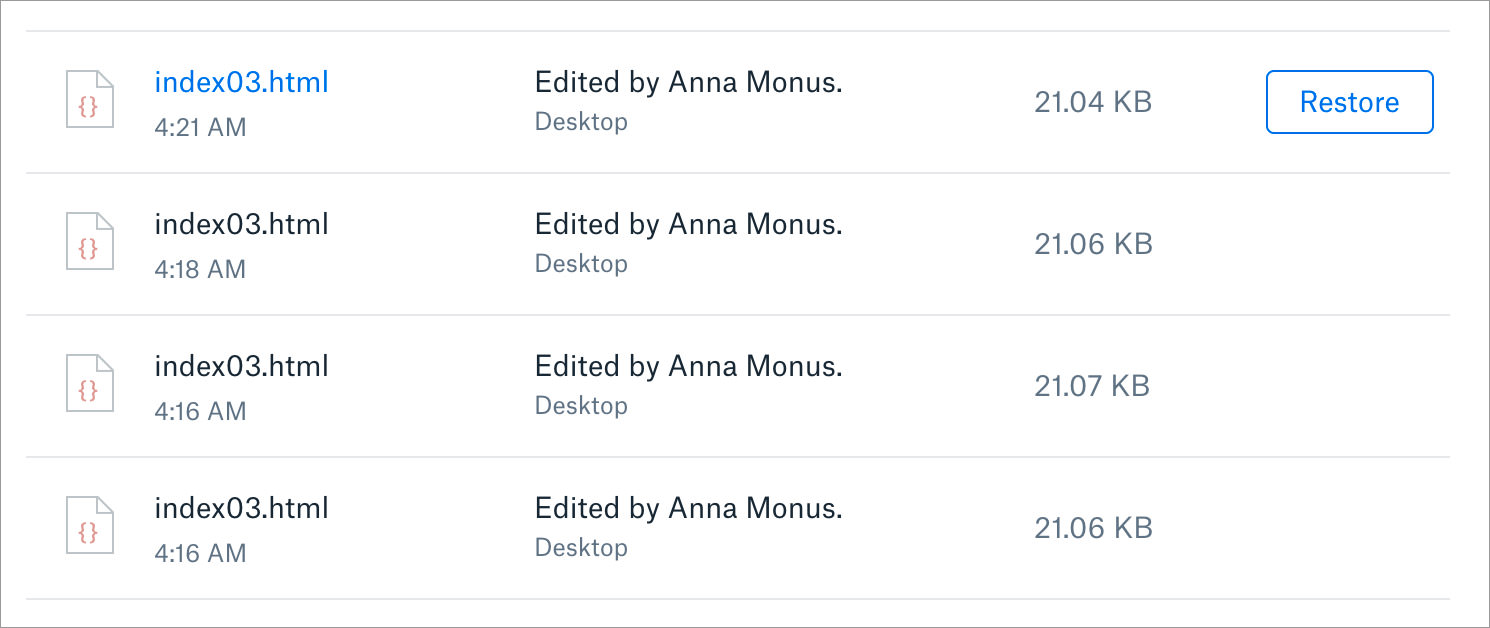
Access older versions of files
Ever wish you could undo changes to a file? With Dropbox, you can! It keeps older versions of your files for 30 days, allowing you to revert to previous versions if needed, much like the File History feature in Windows 10.
Here’s how you can access an older version of a file:
- Next to the file of interest, click the three dots and choose “Version history”.
- Preview the versions listed and click “Restore” on the one you want to revert to.
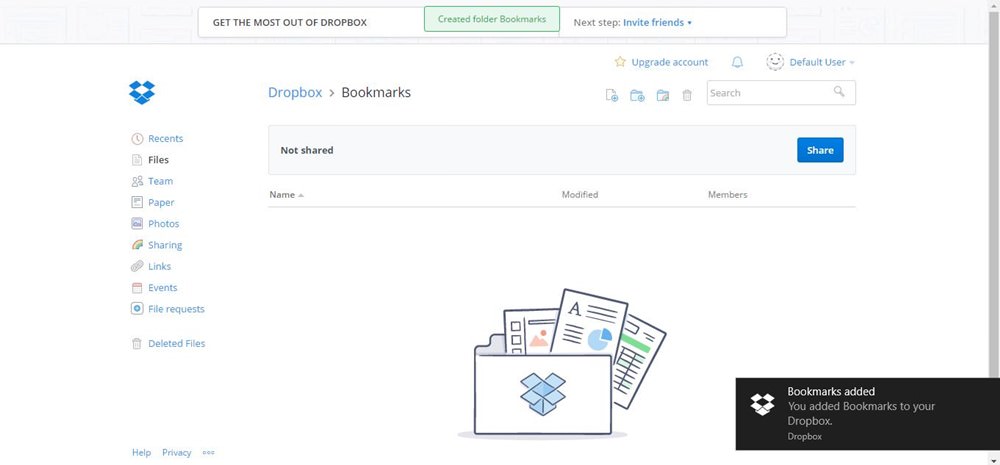
Smart bookmarks with Dropbox
Imagine having all your bookmarks accessible from any device via the cloud. Dropbox introduces a seamless way to store and sync your bookmarks just by dropping them into a designated folder.
Note: While this works great with Google Chrome and Mozilla Firefox, Microsoft Edge does not support the drag-and-drop feature for this purpose.
To organize and sync your bookmarks using Dropbox:
- Create a “Bookmarks” folder in your Dropbox. This will be your central hub for all links.
- Simply drag the small icon next to the browser’s location bar and drop it into your “Bookmarks” folder in Dropbox.
Get direct download links
Typically, when you click a Dropbox link, it opens a preview page with an option to download. But there’s a neat trick to bypass this and start the download immediately.
For a direct download link, change the dl=0 at the end of the Dropbox link to dl=1. This simple tweak turns it into an instant download link.


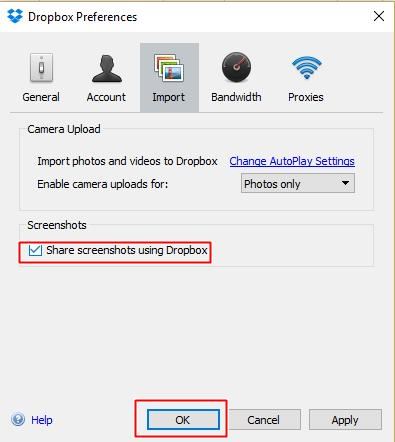
Share screenshots on the fly
Gone are the days of manually dragging screenshots to Dropbox to share them. With Dropbox’s screenshot sharing feature, you can streamline the process and share your screenshots instantly.
To set up quick screenshot sharing:
- Right-click the Dropbox icon in your system tray.
- Click the gear icon and choose “Preferences”.
- Navigate to the Import tab, select “Share screenshots using Dropbox”, and click “OK”.
- Now, when you take screenshots using the Ctrl + Print Screen keys, Dropbox will automatically save them to a “Dropbox/screenshots” folder and copy the link to your clipboard, ready for quick sharing.
Add comments to files
Dropbox not only makes file sharing effortless but also includes a powerful commenting feature to facilitate discussions directly on any file. Whether you’re inviting someone to view a file or sharing a link, don’t miss out on this collaborative tool.
Accessible via Dropbox’s web, mobile, and desktop applications (specifically the Dropbox app, not the file browser on your computer), this feature allows you to select any file or view it in preview mode to access the comment sidebar.
In this sidebar, you can input your observations, ask questions, or tag teammates with an @ to bring them into the conversation. They’ll receive a notification either in Dropbox or via email, allowing you to see the dialogue unfold in real time.
This commenting tool centralizes all discussions related to a file, ensuring that every detail is noted and nothing is missed. As you and your team update the file, the online preview updates as well, keeping everyone in sync with the latest version.
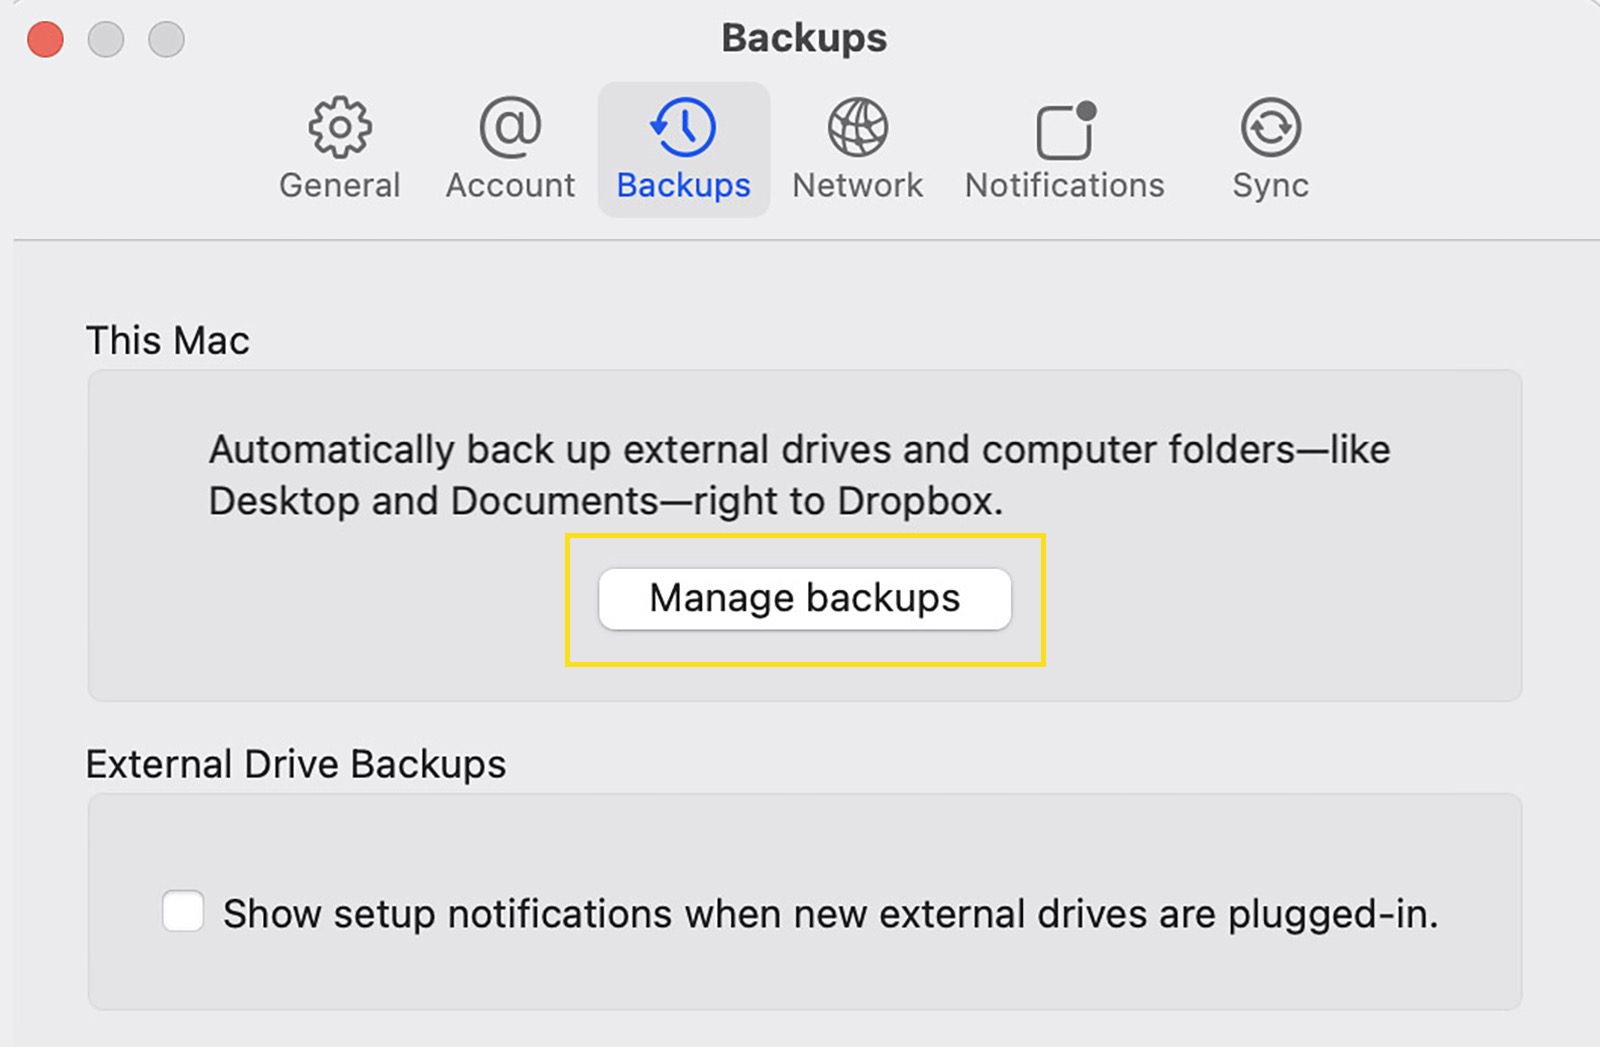
Back up Desktop and Documents folders
Expand your Dropbox’s utility beyond just syncing a specific folder—now it can also protect the entirety of your Desktop, Downloads, and Documents folders.
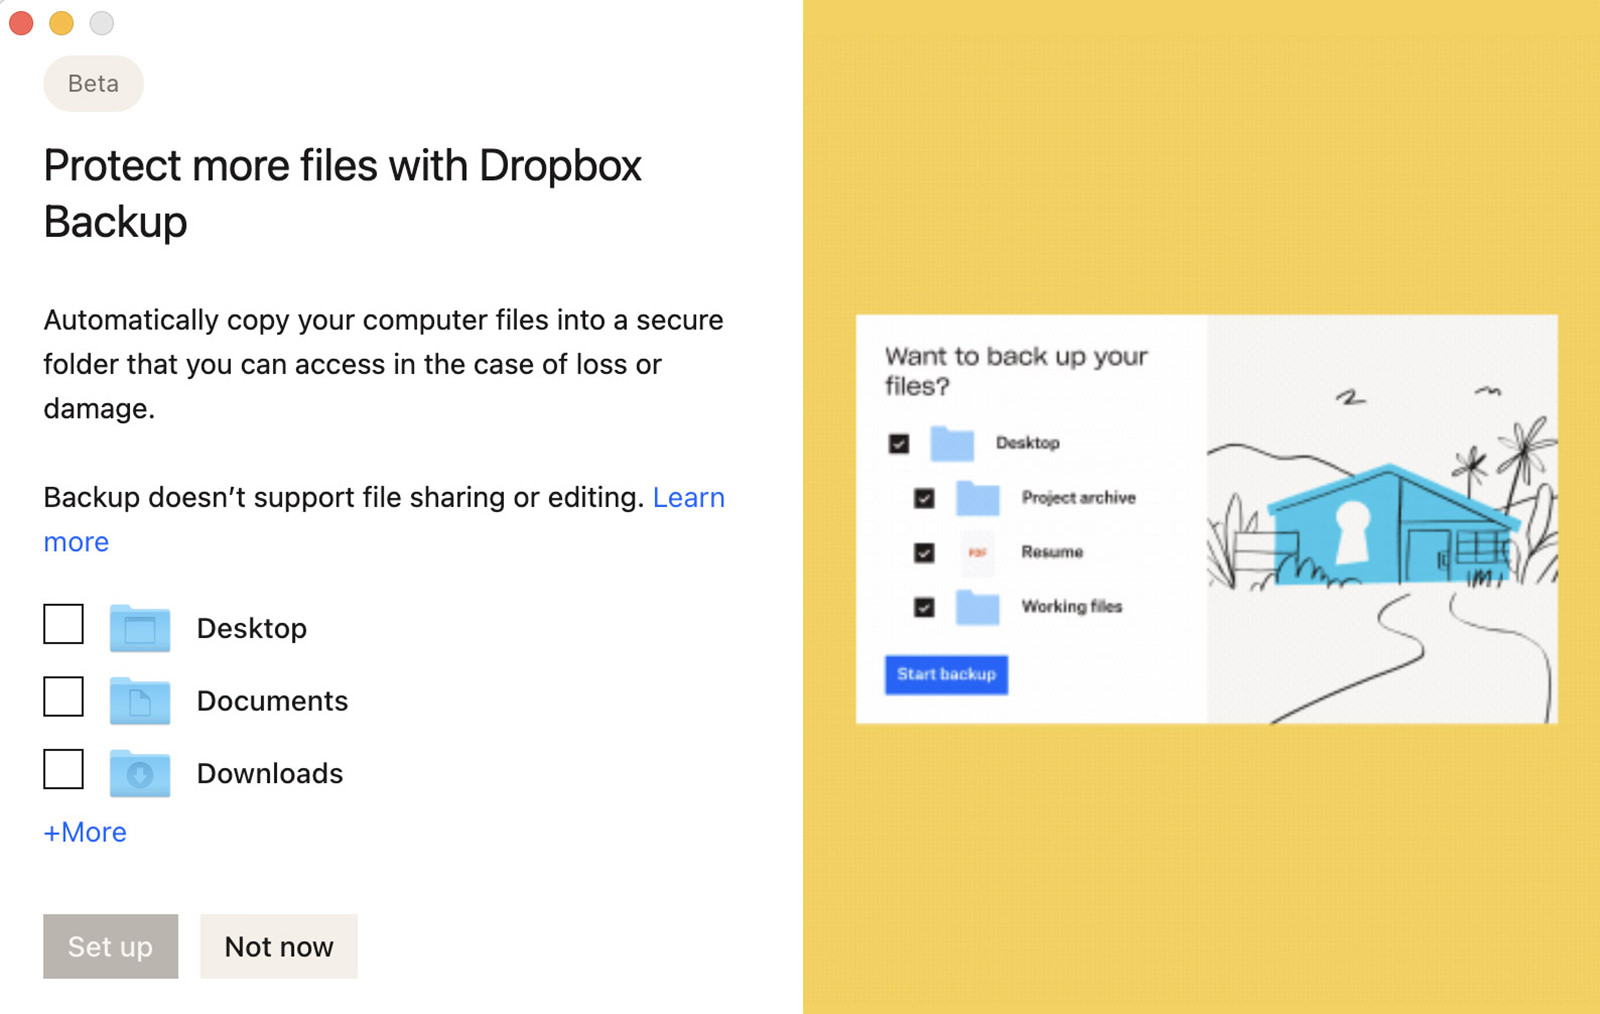
Setting up is straightforward:
- Access your Dropbox settings,
- locate the ‘Backups’ section, and
- select the ‘Manage backups’ option.
Choose the folders you wish to sync and back up.
This functionality offers a handy way to safeguard essential files outside your main Dropbox folder, ensuring your Desktop and other crucial areas are always up-to-date and secure in Dropbox with minimal effort.
Sync required files and folders only
If you’re looking to save space on your computer or conserve bandwidth, Dropbox’s Selective Sync feature is your ally. It allows you to choose only the folders you need to sync, keeping your hard drive clutter-free and your Internet usage optimized.
To enable Selective Sync:
- Right-click the Dropbox icon in your system tray.
- Click the gear icon and select “Preferences”.
- Go to the “Account” tab and click “Selective Sync”, then hit “OK”.
- In the Selective Sync window, deselect any folders you do not want to sync to your computer. Click “Update”, then “OK” to confirm your changes.
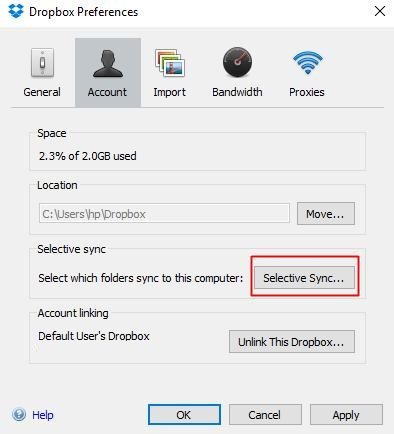
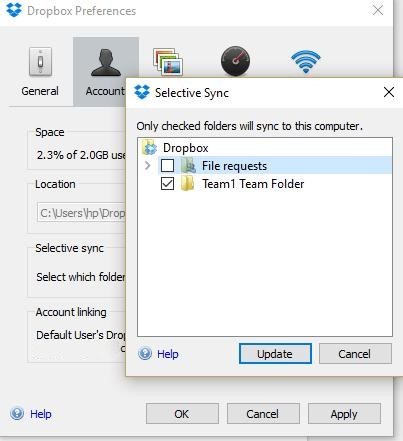
Note: Deselecting folders will remove them from your computer’s hard drive but keep them accessible through dropbox.com and other devices.
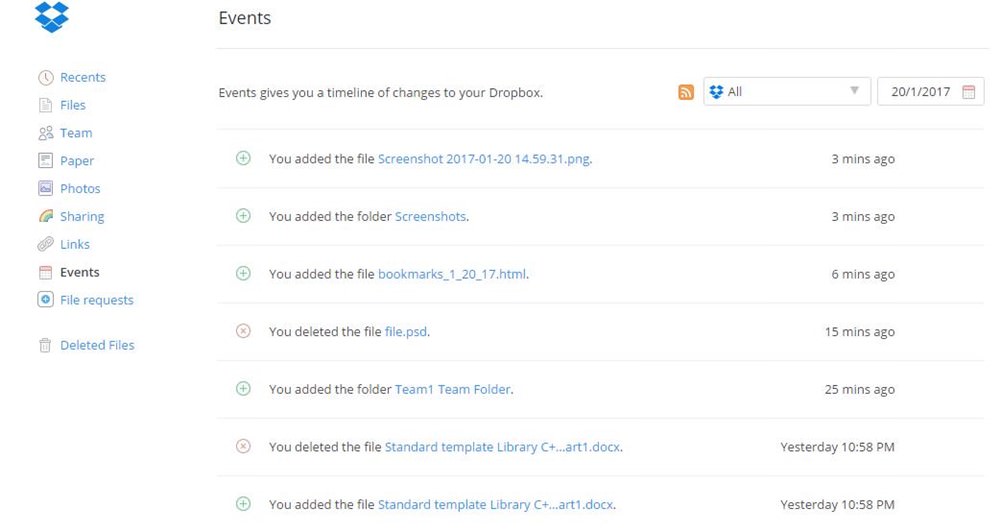
Check Dropbox files activities
The “Events” feature in Dropbox is a powerful tool that logs various activities within your account, such as file creation, sharing, deletion, and restoration. This log is not just a timeline but a detailed record that you can filter by category and date, and sort for easier navigation.
To access the event log in Dropbox:
- Click on “Events” in the left sidebar of your Dropbox page.
- Explore the timeline to see a detailed log of all activities associated with your account.
Auto-sync your memories
Dropbox isn’t just for files and folders; it’s also an ideal space for storing and viewing your photos and videos. With its online gallery feature, you can easily view your media without the need to download them, making Dropbox a perfect place to safeguard and enjoy your precious memories.
To view your photos and videos in Dropbox:
- First, upload your photos and videos to Dropbox.
- Go to dropbox.com and select “Photos” from the sidebar to access your media.
- Browse through your photos and videos, neatly organized in a gallery format.

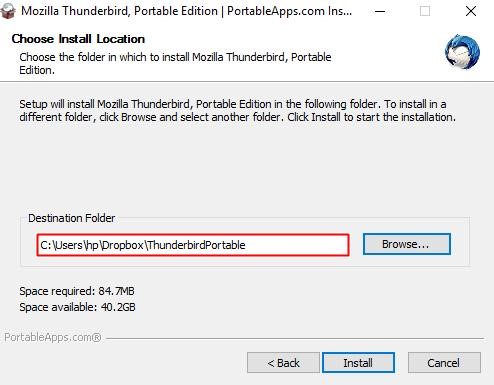
Bonus: Sync data of portable apps
Dropbox’s synchronization isn’t limited to documents and media; it can also keep your application data consistent across multiple computers. This feature is particularly handy for portable apps, allowing you to have the same settings, bookmarks, and history across all devices without needing to rely on individual app sync features.
Here’s a guide to syncing a portable app’s data using Dropbox, demonstrated with Thunderbird:
- Download and install the portable version of an app (e.g., Thunderbird) directly into your Dropbox folder.
- Run the portable app from the Dropbox folder as you would normally. Any changes or data will be automatically synchronized across all your devices through Dropbox.
Explore these lesser-known tips to maximize your productivity and make the most out of your Dropbox experience. Happy dropboxing!