10 Steps to Creating a Professional-Looking WordPress Admin
Whether you build WordPress sites for clients, have your own multi-authored blog, or just want a more personalized look for your site, there are many cases when you may want to change the design of the WordPress admin panel and the login page. You can install a pre-prepared admin theme plugin for sure, but what if you want more freedom?
Branding the WordPress admin is not just about design, it can be a smart way of self-promotion as well. In this post we will take a look at how you can customize the WordPress dashboard and the login page, add your own logo, remove or change menu items, remove links pointing to WordPress.org, and fine-tune many other admin settings with the help of the AG Custom Admin Panel plugin.

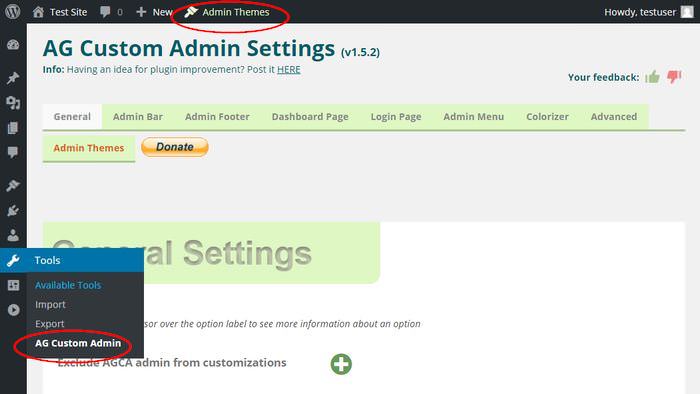
1. Install the AG Custom Admin Plugin
First of all, navigate to the Plugins > Add New admin menu item in your WordPress dashboard, search for the AG Custom Admin plugin, install and activate it. The plugin places a new submenu called AG Custom Admin inside the Tools menu, and a button onto the top Admin Bar to help you quickly reach the settings.
2. General Settings
In the first tab you can configure the General Settings. One of the great things about this plugin is that if you move the cursor over the option labels, a small tooltip pops up in which you can read more about that specific option.
The first option in General Settings is the “Exclude AGCA admin from customizations” where you can quickly switch on and off the customizations for admin users. This can be useful if you want users with the admin role to see the default WordPress dashboard.
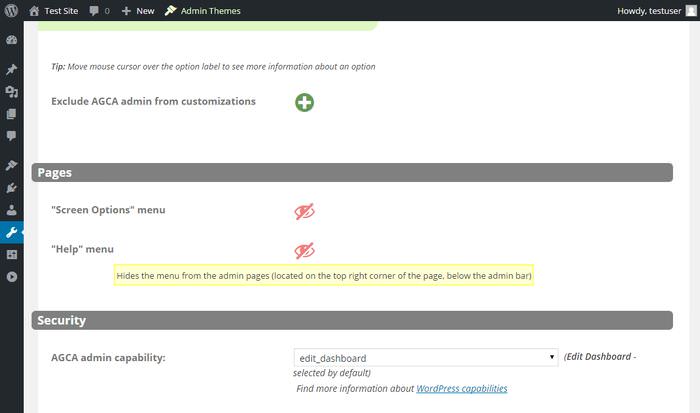
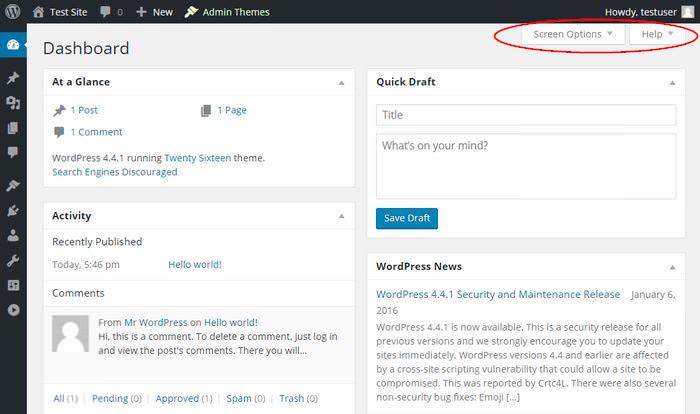
The next two settings hide or reveal the “Screen Options” and the “Help” menu located on the top right corner of each admin page (see below). Too many choices can confuse less tech-savvy users, so it can be a good idea to get rid of these two options.
General Settings also allow you to choose the WordPress capability that gives users access to the settings of the plugin.
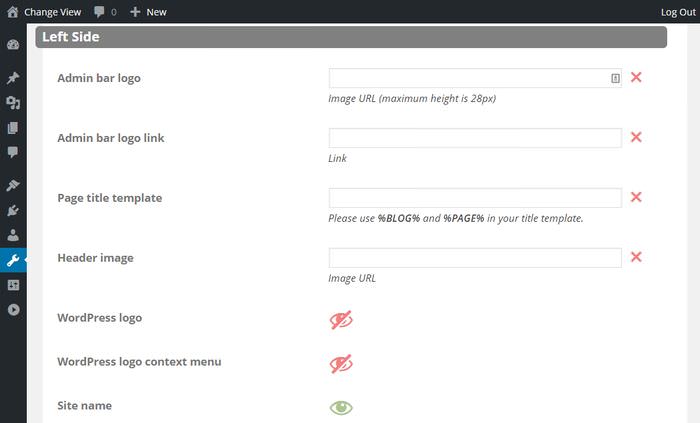
3. Hide or Customize the Admin Bar
The Admin Bar Settings tab helps you hide or customize the admin bar, the horizontal menu on the top. You can completely hide it from the admin panel, and show only a stylish Log Out button on the top right corner.
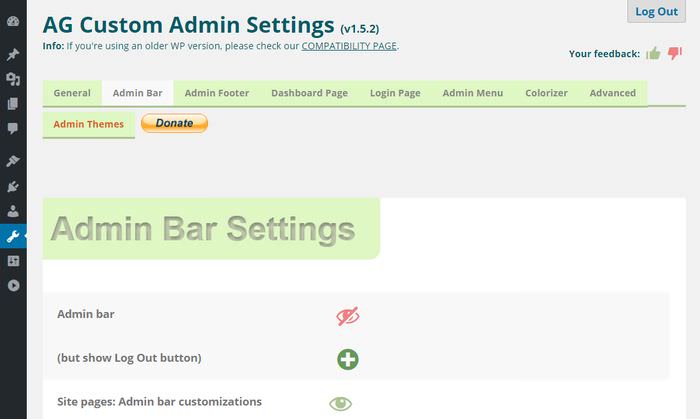
In other cases you may just want to simplify the admin bar by removing some of its less important items. The Admin Bar Settings have many options that allow you to hide each part one by one, customize the blog heading, add your own logo instead of the default WordPress logo, or completely remove it.
On the screenshot below I modified the blog heading to “Change View” to indicate that this is the place where they can switch between the frontend and the backend.
I also removed the WordPress logo altogether, but didn’t replace it with the Hongkiat logo, as I’ll rather add this to the vertical admin menu (Step 7). From the next step I’ll go on with the completely removed admin bar.
4. Brand The Footer
In the Admin Footer tab you can either completely remove the footer from the bottom of the admin panel, or change its text to whatever you want. It can be a good idea to place a link to the home page of your business, so your clients can quickly contact you if they need some support.

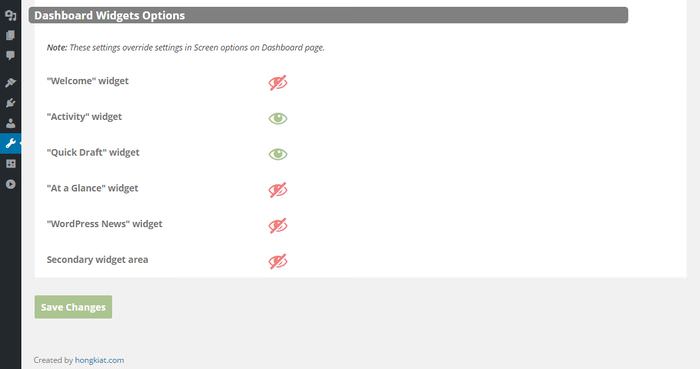
5. Clean Up the Dashboard
The Dashboard Page Settings allow you to modify the home page of your admin panel. This is the screen with the dashboard widgets such as “At a Glance” and “WordPress News” you see at first when you log in as an admin.
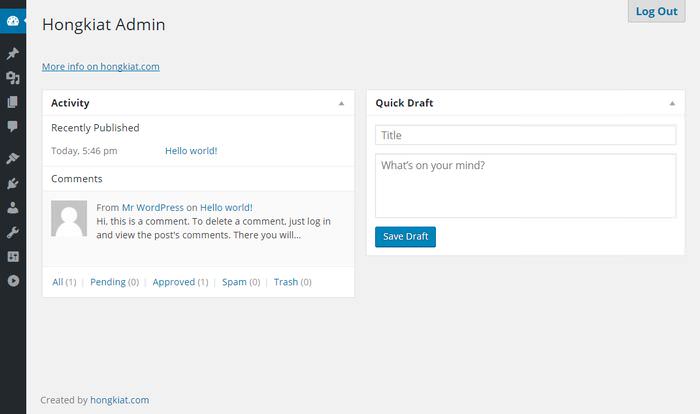
In the first setting you can change the text of the heading from the word “Dashboard” to your own brand name, and you can also add your custom content below it.
It can definitely help users if you place a “More info” link below the headline (as I did it on the screenshot below). This way they can easily reach you. A quick “Welcome in our admin area” intro can be useful as well.

The AG Custom Admin plugin also makes it possible to hide the dashboard widgets one by one. I only leave two, to make my branded admin less cluttered. If you hide the widgets here they won’t be available for users from the “Screen Options” menu.
My customized WordPress dashboard looks like this right now, every reference to WordPress.org has disappeared, and it looks cleaner and more straightforward.
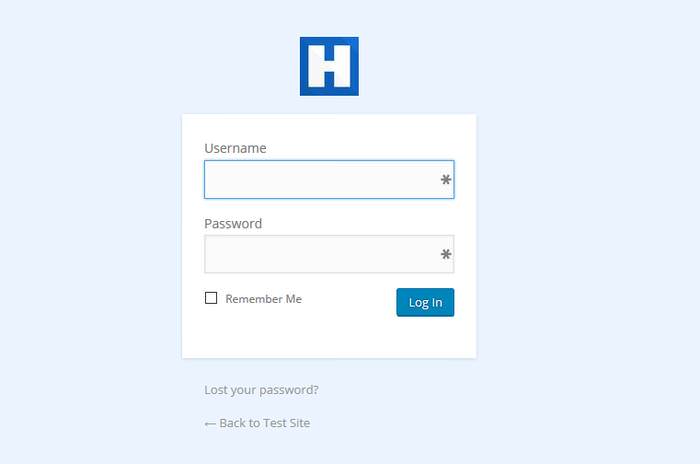
6. Add Your Logo to the Login Page
The Login Page Settings allow you to customize the login page of your site, replace the WordPress logo with your own graphics, and hide or reveal the “Back to blog”, “Register”, and “Lost Password” links.
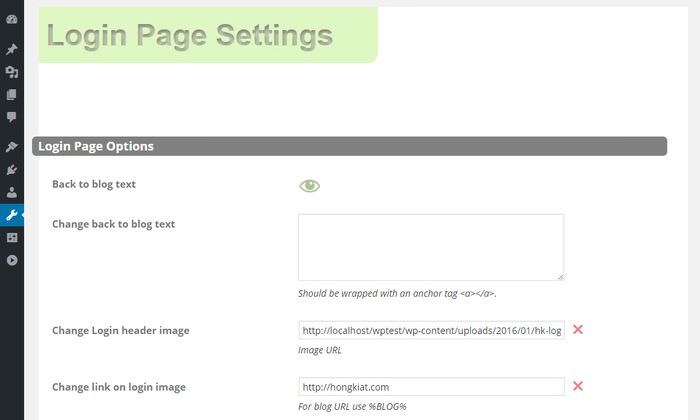
On the screenshot below you can see that just changing the logo and pointing the link behind it to your own site can give a customized look to the login page, and can definitely help promote your brand.
7. Change the Admin Menu on the Left
The Admin Menu can be found on the left side of the admin panel. It has many items, and even more subitems, many of which don’t really have the most self-explanatory label. That can make the learning curve steep for non-tech people.
The Admin Menu Settings help you quickly clean up the admin menu. You can remove the whole admin menu if you want, but it’s probably better to just hide the items that your users won’t need.
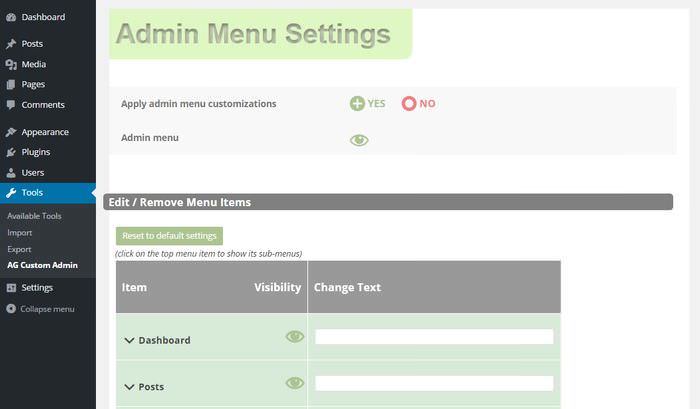
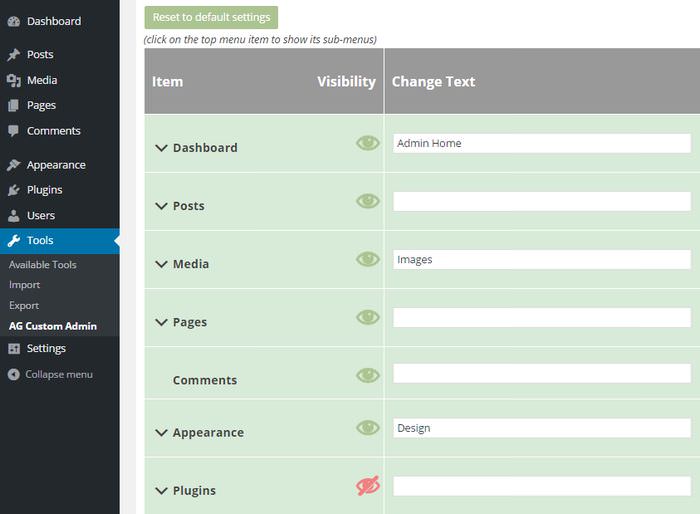
You not only can make the top menu items invisible, but the submenus as well; just click on the top-level menu, and a handy dropdown list will appear. Moreover, you can rename the labels to something that is easier to understand for laypeople, just like I did it with the “Dashboard”, “Media”, and “Appearance” labels below.
You can also change the basic design of the admin menu if you want. You can hide the icons, the menu item separators, the submenu arrow, and the “Collapse menu” button, add round the border of the submenus, and insert your own logo on top of the admin menu.
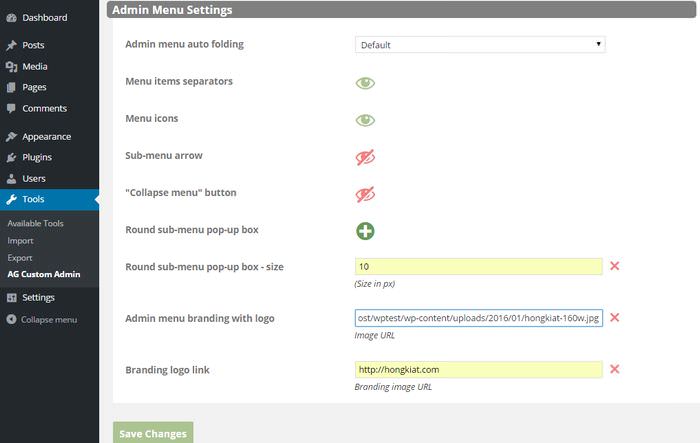
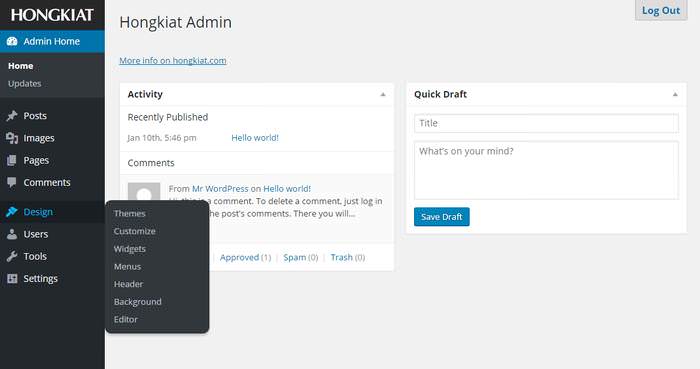
For myself, I added a Hongkiat logo to the admin menu with a link behind it pointing to the homepage of hongkiat.com, which clearly brands the whole admin panel, but not in an intrusive way.
I renamed 3 menu items (the new ones are “Admin Home”, “Images”, and “Design”), removed the “Plugin” menu altogether, and added a 10px radius to the corners of the submenu popups.
Here is how it looks like:
8. Colorize the Admin
The Colorizer tab allows you to spice up your WordPress admin by changing the text and background colours of the main elements. The colorizer function is real-time, so as you pick up a new colour you can see the change at once without saving the settings.
Here I only modified the default background colour to light blue, so now it matches the royal blue of the Hongkiat logo, but you can alter other things if you want. It’s probably a good idea to play around with the colours a bit to see what looks best where.
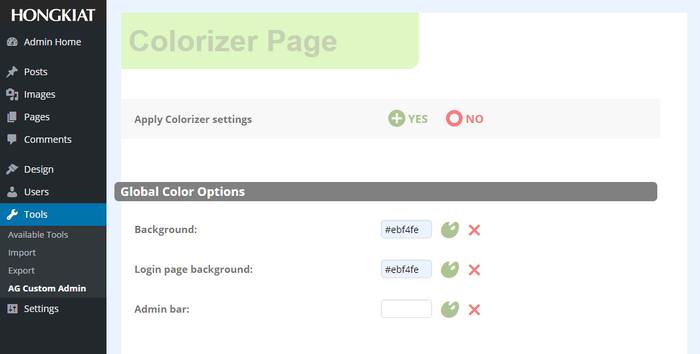
You can not only change the colours of the admin panel, but also the background colour of the login page, too.
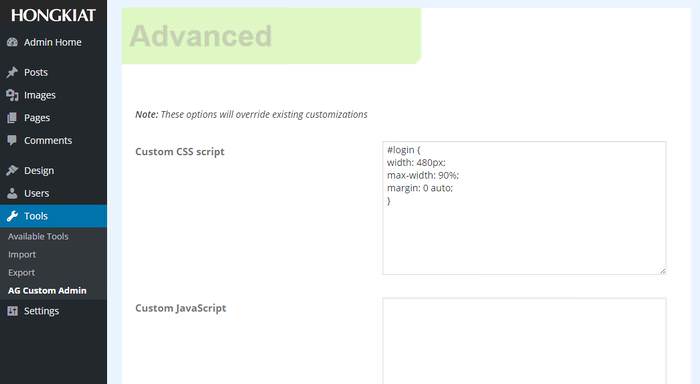
9. Add Your Custom Code
If you are an experienced front-end developer, you can add your custom CSS and JavaScript code to the admin area as well. With the help of your browser’s developer tools you can easily grab the CSS selector of the element you want to modify.
In this step, I make the panel on the login page a little bit wider with the help of the following code snippet:
#login {
width: 480px;
max-width: 90%;
margin: 0 auto;
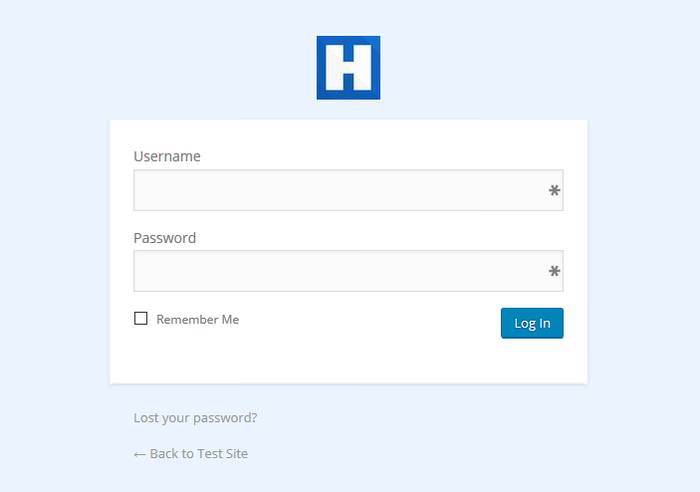
}
As you can see, the login panel has become wider but is still responsive thanks to the max-width rule. Most likely this change will provide a better experience for most users. You can even save your custom code by exporting it into an .agca file, and later importing it to other WordPress sites.
10. Install a Pre-Prepared Admin Theme
The last tab called Admin Themes allows you to install a pre-prepared admin theme on top of your settings. If you do so, you will lose the custom colours you set in the Colorizer tab, but still can keep other settings.
Most of the admin themes here are not free (here are 10 WordPress admin themes that are), but buying one can be a great way to support the authors of this awesome plugin.
